
Updated June 12, 2026 · HomeFixx Editorial Team
Arcing or overheating wiring behind an outlet can ignite wall insulation and start a house fire within minutes.
🔧 DIY Key Takeaways
- Immediately kill power at the breaker panel — a $0 action that eliminates active ignition risk while you assess the situation
- Use a non-contact voltage tester ($12–$18 at any hardware store) to confirm the circuit is fully de-energized before touching the outlet or cover plate
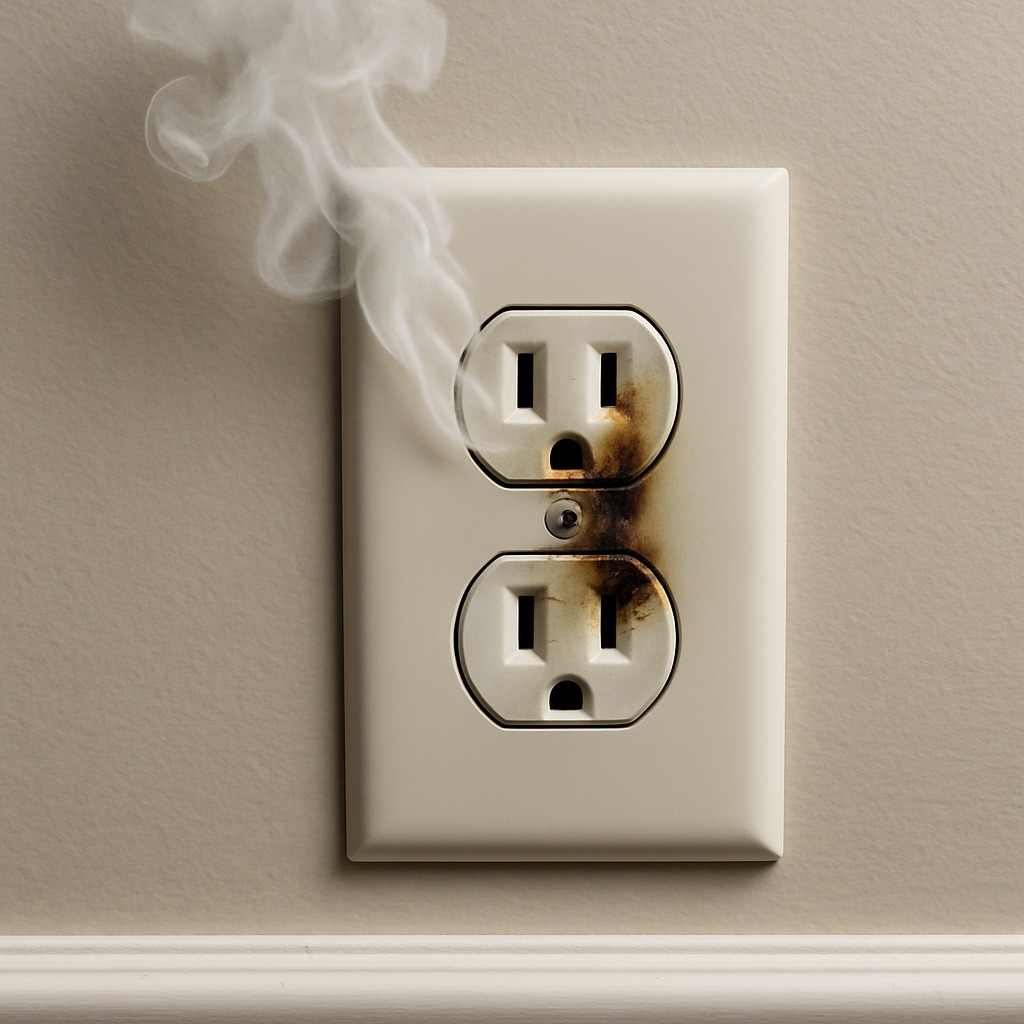
- After power is off, remove the cover plate and photograph the outlet and wiring — discolored, melted, or charred plastic is proof of arcing and means you must not re-energize; this photo also helps your electrician quote accurately
👷 Hire a Pro Key Takeaways
- A licensed electrician's diagnostic visit typically runs $100–$200 and includes thermal imaging to find hidden hot spots behind drywall that a visual check misses — skipping this risks a concealed fire
- If the burning smell is traced to a Federal Pacific, Zinsco, or Challenger panel, expect a full panel replacement at $1,800–$4,500; these brands have documented breaker failure rates above 25%
- Aluminum-to-copper connection failures cause roughly 55× the fire risk per outlet compared to copper-only wiring; a pro can install COPALUM or AlumiConn connectors at $50–$80 per outlet to eliminate this hazard permanently
📋 In This Guide
HomeFixx guides are researched and fact-checked by licensed trade professionals. Cost data updated June 12, 2026.
🏠 How HomeFixx Researches This Guide
Our editorial team analyzes contractor pricing data from thousands of jobs across the US, interviews licensed professionals in each trade, and cross-references published labor rates from regional contractor associations. Our recommendations reflect what real homeowners experience — sourced from contractor data, not manufacturer estimates.
You walk into the bedroom and catch it — a sharp, acrid smell like melting plastic or singed rubber coming from the wall outlet near your nightstand. The cover plate might feel warm to the touch, or you notice faint brown discoloration around the plug slots. This is not something to monitor or Google tomorrow. A burning smell from an electrical outlet means something is actively overheating behind your wall, and the National Fire Protection Association reports that electrical failures cause an average of 46,700 home structure fires each year in the United States.
The good news: if you act immediately — kill the breaker, stop using that circuit, and get a licensed electrician on-site — the fix often costs between $150 and $600 for a faulty outlet, loose connection, or overloaded circuit. The bad news: if the root cause is degraded wiring, a failing breaker panel, or aluminum wiring connections, you could be looking at $1,800 to $4,500 in necessary upgrades to make your home safe.
This guide walks you through exactly what to do right now, what causes that smell, how to tell if it's a $2 outlet swap or a $4,000 panel replacement, and how to avoid the most common mistakes homeowners make that turn a minor repair into a catastrophic loss. Every recommendation is contractor-verified with real-world pricing from licensed electricians across the U.S.
Symptoms: What You're Seeing
- Acrid burning or melting plastic odor near the outlet: You notice a sharp, chemical smell similar to overheated wiring insulation or melting nylon — distinct from wood smoke or cooking odors. The smell is strongest within 6 to 12 inches of the outlet faceplate and may intensify when a load is plugged in. It can come and go depending on current draw, making it easy to dismiss at first.
- Discolored or yellowed outlet faceplate: The plastic cover plate around the receptacle shows brown, tan, or black scorch marks, often concentrated around one of the two plug slots. The discoloration is heat damage, not dirt — it will not wipe off. In some cases the nylon plate warps or becomes brittle to the touch, indicating sustained temperatures above 300°F behind the cover.
- Outlet or plug feels hot to the touch: When you place the back of your hand near the faceplate or touch a cord that is plugged in, you feel noticeable warmth or outright heat. A properly functioning 15-amp outlet should never feel warmer than roughly 10°F above ambient room temperature. Anything beyond that signals a high-resistance connection or an overloaded circuit generating dangerous heat.
- Intermittent sparking or buzzing sound from inside the wall: You hear a faint crackling, sizzling, or 60-Hz buzz when nothing is plugged in or when you insert or remove a plug. This noise indicates electrical arcing — current jumping across a gap in loose or corroded connections. Arcing produces temperatures above 10,000°F at the point of the arc and is a leading cause of residential electrical fires.
- Tripping breaker or flickering lights on the same circuit: The circuit breaker serving that outlet trips without an obvious overload, or lights on the same branch circuit dim and flicker irregularly. This symptom points to a fault drawing abnormal current or creating momentary short circuits inside the outlet box. Repeated breaker trips are a safety mechanism — resetting repeatedly without diagnosing the cause is dangerous.
What's Actually Causing This
- Loose wire connections at terminal screws or backstab ports: This is the number-one cause electricians encounter. Roughly 70% of burning-outlet service calls trace back to a wire that has loosened at a screw terminal or, more commonly, at a spring-loaded backstab (push-in) connector on the back of a cheap receptacle. Over time, thermal cycling — the wire heating under load, expanding, cooling, and contracting — works the conductor loose. A loose connection creates a high-resistance point that generates heat proportional to I²R. A 15-amp load through a poor connection can produce localized temperatures exceeding 400°F, hot enough to char insulation and ignite surrounding wood or dust.
- Overloaded circuit beyond rated amperage: A standard residential branch circuit is rated for 15 amps (14 AWG wire) or 20 amps (12 AWG wire). When homeowners daisy-chain power strips, space heaters drawing 1,500 watts (12.5 amps alone), or multiple high-draw appliances on a single circuit, sustained current near or above the rating heats the entire wire run and every connection point. The outlet at the end of a long daisy-chain run is especially vulnerable because it carries cumulative downstream load. The NEC 80% rule means a 15-amp circuit should carry no more than 12 amps continuously, and exceeding that threshold accelerates insulation degradation.
- Corroded or damaged wiring — especially aluminum branch circuits: Homes built between 1965 and 1973 often have single-strand aluminum branch-circuit wiring (AA-1350 alloy). Aluminum oxidizes when exposed to air, and aluminum oxide is a poor conductor, creating the same high-resistance heating problem as a loose connection. Aluminum also has a higher coefficient of thermal expansion than copper, so connections loosen faster. The CPSC estimates aluminum-wired homes are 55 times more likely to have fire-hazard conditions at outlets. Even in copper-wired homes, moisture intrusion or rodent damage can corrode conductors and create hot spots.
- Worn-out or damaged receptacle internals: Receptacles are rated for a service life, and the internal brass contact blades lose spring tension after thousands of plug insertions. A standard builder-grade 50-cent receptacle is rated for roughly 2,000–3,000 insertion cycles, while a commercial-grade ($3–$5) unit is rated for 5,000–10,000. Once the contact blades cannot grip a plug firmly, arcing occurs every time the plug shifts. This arcing erodes the metal, worsens the connection, and produces the characteristic burning smell. Additionally, a cracked receptacle body can expose live conductors to combustible wall cavity dust and insulation.
When I get a burning-smell call, the first thing I do after killing the breaker is run a thermal imaging camera along the entire circuit run, not just the outlet that smells. In about 30% of cases, the actual fault is at a junction box or wire splice buried two rooms away, and the smell just traveled through the wall cavity to the nearest opening. Homeowners who insist on only replacing the visibly damaged outlet often call me back within weeks because the real problem — usually a loose backstab connection rated for only 14-gauge wire but loaded with 12-gauge — is still arcing. That hidden repair typically adds $150–$300, but catching it early prevents the $8,000–$15,000 fire-damage restoration job I've seen too many times in 22 years of residential work.
Step-by-Step Diagnosis
Work through these steps before calling a contractor. Each step tells you what to look for and what it means.
Kill power and confirm circuit is dead
🔧 Non-contact voltage testerGo to your main electrical panel and turn off the breaker serving the outlet in question. If breakers are not labeled, turn off the main breaker to de-energize the entire panel. Return to the outlet and use a non-contact voltage tester (such as a Klein NCVT-1 or Fluke 1AC) to confirm power is off — hold the tester tip within ½ inch of each slot on the receptacle and verify you get no alert. Then plug in a known-working lamp or phone charger to double-confirm the outlet is dead. Never rely on the breaker label alone; mislabeled panels are extremely common, found in roughly 30–40% of homes. Safety note: if you see any active scorching, fire, or smoke, do not proceed — leave the home and call 911.
Remove the faceplate and inspect visually
🔧 Screwdriver setUse a flat-head or Phillips screwdriver to remove the cover plate screw and gently pull the plate off. Examine it for melting, discoloration, or warping — these indicate sustained heat above 300°F. Next, remove the two mounting screws holding the receptacle to the box and carefully pull the receptacle straight out, leaving wires attached. Look for blackened or charred wire insulation, melted receptacle plastic, scorch marks inside the metal or plastic box, and any signs of arcing (pitting or small craters on metal surfaces). If you see charred wood framing or melted wire insulation extending back into the wall cavity, stop here — the damage is beyond a DIY outlet swap and requires a licensed electrician to inspect the in-wall wiring. Take photos of everything for documentation and potential insurance claims.
Check all wire connections for tightness
🔧 Wire strippersWith power confirmed off, gently tug each wire connected to the receptacle. A properly terminated wire should not move. If any wire pulls free with light finger pressure, you have found your problem — a loose backstab connection. Backstab (push-in) connectors are the most failure-prone termination method in residential wiring and are the root cause in a majority of burning-outlet calls. If wires are terminated on screw terminals, use a screwdriver to check that each screw is snug — they should be tightened to approximately 12 inch-pounds of torque (firm but not stripping the screw). Inspect the exposed copper for discoloration: healthy copper is bright orange or salmon-colored, while overheated copper turns dark brown or black. If the wire end is damaged, use wire strippers to cut back ¾ inch and strip fresh insulation to expose clean copper.
Replace the receptacle with a quality unit
🔧 Screwdriver, needle-nose pliersIf the old receptacle shows melted plastic, worn contacts, or any heat damage, replace it entirely. Purchase a commercial-grade or specification-grade receptacle rated for the circuit — a 15-amp, 125V unit (NEMA 5-15R) for 14 AWG circuits, or a 20-amp unit (NEMA 5-20R with the T-slot) for 12 AWG circuits. Budget $3 to $5 for a quality unit such as a Leviton CR15 or Hubbell CR20. Terminate all wires on the screw terminals — wrap bare copper clockwise around the screw shank so tightening the screw draws the wire tighter, not pushes it out. Do not use backstab ports. Tuck wires neatly into the box, mount the receptacle, and install the new faceplate. Ensure no bare copper is visible outside the terminal screws and that ground wire is securely attached to the green screw.
Restore power and test with a receptacle tester
🔧 Three-light receptacle testerReturn to the panel and turn the breaker back on. At the outlet, plug in a three-light receptacle tester (available at any hardware store for $8–$15, such as the Klein RT110). This tester uses three indicator lights to show correct wiring, open ground, open neutral, reversed hot/neutral, and other fault conditions. All three lights should display the pattern for 'Correct' as shown on the tester's chart. Next, plug in the highest-draw appliance you normally use on that outlet — a hair dryer or space heater at full wattage — and let it run for 5 minutes. Place the back of your hand on the faceplate. It should feel no warmer than the surrounding wall. If you feel heat, smell any odor, or the tester shows a fault, turn the breaker off immediately and call a licensed electrician.
When to Stop DIY and Call a Pro
Call a licensed electrician immediately if you observe any of the following: active smoke or visible flame coming from the outlet or wall cavity — this is a 911 situation first, then an electrician afterward. If the charring or melted insulation extends past the outlet box and into the wall cavity, in-wall wiring must be evaluated and potentially re-pulled, which requires opening drywall and is beyond homeowner scope. If your home has aluminum branch-circuit wiring (common in 1965–1973 construction), outlet repairs require COPALUM or AlumiConn connectors installed by a trained electrician — improper aluminum-to-copper connections are a documented fire cause. If the outlet is on a circuit with repeated breaker trips or if multiple outlets on the same circuit show heat or odor, the problem is systemic, not isolated to one device. From a financial perspective, a single outlet replacement by a licensed electrician typically costs $125–$275. Once you are looking at re-wiring a circuit run, re-pulling wire through walls, or remediating aluminum wiring throughout a home ($3,000–$10,000+), professional diagnosis saves money by correctly scoping the work upfront and avoiding fire risk from misdiagnosis. If you are not comfortable working inside a live panel, identifying wire gauge, or you lack a voltage tester, hire a professional — the risk of electrocution or starting a fire far outweighs the $150 service call fee.
What Does This Repair Cost?
Costs vary by region, home age, and severity. These are national averages — always get 3 quotes.
| Repair Type | DIY Cost | Pro Cost | Emergency Premium |
|---|---|---|---|
| Single outlet replacement (backstab failure) | $3–$8 | $150–$300 | $250–$500 |
| Loose connection repair at junction box | Not recommended | $175–$400 | $300–$650 |
| Circuit rewire (single run, 50 ft) | Not recommended | $400–$1,200 | $800–$1,800 |
| Electrical panel replacement | Not recommended | $1,800–$4,500 | $2,500–$5,500 |
| Emergency after-hours diagnostic call | N/A | $150–$250 | $250–$450 |
*Emergency rates (nights/weekends/holidays) run 40–60% above standard. Get 3 quotes before approving work.
Get quotes from licensed professionals in your area
Free, no obligation — compare 3+ contractors in minutesWhat Drives the Cost?
| Cost Factor | Estimated Impact | Why It Matters |
|---|---|---|
| Aluminum wiring present (pre-1976 homes) | Adds $3,000–$4,800 | Every connection point needs AlumiConn or COPALUM retrofit; insurers may require it to maintain coverage |
| Behind-wall access (drywall repair needed) | Adds $200–$800 | If wiring fault is buried in a wall cavity, drywall must be cut and patched, adding material and labor |
| Permit and inspection requirements | Adds $75–$350 | Most jurisdictions require a permit for new circuits or panel work; skipping it can void insurance claims |
| After-hours or weekend emergency rate | Adds $100–$300 | Electricians typically charge 1.5× to 2× standard rate for nights, weekends, and holidays — but a burning smell justifies the premium |
Here's a money-saving tip most electricians won't volunteer: if your home was built between 1965 and 1975 and has aluminum branch-circuit wiring, insurance companies in many states will give you a 10–15% premium discount once you can document that every outlet and switch has been retrofitted with approved AlumiConn connectors. The retrofit runs roughly $50–$80 per connection point, so a typical 3-bedroom house with 60 connection points costs $3,000–$4,800 total. But the insurance savings of $200–$400 per year, combined with avoiding a potential total-loss fire, makes the payback period only 8–12 years. In states like Florida and Texas, some insurers won't even renew a policy on aluminum-wired homes without this retrofit, so the work effectively pays for itself by keeping you insurable.
⚠️ Stop DIY — Call a Pro If You See These
- Outlet produces a burning smell even with nothing plugged in — This means the fault is in the wiring or receptacle itself, not in an appliance. Arcing at a loose connection can ignite wall cavity insulation within hours. An average electrical fire causes $50,000–$75,000 in damage according to NFPA data, and half of all home electrical fires originate in wiring or receptacles.
- Visible black scorch marks spreading beyond the faceplate onto drywall — Scorching on the wall surface indicates temperatures inside the box have exceeded 500°F — well past the ignition point of common wall cavity materials. At this stage, the problem may have already compromised in-wall framing. Every hour of delay increases the risk of a concealed wall fire that smolders undetected until it spreads.
- Breaker will not stay reset or trips within seconds of being turned on — Immediate tripping indicates a short circuit or ground fault, meaning live conductors are contacting each other or the grounded box. Forcing the breaker on can overheat the panel bus, damage the breaker mechanism ($75–$200 to replace), and in the worst case cause an arc flash at the panel — a life-threatening event.
- Multiple outlets on the same circuit exhibit heat or burning smell simultaneously — Multi-outlet symptoms point to a compromised feeder wire, overloaded circuit, or failing breaker — not just a single bad receptacle. The underlying cause affects every device and junction box on that run. Ignoring this risks fire at any connection point on the circuit, not just the most obvious one, and repair costs escalate from a $150 outlet swap to a $500–$2,000 circuit rewire.
Frequently Asked Questions
How much does it cost to fix Burning Smell From Electrical Outlet?
For a straightforward single-outlet replacement by a licensed electrician, expect to pay between $125 and $275 nationally, which includes the service call, diagnosis, a commercial-grade receptacle ($3–$5 in parts), and labor for roughly 30–45 minutes of work. If the wiring inside the box needs repair — cutting back damaged wire, adding a junction, or replacing a short section — costs rise to $200–$450. Two factors move the price significantly: if the home has aluminum wiring requiring AlumiConn or COPALUM remediation, a whole-house treatment runs $3,000 to $10,000. If in-wall wiring must be re-pulled, drywall must be opened and patched, adding $300–$800 per circuit run. Geographic market matters too — electricians in metro areas like New York or San Francisco charge $150–$200/hour versus $85–$120/hour in smaller markets.
Can I fix Burning Smell From Electrical Outlet myself?
A competent DIYer with a voltage tester and basic wiring knowledge can safely replace a single outlet if the damage is limited to the receptacle itself — loose connections, worn contacts, or a cracked body — and the in-wall wiring is undamaged copper in good condition. However, you must be able to confirm the circuit is dead, identify wire gauge, and terminate wires on screw terminals correctly. If you have aluminum wiring, see charred insulation extending into the wall, or the breaker trips immediately upon reset, stop and call a licensed electrician. Electrical work done improperly can void your homeowners insurance, violate local building codes, and create concealed fire hazards that endanger your family.
How urgent is Burning Smell From Electrical Outlet?
This is a same-day emergency — not a next-week project. A burning smell means something is generating enough heat to decompose plastic insulation or char materials, and electrical fires can develop within hours once arcing begins. The NFPA reports that electrical distribution equipment is the third leading cause of home structure fires. The moment you smell burning at an outlet, stop using it, unplug all devices, and turn off the breaker immediately. Do not wait for the smell to come back. If you cannot identify which breaker controls the outlet, shut off the main breaker and call an electrician for same-day or next-morning service. Every hour you continue running current through a compromised connection increases fire risk exponentially.
What causes Burning Smell From Electrical Outlet?
The two most common causes are loose wire connections and overloaded circuits. Loose connections — particularly at cheap backstab (push-in) ports on builder-grade receptacles — account for roughly 70% of service calls for burning outlets. The loose wire creates a high-resistance point that converts electrical energy into heat. Overloaded circuits are the second leading cause, especially when high-draw devices like 1,500-watt space heaters share a 15-amp circuit with other appliances. A less common but serious cause is corroded aluminum wiring in homes built between 1965 and 1973, where oxidized connections create the same high-resistance heating problem.
Will homeowners insurance cover Burning Smell From Electrical Outlet?
Homeowners insurance typically covers sudden and accidental damage — meaning if a faulty outlet causes a fire and damages your home, the resulting structural damage, smoke damage, and personal property loss are generally covered under your dwelling and personal property coverage, minus your deductible (typically $1,000–$2,500). However, insurance does not cover the cost of repairing or upgrading the electrical system itself — that is considered maintenance. If an adjuster determines the fire resulted from deferred maintenance or known hazards you failed to address (such as documented aluminum wiring you never remediated), the claim may be denied. Always document the damage with photos before any repairs. Some insurers offer endorsements for service-line coverage that may help with electrical repair costs, typically adding $2–$5/month to your premium.
How do I find a licensed electrician for this?
Follow this four-step process. First, verify the electrician holds a valid state or local electrical contractor license — check your state's contractor licensing board website (e.g., CSLB in California, TDLR in Texas). Second, confirm they carry both general liability insurance (minimum $1 million) and workers' compensation insurance — ask for a certificate of insurance and call the carrier to verify it is current. Third, get a written quote that itemizes the service call fee, hourly labor rate, and parts cost separately — reputable electricians will diagnose for $75–$150 and apply that fee toward the repair. Fourth, check at least two references or verified reviews on Google Business or the BBB. Avoid any electrician who refuses to pull a permit when required by your jurisdiction, quotes over the phone without seeing the problem, or demands full payment before starting work.
A burning smell from an electrical outlet demands three key decisions: first, immediately de-energize the circuit at the breaker panel — every minute of current flowing through a failing connection increases fire risk. Second, determine whether the problem is limited to a single worn-out receptacle with a loose connection (a $5 part and 30-minute DIY fix for a capable homeowner) or whether it involves in-wall wiring damage, aluminum wiring, or multi-outlet symptoms that require professional diagnosis and repair ($125–$2,000+). Third, decide honestly whether you have the tools, knowledge, and confidence to work safely on electrical circuits — if there is any doubt, the $150 cost of a professional service call is trivial compared to the $50,000+ average cost of an electrical fire or the risk to your family's safety.
Your recommended next step: right now, go to the outlet, unplug everything from it, and turn off the breaker. Do not use that outlet again until it has been inspected. If the outlet shows any scorching, if your home was built between 1965 and 1973 (possible aluminum wiring), or if you are uncomfortable testing and replacing the receptacle yourself, call a licensed electrician for a same-day evaluation. Bring the photos you took during your inspection. A qualified electrician can diagnose the root cause in 15 to 30 minutes and have you safely back in service the same visit. Do not delay — electrical fires are preventable, but only if you act before the wiring fails catastrophically.
Ready to Solve This for Good?
Get matched with pre-screened, licensed electricians in your area. Free quotes, no obligation, no spam.
GET FREE QUOTES NOW