
Updated June 12, 2026 · HomeFixx Editorial Team
A failing compressor or loose fan blade can destroy your condenser unit within 48–72 hours, turning a $150 fix into a $3,500+ replacement.
🔧 DIY Key Takeaways
- Shut off the unit immediately at the breaker if you hear metal-on-metal grinding — running it even 10 more minutes can score the compressor housing, adding $1,200+ to the repair
- Clear all debris (sticks, leaves, gravel) from the condenser cage using a garden hose and soft brush — a $0 fix that resolves roughly 15% of outdoor AC noise complaints
- Tighten exposed fan-shroud screws with a 5/16" nut driver ($8 at any hardware store) — loose mounting hardware is the single most common cause of buzzing and rattling outside units
👷 Hire a Pro Key Takeaways
- A screaming or high-pitched hissing noise often indicates refrigerant leaking under pressure — EPA-certified HVAC techs charge $250–$650 for leak detection, line repair, and R-410A recharge, and DIY refrigerant handling is federally illegal
- Compressor hard-start failures create a repeated loud clicking or buzzing at startup — a $150–$350 hard-start kit install now prevents a $1,800–$3,500 compressor replacement later
- If the outdoor fan motor bearings are grinding, a pro swap costs $175–$450 including the motor; waiting causes the motor to seize and can send voltage spikes that fry the control board ($300–$600 additional)
📋 In This Guide
HomeFixx guides are researched and fact-checked by licensed trade professionals. Cost data updated June 12, 2026.
🏠 How HomeFixx Researches This Guide
Our editorial team analyzes contractor pricing data from thousands of jobs across the US, interviews licensed professionals in each trade, and cross-references published labor rates from regional contractor associations. Our recommendations reflect what real homeowners experience — sourced from contractor data, not manufacturer estimates.
It's 11 p.m., 92°F outside, and your outdoor AC unit just started making a noise loud enough to wake the neighbors. Maybe it's a rhythmic banging that vibrates the concrete pad, a harsh metallic screech every time the compressor kicks on, or a constant buzzing hum that wasn't there yesterday. Whatever the sound, your gut is telling you something is wrong — and you're right. An outdoor AC unit making unusual noise is almost always a mechanical warning sign that escalates fast.
This guide is built differently than what you'll find elsewhere. We've cataloged the seven most common noise types — banging, screeching, grinding, buzzing, clicking, hissing, and humming — and mapped each one to its likely cause, its urgency level, and exactly what it costs to fix in 2024. Real numbers: a loose fan blade repair runs $75–$200, a failed compressor can hit $1,800–$3,500, and an emergency weekend call adds 40–60% to any of those figures.
Below, you'll get a step-by-step diagnosis you can perform in under 10 minutes with zero tools, clear guidance on what you can safely tighten or clean yourself, and the precise point at which delaying a professional call starts costing you real money. Let's identify your noise and stop the damage.
Symptoms: What You're Seeing
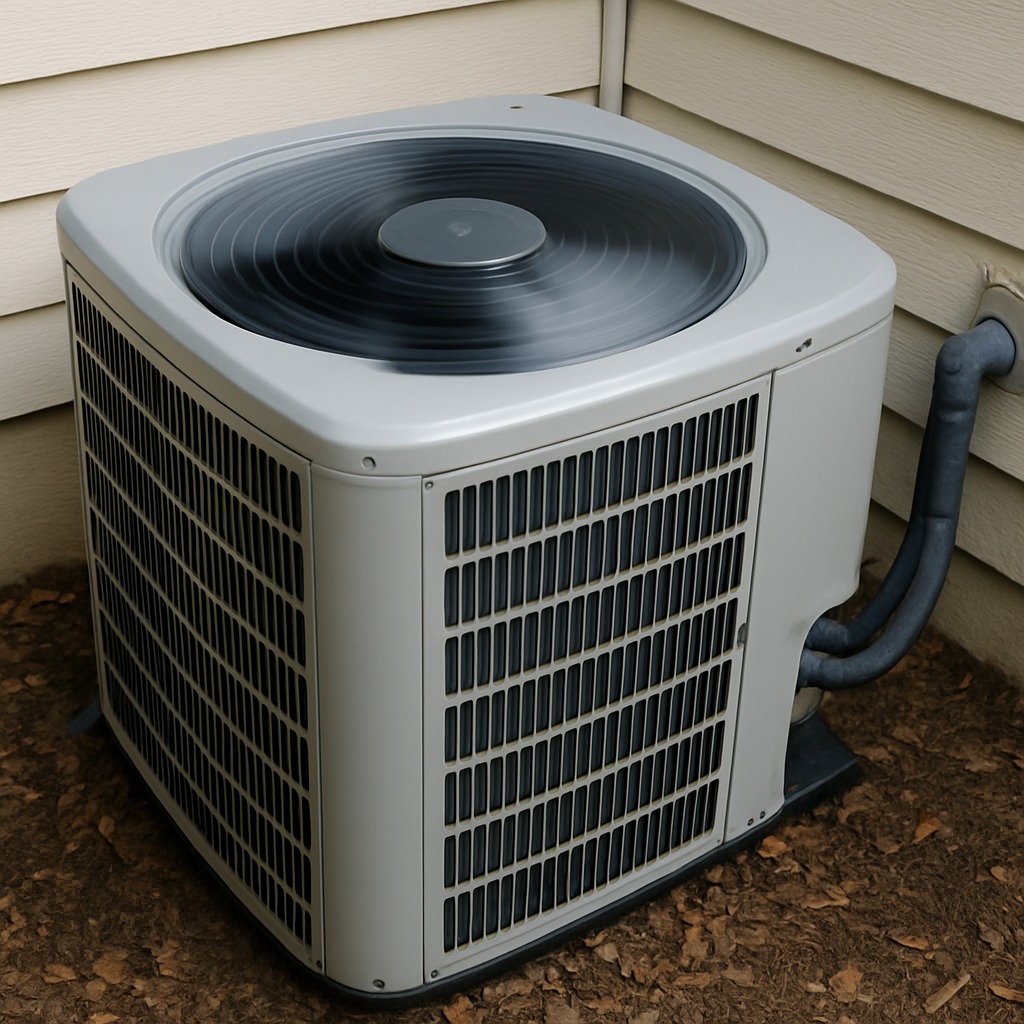
- Grinding or metal-on-metal screeching: You hear a harsh, high-pitched grinding coming from the outdoor condenser unit, often loudest within the first 30 seconds of startup. It sounds like a seized bearing or a loose fan blade dragging against the shroud. You may also notice the unit vibrating more than usual, and if you place your hand on the cabinet you can feel irregular pulsing. This noise often worsens in high-heat conditions when the compressor cycles more frequently.
- Banging or clanking on each cycle: A rhythmic thudding or banging sound emanates from inside the condenser cabinet, typically coinciding with the compressor engaging or shutting off. It can sound like someone hitting the unit with a wrench. This usually indicates a loose or broken internal component—such as a connecting rod, piston pin, or crankshaft inside the compressor—or a fan blade that has thrown a balance weight. The noise may repeat every few seconds or only at startup and shutdown.
- Buzzing or electrical humming: A persistent, low-frequency buzz radiates from the condenser unit even when the fan is not spinning. It often intensifies when ambient temperatures climb above 95°F. This buzzing can be felt through the concrete pad and may indicate a failing contactor relay, loose wiring terminals, or a compressor struggling against excessive head pressure. You might also detect a faint burnt-plastic or ozone smell near the electrical disconnect box.
- Rattling or loose-hardware vibration: A tinny, shaking rattle comes from the condenser cabinet, especially noticeable during steady-state operation. It sounds like sheet-metal screws have backed out or the protective grille on top has come loose. Walking up and pressing on the cabinet panels may temporarily silence it. Debris—sticks, acorns, or pebbles—trapped between the fan and the housing can also produce this sound, and you may see small fragments ejecting from the top grille.
- High-pitched squealing or screaming: A piercing, whistle-like shriek erupts from the outdoor unit, sometimes loud enough to hear from 50 feet away. This can last anywhere from a few seconds to several minutes. It often signals dangerously high refrigerant pressure inside the compressor or a severely worn compressor motor bearing. In some units a built-in pressure sensor will shut the system down automatically, but older units may lack this safeguard. If you smell a chemical sweetness near the unit, refrigerant could be leaking.
What's Actually Causing This
- Worn or failed condenser fan motor bearings: The condenser fan motor spins at roughly 1,075 RPM during operation and runs thousands of hours per cooling season. The sealed bearings inside the motor are lubricated at the factory and rated for approximately 60,000–80,000 operating hours, but exposure to rain, dust, and extreme heat accelerates wear. Once the bearing grease breaks down, metal-on-metal contact produces grinding or squealing. This is the single most common cause of loud outdoor AC noise, accounting for an estimated 30–40% of service calls related to condenser noise. Replacement fan motors typically cost $150–$350 for the part alone.
- Loose or damaged condenser fan blade: The aluminum or composite fan blade is secured to the motor shaft with a single set screw. Over years of thermal cycling and vibration, this set screw can loosen, allowing the blade to wobble and strike the condenser shroud or protective grille. A cracked or chipped blade—often caused by storm debris—creates an imbalance that produces banging, clanking, or rattling at full speed. A blade that is even 1/8-inch out of balance can generate noticeable noise and premature motor bearing failure. This accounts for roughly 15–20% of noisy-condenser calls and costs $20–$75 for a replacement blade plus labor.
- Compressor internal mechanical failure: The hermetic scroll or reciprocating compressor contains pistons, connecting rods, and internal springs, all sealed inside a welded steel shell. When internal mounts fracture or a piston wears, the compressor produces a heavy banging or knocking, especially at startup. Compressors typically last 12–17 years, but short-cycling, low refrigerant charge, or dirty coils accelerate wear. Internal failure is irreversible; once the noise starts, replacement is the only fix. A new compressor installed runs $1,500–$2,800, making this the most expensive root cause. About 10–15% of loud condenser noise complaints trace back to compressor failure.
- Electrical contactor chattering or arcing: The contactor is a relay that sends 240-volt power to the compressor and fan motor. Rated for around 100,000 cycles, a contactor typically lasts 5–10 years. When the contact pads pit and corrode, the relay cannot pull in fully, causing a rapid open-close chattering that produces a loud buzzing or humming. The arcing also generates heat that can melt the plastic housing and poses a fire risk. Replacing a contactor costs $30–$60 for the part and $150–$250 total with labor, making it one of the cheapest fixes but one of the more dangerous to ignore.
After 20 years in residential HVAC, here's a trick most homeowners miss: place your hand on the copper refrigerant lines running from the outdoor unit while it's operating. The large insulated suction line should feel cool, roughly 40–60°F. If it's warm or room temperature while the unit is running and making noise, you likely have a refrigerant charge issue or a failing compressor — not just a mechanical rattle. This one test saves you from chasing debris or loose screws when the real problem is internal. Share this observation with your technician; it can cut diagnostic time by 30 minutes and save you $75–$125 in labor.
Step-by-Step Diagnosis
Work through these steps before calling a contractor. Each step tells you what to look for and what it means.
Power down and lock out the unit
🔧 Non-contact voltage testerGo to the outdoor disconnect box—a gray or beige metal box mounted on the wall within 6 feet of the condenser—and pull the disconnect handle or remove the fuse block. Verify power is off using a non-contact voltage tester held near the wiring inside the disconnect. Then go inside and switch the thermostat to the OFF position. Never work on a condenser with power connected; the capacitor can store a lethal 370–440 volt charge even after the breaker is off. Wait at least 5 minutes for the capacitor to begin self-discharging before touching any internal components. Success looks like zero voltage reading on your tester and no fan movement when you manually nudge the blade.
Clear debris from condenser cabinet interior
🔧 5/16-inch nut driver or socket, shop vacuumRemove the top grille or fan shroud by backing out the four to six 5/16-inch hex-head sheet metal screws around its perimeter. Carefully lift the shroud with the fan motor still attached and rest it gently to the side without stretching the wiring. Look inside the cabinet for sticks, leaves, acorns, gravel, animal nests, or any foreign objects resting on the compressor or against the coil fins. Remove all debris by hand or with a shop vacuum on low suction. Inspect the bottom pan for standing water or mud buildup—more than 1/2 inch of standing debris can redirect vibration and amplify noise. Reassemble the shroud and hand-tighten screws in a star pattern to ensure even seating. This single step resolves roughly 10–15% of rattling complaints.
Inspect and tighten the fan blade
🔧 5/16-inch or 3/8-inch hex wrench (Allen key)With the shroud removed and the fan motor exposed, grip the fan blade and try to wiggle it on the shaft. Any lateral play exceeding 1/16-inch indicates a loose set screw. Locate the set screw on the fan hub—usually a 3/8-inch or 5/16-inch hex—and tighten it firmly while holding the blade centered in the shroud opening. Spin the blade by hand; it should rotate freely without wobbling or contacting any part of the cabinet. Check each blade tip for cracks, chips, or missing pieces. A damaged blade cannot be repaired and must be replaced with an OEM-equivalent part matched by diameter (typically 18–24 inches) and pitch. After tightening, hand-spin again and listen: a smooth, silent rotation means you are done.
Tighten cabinet panels and mounting hardware
🔧 1/4-inch and 5/16-inch nut driver, torpedo levelWalk around the condenser and check every visible screw and bolt. Pay special attention to the top grille screws, side-panel sheet-metal screws, and the four bolts or rubber isolation pads that secure the unit to the concrete or composite pad. Use a 1/4-inch or 5/16-inch nut driver to snug each fastener—do not over-torque sheet metal screws or you will strip the holes. If rubber isolation pads under the unit are cracked, flattened, or missing, replace them; a set of four condenser isolation pads costs $8–$15 online. Verify the unit sits level on the pad using a torpedo level across the top rail—a tilt greater than 1/4-inch can amplify vibration noise. Re-level by shimming with composite or rubber pads, never wood, which rots.
Clean condenser coils and restore airflow
🔧 Garden hose with spray nozzle, coil cleaner spray, fin combClogged condenser coils force the compressor to work harder, raising head pressure and amplifying operational noise. Using a garden hose with a standard spray nozzle—never a pressure washer, which bends the delicate aluminum fins—spray from the inside out at a 45-degree downward angle. Work in overlapping passes from top to bottom on all four sides. For heavy buildup, apply a no-rinse coil cleaner (such as Nu-Calgon Evap Foam No Rinse) to dry coils first, wait 10–15 minutes, then rinse. Clean coils should allow you to see daylight through the fins. After rinsing, visually confirm no more than 10% of the fin area is bent or blocked. Use a fin comb to straighten any crushed sections. Restoring full airflow reduces compressor strain, lowering noise by an estimated 3–6 dB in many cases.
When to Stop DIY and Call a Pro
Call a licensed HVAC technician immediately if you hear a high-pitched screaming or hissing from the outdoor unit—this can indicate refrigerant pressures exceeding safe limits (over 600 PSI on R-410A systems), risking a catastrophic compressor failure or refrigerant release that can displace oxygen in enclosed spaces. Likewise, if the unit trips the circuit breaker repeatedly, emits visible sparks or a burning smell, or if the compressor produces a heavy internal banging that does not stop after clearing debris and tightening the fan blade, stop all DIY work. Compressor and electrical repairs require EPA Section 608 certification for refrigerant handling and a solid understanding of high-voltage circuits. From a financial standpoint, any repair estimated above $400–$500 in parts warrants a professional diagnosis, because a misdiagnosis at that dollar level—like replacing a fan motor when the real issue is a failing compressor—can double your total cost. A professional diagnostic visit typically runs $89–$150 and includes a full electrical and refrigerant pressure check, which pays for itself by preventing wasted parts spending.
What Does This Repair Cost?
Costs vary by region, home age, and severity. These are national averages — always get 3 quotes.
| Repair Type | DIY Cost | Pro Cost | Emergency Premium |
|---|---|---|---|
| Debris removal / coil cleaning | $0–$15 | $75–$200 | $150–$325 |
| Fan blade or shroud tightening/replacement | $8–$35 | $100–$275 | $200–$425 |
| Capacitor replacement | $10–$30 | $150–$300 | $250–$450 |
| Condenser fan motor replacement | Not recommended | $175–$450 | $350–$650 |
| Refrigerant leak repair & recharge | Not recommended | $250–$650 | $450–$900 |
| Compressor replacement | Not recommended | $1,800–$3,500 | $2,500–$4,500 |
| After-hours / weekend service call | N/A | $125–$250 | $200–$350 |
*Emergency rates (nights/weekends/holidays) run 40–60% above standard. Get 3 quotes before approving work.
Get quotes from licensed professionals in your area
Free, no obligation — compare 3+ contractors in minutesWhat Drives the Cost?
| Cost Factor | Estimated Impact | Why It Matters |
|---|---|---|
| Unit age (10+ years) | Adds $200–$800 | Older units use discontinued parts that require special ordering or adapters, increasing labor and part costs significantly |
| Refrigerant type (R-22 vs R-410A) | Adds $100–$1,500 | R-22 (Freon) is phased out and now costs $75–$150 per pound vs. $15–$30 for R-410A — a full recharge on an old system can exceed $1,500 |
| Weekend or after-hours call | Adds $75–$250 | Most HVAC companies charge a 40–60% premium for non-business-hour dispatches, and availability is limited during heat waves |
| Warranty coverage (parts/labor) | Saves $300–$2,000 | Many compressors carry a 5–10 year manufacturer warranty — verify before paying; labor warranties from the installer may also still apply |
Regional climate matters more than people realize when diagnosing outdoor AC noise. In the Southeast and Gulf states, condenser coils clog with cottonwood fluff and pollen so aggressively that the fan motor strains and starts humming loudly by mid-May — a $0 coil rinse prevents a $275 motor burnout. In the Southwest, sun-baked capacitors fail at nearly double the national rate, creating a telltale buzzing-then-clicking pattern. A quality capacitor costs an HVAC tech $10–$25 wholesale, yet the service call runs $150–$250. If you're handy and comfortable with high-voltage discharge procedures, a capacitor is the one component many seasoned pros will admit is a reasonable advanced-DIY repair — but only if you own a multimeter and know how to safely discharge the old one.
⚠️ Stop DIY — Call a Pro If You See These
- Compressor cycles on and off every 2–3 minutes (short-cycling) with banging at each start — Short-cycling under load can burn out the compressor windings within 2–6 weeks, turning a $250 fan motor or contactor repair into a $1,500–$2,800 compressor replacement or full system changeout.
- Circuit breaker trips within seconds of the condenser starting — This indicates a ground fault or locked-rotor amperage draw, which can overheat wiring in the disconnect or panel. Continued reset attempts risk an electrical fire or permanent compressor winding damage within days.
- Visible ice formation on the refrigerant lines at the outdoor unit while hearing loud buzzing — Ice on the larger suction line at the condenser during summer operation signals extremely low refrigerant charge or a restriction. Running the system in this state for more than 24–48 hours can slug liquid refrigerant back to the compressor, destroying the valve plate and resulting in $2,000+ in repairs.
- Oily residue or green-tinted stains around copper fittings at the condenser — This is a telltale sign of an active refrigerant leak. R-410A costs $50–$150 per pound to recharge, and a slow leak can drain a full 8–12 lb charge within a few weeks, starving the compressor of lubrication and leading to seizure.
Frequently Asked Questions
How much does it cost to fix Ac Making Loud Noise Outside?
Nationally, the cost ranges from $150 to $2,800 depending on the root cause. At the low end, replacing a contactor or tightening a loose fan blade runs $150–$250 including a service call. A new condenser fan motor with capacitor typically costs $300–$600 installed. At the high end, a compressor replacement runs $1,500–$2,800. The two biggest price movers are the specific component that failed and whether you have R-410A (common, cheaper) versus an older R-22 system requiring retrofit or refrigerant conversion, which can add $500–$1,200.
Can I fix Ac Making Loud Noise Outside myself?
Yes, in limited cases. You can safely clear debris from the cabinet, tighten fan blade set screws, secure loose cabinet hardware, clean condenser coils, and replace obviously worn rubber isolation pads—all with basic hand tools. These steps resolve roughly 20–30% of noisy condenser complaints. However, you should not attempt to replace a fan motor or capacitor unless you understand how to safely discharge a run capacitor, and you must never open refrigerant lines without EPA Section 608 certification. If the noise persists after basic maintenance, the root cause is likely electrical or mechanical and requires a professional.
How urgent is Ac Making Loud Noise Outside?
It depends on the noise type. A light rattle or hum can wait days to a week without risking further damage—it is usually loose hardware or debris. Grinding from a failing fan motor should be addressed within 24–48 hours; continued operation will seize the motor, potentially stalling airflow and spiking compressor head pressure. A screaming, hissing, or loud banging from the compressor is a same-day emergency—shut the system off immediately and call a technician. Waiting even one day with a critically high-pressure condition risks compressor failure and a repair bill that jumps from hundreds to thousands.
What causes Ac Making Loud Noise Outside?
The three most common causes are: (1) worn condenser fan motor bearings—accounting for 30–40% of noise calls—which produce grinding or squealing; (2) a loose or damaged fan blade striking the shroud, responsible for about 15–20% of cases; and (3) a failing contactor relay that chatters or buzzes under load. Less common but more serious is internal compressor failure, which creates heavy banging and requires compressor replacement. Debris trapped in the cabinet is an often-overlooked cause that is free to fix but frequently missed.
Will homeowners insurance cover Ac Making Loud Noise Outside?
Standard homeowners insurance does not cover mechanical breakdown, wear and tear, or lack of maintenance—which is what causes the vast majority of loud condenser noises. If the noise results from a covered peril, such as a tree limb falling onto the condenser and damaging the fan or compressor, your policy's dwelling or other-structures coverage would typically apply after your deductible (commonly $500–$2,500). A home warranty plan, which is separate from insurance, often covers HVAC mechanical failure for a $75–$125 service fee, but check your plan for exclusions related to pre-existing conditions or refrigerant type.
How do I find a licensed hvac technician for this?
Follow this four-step process: (1) Verify the technician holds a valid state or local HVAC contractor license—you can check this through your state's contractor licensing board website. (2) Confirm they carry general liability insurance (minimum $1 million) and workers' compensation coverage; ask for a certificate of insurance. (3) Get a written, itemized quote before any work begins—it should list diagnostic fee, parts with model numbers, labor hours, and warranty terms. (4) Check at least three references or verified online reviews from the past 12 months. Avoid any company that diagnoses over the phone without inspecting the unit or pressures you into a same-day full system replacement.
When your outdoor AC unit starts making loud noise, three decisions matter most. First, identify the noise type—rattling and buzzing are usually low-cost fixes under $300, grinding points to a fan motor replacement in the $300–$600 range, and banging or screaming may signal compressor failure costing $1,500 or more. Second, decide honestly whether the fix is within your skill set; clearing debris, tightening hardware, and cleaning coils are safe homeowner tasks, but anything involving capacitors, wiring, or refrigerant lines is professional territory. Third, act on the right timeline—minor rattles can wait a few days, but grinding or screeching warrants shutting the unit off and scheduling service within 24 hours to prevent cascading damage.
Your recommended next step: power down the outdoor unit at the disconnect, perform the five basic inspection and cleaning steps outlined above, and listen to a short test run. If the noise persists or changes character, shut the system back off and schedule a diagnostic visit with a licensed HVAC technician. A $89–$150 professional diagnostic now can save you $1,000 or more by catching a failing fan motor before it takes the compressor with it. Do not ignore the noise and do not keep resetting tripped breakers—every cycle of strain shortens the life of the most expensive component in your system.
Ready to Solve This for Good?
Get matched with pre-screened, licensed hvac technicians in your area. Free quotes, no obligation, no spam.
GET FREE QUOTES NOW