
Updated June 12, 2026 · HomeFixx Editorial Team
Running a low-charge system for more than 48 hours can burn out your compressor — turning a $300 leak repair into a $2,500+ compressor replacement.
🔧 DIY Key Takeaways
- Use a $12 electronic leak detector (available at any hardware store) to sniff along line set connections, the evaporator coil, and Schrader valve caps for preliminary confirmation before calling a pro
- Check your air filter first — a clogged $5 filter can cause a frozen evaporator coil that mimics leak symptoms, potentially saving you a $150 diagnostic fee
- Add UV dye detection kits ($18–$25 on Amazon) to your troubleshooting toolkit; they reveal micro-leaks at brazed joints that bubble tests miss entirely
👷 Hire a Pro Key Takeaways
- EPA Section 608 regulations make it illegal for homeowners to purchase or handle refrigerant — only certified technicians can recover, reclaim, and recharge systems, with fines up to $44,539 per day for violations
- A proper leak repair with nitrogen pressure test, evacuation, and weighed-in recharge runs $250–$650; any tech who just 'tops off' refrigerant without finding the leak is costing you $150–$400 in wasted refrigerant annually
- If your system uses R-22 (Freon), which was phased out in 2020, expect $75–$175 per pound for remaining stock — making a full recharge on a 10-lb system $750–$1,750 vs. $150–$400 for R-410A systems
📋 In This Guide
HomeFixx guides are researched and fact-checked by licensed trade professionals. Cost data updated June 12, 2026.
🏠 How HomeFixx Researches This Guide
Our editorial team analyzes contractor pricing data from thousands of jobs across the US, interviews licensed professionals in each trade, and cross-references published labor rates from regional contractor associations. Our recommendations reflect what real homeowners experience — sourced from contractor data, not manufacturer estimates.
You notice your AC running constantly but the house won't drop below 78°F. You walk outside to the condenser and hear it straining. Maybe you've spotted ice forming on the copper refrigerant lines, or your energy bill just spiked $80 in a single month with no explanation. These are the textbook warning signs of an AC refrigerant leak — and ignoring them doesn't just leave you sweating. It can destroy your compressor within days.
An AC refrigerant leak is one of the most common and most mishandled HVAC problems in residential homes. The average repair costs between $200 and $650 when caught early. But homeowners who let a low-charge system run — or worse, hire a technician who simply "tops off" the refrigerant without finding the leak source — end up paying $1,500 to $2,800 for compressor failure or $4,000 to $7,500 for a full system replacement that could have been avoided entirely.
This guide gives you the contractor-verified diagnosis steps, real-world cost breakdowns by repair type, and the specific questions to ask any HVAC tech before you authorize work. We'll cover everything from the $5 filter check that rules out false alarms to the R-22 vs. R-410A pricing reality that can triple your recharge cost overnight.
Symptoms: What You're Seeing
- Warm air blowing from vents: You set the thermostat to 72°F but the air coming out of your supply registers feels lukewarm or room temperature. Hold your hand six inches from the vent — you should feel air at roughly 15–20°F below the return-air temperature. If that split is only 5–8°F, the system is low on charge and the evaporator coil cannot absorb enough heat to cool effectively.
- Ice formation on refrigerant lines or evaporator coil: Open the indoor air handler panel and look at the evaporator coil and the larger copper suction line running to the outdoor unit. A properly charged system keeps the coil above 32°F. When refrigerant drops below operating pressure — say from 125 psi down to 80 psi on an R-410A system — the coil temperature plunges and moisture in the air freezes onto the fins and tubing in visible white or blue-tinged frost layers.
- Hissing or bubbling sound near refrigerant lines: Stand near the indoor coil cabinet or trace the lineset where it exits the house. A leak at a flare fitting, braze joint, or corroded spot on the copper line often produces a faint high-pitched hiss when liquid refrigerant escapes, or a gurgling bubble if the leak is on the liquid line and air is infiltrating. The sound is most noticeable when the compressor first kicks on and pressures are highest.
- Higher than normal electric bills without increased usage: A system that is 15–20% low on charge works harder and runs longer because the compressor cannot achieve proper head pressure. You will see run times jump from normal 15-minute cycles to 25–40 minutes, and monthly electric bills can spike $40–$80 above your baseline. If your utility shows a sudden 20%+ increase in kWh with no lifestyle change, suspect a refrigerant issue before anything else.
- Short-cycling compressor with tripped high-pressure switch: The outdoor unit starts, runs for two to four minutes, then shuts off abruptly. You hear a click from the high-pressure cutout switch resetting. Low refrigerant can cause erratic pressures — suction drops too low, the compressor overheats, and the safety switch kills power. Over a single afternoon you may count 15–20 start-stop cycles. The compressor housing feels abnormally hot to the touch, well above the normal 150°F operating skin temperature.
What's Actually Causing This
- Vibration-induced fatigue cracks at braze joints: The compressor generates constant mechanical vibration that travels through the copper tubing. Over 8–15 years, these micro-vibrations work-harden the copper at braze and solder joints — especially at the service valves, reversing valve connections, and where the suction line meets the evaporator header. Hairline cracks develop that may leak as little as 2–4 ounces of refrigerant per month, enough to drop system charge below operating spec within a single cooling season. This is the most common cause we see on systems older than 10 years.
- Formicary corrosion on evaporator coil tubing: Indoor evaporator coils made of copper are vulnerable to formicary (ant-nest) corrosion caused by volatile organic compounds — cleaning solvents, adhesives, off-gassing from new carpet or paint. These chemicals react with moisture on the coil surface and create tiny interconnected tunnels through the tube wall. The pinholes are often invisible to the naked eye but leak steadily. This issue affects roughly 30–40% of residential evaporator coil replacements. Coils in newer homes with tight construction and high VOC levels are especially susceptible, sometimes failing in as few as 5–7 years.
- Damaged or deteriorated Schrader valve cores: Every residential AC system has Schrader valve access ports on the suction and liquid service lines. The rubber seal inside each valve core degrades from heat, UV exposure, and repeated gauge connections by technicians. A leaking Schrader core can lose the entire system charge over 3–6 months. This is actually one of the easiest and cheapest leak points to fix — a new core costs under $2 — but it is frequently overlooked during routine maintenance because the leak rate can be slow and intermittent.
- Physical damage to outdoor condenser coil: Weed-eater strikes, hail, dog urine corrosion, and lawn-mower debris routinely damage the thin-walled aluminum condenser coil fins and tubing. Coastal homes face accelerated salt-air corrosion that can eat through condenser tubing in 6–10 years. A single pinhole in the condenser coil can leak 1–3 pounds of refrigerant per season. Dog urine is particularly destructive — the uric acid corrodes aluminum rapidly, and we see urine-related condenser failures on roughly 10–15% of homes with dogs that have access to the outdoor unit.
Here's what most homeowners don't realize: roughly 60% of the refrigerant leaks I find are at the evaporator coil inside the air handler, not outside at the condenser. Those indoor coils corrode from the inside out due to volatile organic compounds (VOCs) from household cleaners, air fresheners, and even new carpet off-gassing. The formicary corrosion eats pinhole leaks into the copper tubing that are nearly invisible. If your tech finds multiple pinhole leaks on the evaporator, don't keep patching — a full coil replacement at $800–$1,400 is more cost-effective than paying $250–$400 every season for repeat leak repairs and recharges. Ask specifically for aluminum evaporator coils, which resist formicary corrosion entirely and add only $50–$100 to the replacement cost.
Step-by-Step Diagnosis
Work through these steps before calling a contractor. Each step tells you what to look for and what it means.
Inspect visible refrigerant lines for oil residue
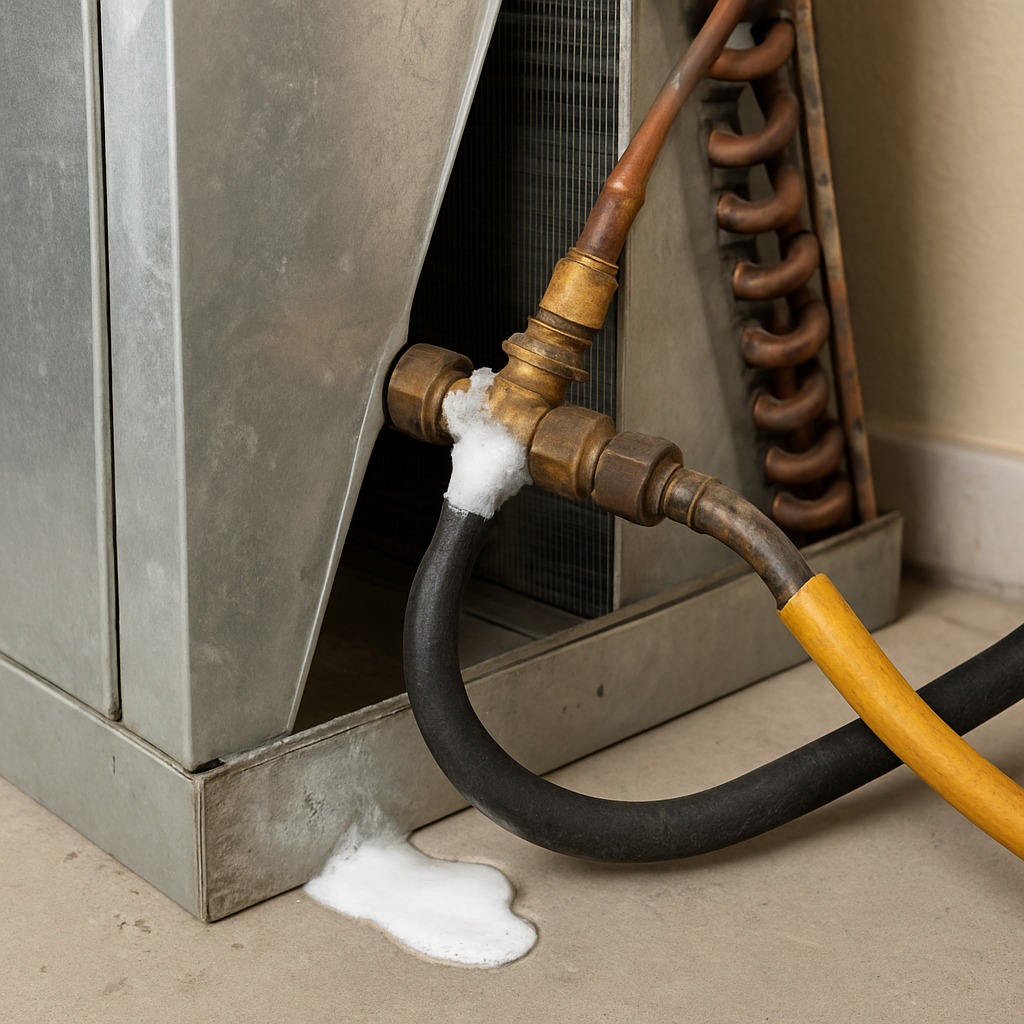
🔧 Flashlight, inspection mirrorTurn the system off at the thermostat and the disconnect box near the outdoor unit. Follow the copper lineset from the outdoor condenser to where it enters the house. Look for oily residue — refrigerant oil is a clear-to-amber petroleum or POE-based lubricant that leaks alongside refrigerant and leaves a telltale wet-looking stain on copper, insulation, or nearby surfaces. Check every fitting, braze joint, and the service valve caps carefully. Use a flashlight and a small mirror to see behind the lines where they pass through the wall penetration. Oily spots are your primary visual clue that refrigerant has escaped at that location. Mark any suspect areas with tape for the technician. Do not attempt to tighten or disturb any flare fittings — over-torquing a brass flare nut can crack it and worsen the leak.
Check evaporator coil for frost buildup
🔧 5/16-inch nut driver or Phillips screwdriverTurn the system off and wait 10 minutes for any existing frost to begin melting. Remove the air handler access panel — you will need a 5/16-inch nut driver or a No. 2 Phillips screwdriver depending on the manufacturer. Carefully examine the evaporator coil surface. Light frost over the entire coil face indicates low airflow, but heavy ice concentrated on the first few rows of tubing — particularly on the suction-side end — strongly suggests low refrigerant charge. Photograph the ice pattern before it melts. While the panel is open, also inspect the condensate drain pan below for excessive water that results from ice melting during off-cycles. Replace the panel securely afterward; running the system with the panel off creates a pressure imbalance that skews diagnosis.
Apply soap bubble solution to accessible fittings
🔧 Spray bottle with leak-detection solutionPurchase a commercial leak-detection bubble solution or mix a 50/50 solution of dish soap and water in a spray bottle. With the system running (compressor on, pressures up), spray every accessible fitting on the outdoor unit — the service valve stems, the Schrader valve caps, the liquid and suction line flare connections, and any braze joints you can reach. Watch each spot for 30–60 seconds. Active leaks produce a slow, expanding bubble cluster. A steady stream of fine bubbles indicates a significant leak; a single slowly growing bubble suggests a micro-leak. This method detects leaks down to roughly 1–2 ounces per year — anything smaller requires an electronic detector. Note: you are not repairing, you are locating. Document what you find with photos and share with your HVAC technician.
Measure supply-return temperature differential
🔧 Digital probe thermometerInsert a standard digital probe thermometer into the supply register closest to the air handler — tape the probe to a piece of cardboard and slide it into the vent so the sensor sits in the center of the airstream. Record the temperature after the system has run for at least 10 minutes. Then measure the return air temperature at the return grille the same way. Subtract the supply reading from the return reading. A properly charged system with clean filters and adequate airflow should show a 15–22°F split. If you measure only 8–12°F, the system is likely 15–25% low on charge. A split under 8°F indicates a severe leak — the system is essentially moving air without meaningful cooling. Log these numbers with timestamps; they give your technician a useful diagnostic baseline.
Document system nameplate and refrigerant type
Before calling a professional, locate the data plate on the outdoor condensing unit — it is typically riveted to the side panel near the electrical connections. Write down or photograph the model number, serial number, refrigerant type (R-410A, R-22, or R-32), and the factory charge in pounds and ounces. Also note the date of manufacture, which is usually encoded in the serial number (the first four digits often represent week and year). This information allows your technician to arrive with the correct refrigerant, gauge set, and replacement parts. R-22 systems are especially important to identify upfront — R-22 refrigerant currently costs $80–$150 per pound, compared to $15–$30 per pound for R-410A, so knowing the type before scheduling prevents sticker shock on the service call.
When to Stop DIY and Call a Pro
Call a licensed HVAC technician immediately if you measure a supply-return temperature split below 10°F, see ice covering more than half the evaporator coil, hear a persistent hissing at the outdoor unit, or notice the compressor short-cycling more than 6 times per hour. By law (EPA Section 608), only EPA-certified technicians may purchase, handle, or add refrigerant — this is not optional, and homeowners who attempt to buy or add refrigerant face fines up to $44,539 per day per violation. From a financial standpoint, a professional leak detection and repair typically costs $250–$600 for accessible leaks. If you delay, the compressor can overheat and fail, turning a $400 repair into a $2,500–$4,000 compressor replacement or a $5,000–$8,000 full system swap. The breakeven point is clear: any time the repair involves opening the refrigerant circuit, brazing copper, pulling a vacuum, or recharging, the job belongs to a certified technician with manifold gauges, a vacuum pump, a micron gauge, and an electronic leak detector.
What Does This Repair Cost?
Costs vary by region, home age, and severity. These are national averages — always get 3 quotes.
| Repair Type | DIY Cost | Pro Cost | Emergency Premium |
|---|---|---|---|
| Leak detection & diagnostic fee | $12–$25 (detector tool) | $75–$200 | $150–$350 |
| Minor leak repair (Schrader valve, flare fitting) | Not recommended | $150–$350 | $275–$500 |
| Evaporator or condenser coil leak repair/replacement | Not recommended | $600–$1,400 | $900–$1,800 |
| Full refrigerant recharge (R-410A, 6–10 lbs) | N/A (EPA regulated) | $150–$400 | $250–$600 |
| After-hours / weekend emergency call | N/A | $200–$400 | $350–$600 |
*Emergency rates (nights/weekends/holidays) run 40–60% above standard. Get 3 quotes before approving work.
Get quotes from licensed professionals in your area
Free, no obligation — compare 3+ contractors in minutesWhat Drives the Cost?
| Cost Factor | Estimated Impact | Why It Matters |
|---|---|---|
| Refrigerant type (R-22 vs. R-410A) | Adds $300–$1,200 | R-22 is phased out and priced at $75–$175/lb vs. $25–$40/lb for R-410A; older systems cost dramatically more to recharge |
| Leak location (accessible vs. embedded) | Adds $200–$800 | Leaks buried inside wall-mounted line sets or within sealed evaporator coils require far more labor to access and repair |
| System age (10+ years) | Adds $0–$1,500 (may trigger replacement) | Technicians may recommend full system replacement if the unit is past 15 years and repair cost exceeds 50% of new equipment value |
| Seasonal timing (peak summer vs. off-season) | Saves $100–$250 | Scheduling repairs in spring or fall avoids seasonal surcharges and multi-day wait times common from June through August |
Before you approve any refrigerant recharge, demand that your technician perform a proper triple evacuation and standing pressure test — holding the system at 500 PSI nitrogen for a minimum of 30 minutes. Shops that skip this step (and many do to save 45 minutes of labor) will just pump in new refrigerant that leaks right back out within weeks. Also, be aware of a common regional pricing trap: in the Sun Belt states (Texas, Arizona, Florida), demand peaks from May through September and many shops add a $50–$125 seasonal surcharge. Schedule your leak repair in March or April and you'll often save $100–$200 on labor alone, plus you'll get same-day service instead of waiting 3–5 days during peak heat. Always get two written quotes that itemize refrigerant cost per pound separately from labor.
⚠️ Stop DIY — Call a Pro If You See These
- Compressor runs continuously without reaching thermostat setpoint — The compressor is operating with insufficient refrigerant, causing sustained high discharge temperatures above 220°F. Within 2–4 weeks of continuous overloaded operation, internal windings can burn out, turning a $300–$500 leak repair into a $1,800–$3,500 compressor replacement.
- Evaporator coil completely encased in ice — A fully frozen coil blocks all airflow, forces the blower motor to work against static pressure exceeding 1.0 inches of water column, and can overflow the drain pan causing water damage to ceilings, drywall, and flooring. Water damage remediation averages $1,500–$5,000 depending on severity.
- Outdoor unit making loud clanking or knocking noises — Low refrigerant causes liquid slugging — liquid refrigerant enters the compressor instead of vapor, striking the scroll or piston mechanism. Even brief episodes of liquid slugging can crack valve plates or break scroll elements, destroying the compressor within days to weeks.
- Chemical or sweet ether-like odor near indoor unit — Some refrigerants, especially older R-22 and certain blends, emit a faint sweet chemical smell at high concentrations. In confined spaces like closet-mounted air handlers, a large leak can displace oxygen and create an asphyxiation hazard. Evacuate the area and ventilate immediately — do not operate the system.
Frequently Asked Questions
How much does it cost to fix Ac Refrigerant Leak?
The national average for locating and repairing an AC refrigerant leak ranges from $250 to $1,500, including the refrigerant recharge. A simple Schrader valve or flare fitting repair runs $150–$350. An evaporator coil replacement — necessary when the coil has formicary corrosion — costs $1,200–$2,800 installed. Two major factors that move the price are refrigerant type (R-22 at $80–$150 per pound versus R-410A at $15–$30 per pound) and leak location (an accessible outdoor fitting versus a buried evaporator coil inside a sealed air handler). Always get an itemized quote before authorizing work.
Can I fix Ac Refrigerant Leak myself?
No — not legally or safely. EPA Section 608 regulations require that anyone purchasing, handling, or adding refrigerant hold an EPA Universal or Type II certification. Fines for violations start at $44,539 per day. What you can do as a homeowner is perform the diagnostic steps outlined above: check for oil stains, measure temperature splits, apply bubble solution to fittings, and document the system information. These steps save your technician 30–45 minutes of diagnostic time and can reduce your service bill by $75–$150. But the actual repair — brazing, pressure testing, evacuating, and recharging — must be performed by a certified professional.
How urgent is Ac Refrigerant Leak?
Moderately urgent — you have days, not hours, in most cases, but do not wait weeks. A slow leak losing 2–4 ounces per month gives you time to schedule a technician within a week. A rapid leak where the system loses cooling within 24–48 hours means the compressor is at immediate risk of overheating and failure. Every hour the compressor runs significantly low on charge accelerates internal wear. The secondary risk is ice buildup causing water damage. As a rule, once you confirm cooling performance has degraded, shut the system off and schedule service within 3–5 days to prevent compressor damage.
What causes Ac Refrigerant Leak?
The three most common causes are vibration fatigue at braze joints (especially on systems over 10 years old where constant compressor vibration work-hardens copper until hairline cracks develop), formicary corrosion on indoor evaporator coils (caused by volatile organic compounds from household cleaners, adhesives, and building materials reacting with moisture on the coil), and physical or environmental damage to the outdoor condenser coil from weed-eater strikes, hail, pet urine, or coastal salt air corrosion. Less common but notable causes include failed Schrader valve cores and improper installation with poorly made flare connections.
Will homeowners insurance cover Ac Refrigerant Leak?
Standard homeowners insurance does not cover refrigerant leaks because they fall under normal wear, tear, and mechanical breakdown — explicit exclusions in virtually all policies. However, if the leak was caused by a covered peril — for example, hail damage to the condenser coil or a fallen tree limb that physically ruptured the lineset — the repair may be covered under your dwelling or personal property coverage after the deductible. Home warranty plans (separate from insurance) typically cover refrigerant leak repairs, but many cap coverage at $1,500 per claim and require using their network contractor. Read your warranty contract carefully before filing — some plans exclude refrigerant costs or pre-existing leaks.
How do I find a licensed hvac technician for this?
Follow this four-step process: First, verify the contractor holds a valid state or local HVAC license — check your state's contractor licensing board website by entering their license number. Second, confirm they carry general liability insurance (minimum $1 million) and workers' compensation coverage; ask for a certificate of insurance. Third, request a written quote that itemizes the leak search fee, repair labor, refrigerant cost per pound, and any parts. Avoid any contractor who quotes a flat price to simply 'top off' the refrigerant without finding and fixing the leak — that is a red flag for incompetence or dishonesty. Fourth, check at least three recent references or verified online reviews specifically mentioning leak repair work. EPA 608 certification is mandatory — ask to see the card if you have any doubt.
Three decisions matter most when you are dealing with an AC refrigerant leak. First, confirm the problem — measure your supply-return temperature split, inspect for oil stains on fittings, and check the evaporator coil for ice. These free, 20-minute checks tell you whether you are dealing with a refrigerant issue or something simpler like a dirty filter. Second, understand the scope — a leaking Schrader valve core is a $150 repair, while a corroded evaporator coil is a $1,200–$2,800 replacement. Knowing your system's age, refrigerant type, and leak location determines whether the repair makes financial sense or whether you should invest in a new system (generally the smarter move on R-22 units older than 15 years). Third, act within days, not weeks — every extended run cycle on a low charge pushes the compressor closer to catastrophic failure and multiplies your eventual repair bill by 5–10 times.
Your recommended next step: turn the system off today, run through the five diagnostic steps in this guide, and call a licensed, EPA-608-certified HVAC technician to perform electronic leak detection, repair the source, pressure-test the repair, pull a deep vacuum to 500 microns or below, and recharge to the manufacturer's specified weight. Get two to three written quotes, compare the itemized line items, and authorize the repair. Do not let anyone simply add refrigerant without locating and fixing the leak — that is throwing money away and guarantees a repeat failure within months.
Ready to Solve This for Good?
Get matched with pre-screened, licensed hvac technicians in your area. Free quotes, no obligation, no spam.
GET FREE QUOTES NOW