
Updated June 12, 2026 · HomeFixx Editorial Team
Active water infiltration through basement wall cracks can compromise your foundation's structural integrity and trigger mold growth within 24–48 hours, leading to $8,000–$25,000 in combined remediation costs.
🔧 DIY Key Takeaways
- Apply hydraulic cement to hairline cracks (<1/8") as a temporary seal for about $12–$25 per tube — this buys you weeks, not years, so plan for a permanent fix
- Use a polyurethane or epoxy crack injection kit ($30–$60) on non-structural poured-concrete cracks; follow the manufacturer's port-spacing instructions exactly or the repair will fail within one season
- Improve exterior grading and extend downspouts at least 6 feet from the foundation for $50–$150 in materials — this alone eliminates the root cause of 60% of basement water intrusion cases
👷 Hire a Pro Key Takeaways
- Horizontal cracks or stair-step cracks in block walls signal lateral soil pressure that can lead to wall failure — a structural engineer's assessment ($300–$700) is non-negotiable before any repair work begins
- Professional interior drain tile and sump pump installation runs $3,500–$8,500 for an average basement but carries a transferable lifetime warranty that adds resale value
- Carbon fiber strap reinforcement for bowing walls costs $400–$700 per strap installed (typically 4–8 straps needed) and is 90% less disruptive than full excavation, which can run $10,000–$15,000 per wall
📋 In This Guide
HomeFixx guides are researched and fact-checked by licensed trade professionals. Cost data updated June 12, 2026.
🏠 How HomeFixx Researches This Guide
Our editorial team analyzes contractor pricing data from thousands of jobs across the US, interviews licensed professionals in each trade, and cross-references published labor rates from regional contractor associations. Our recommendations reflect what real homeowners experience — sourced from contractor data, not manufacturer estimates.
You head downstairs after a heavy rain and notice a dark, wet streak running down your basement wall. A hairline crack you ignored last year is now actively leaking, and the carpet nearby smells like mildew. This scenario plays out in thousands of homes every spring — and the window between a $30 DIY injection fix and a $12,000 excavation job is smaller than most homeowners realize.
Basement wall cracks that leak aren't just a nuisance. Active water infiltration accelerates rebar corrosion in poured foundations, degrades mortar joints in block walls, and creates the sustained moisture environment mold needs to colonize within 24 to 48 hours. According to insurance industry data, water damage and mold remediation together average $8,000–$15,000 — and most standard homeowner policies exclude groundwater seepage entirely.
This guide breaks down exactly what your crack pattern means, which repairs you can confidently handle yourself (and for how much), and the precise scenarios where skipping a professional will cost you ten times more. Every cost figure is contractor-verified for 2024 pricing, and every recommendation is rated by urgency so you know whether you have days or hours to act.
Symptoms: What You're Seeing
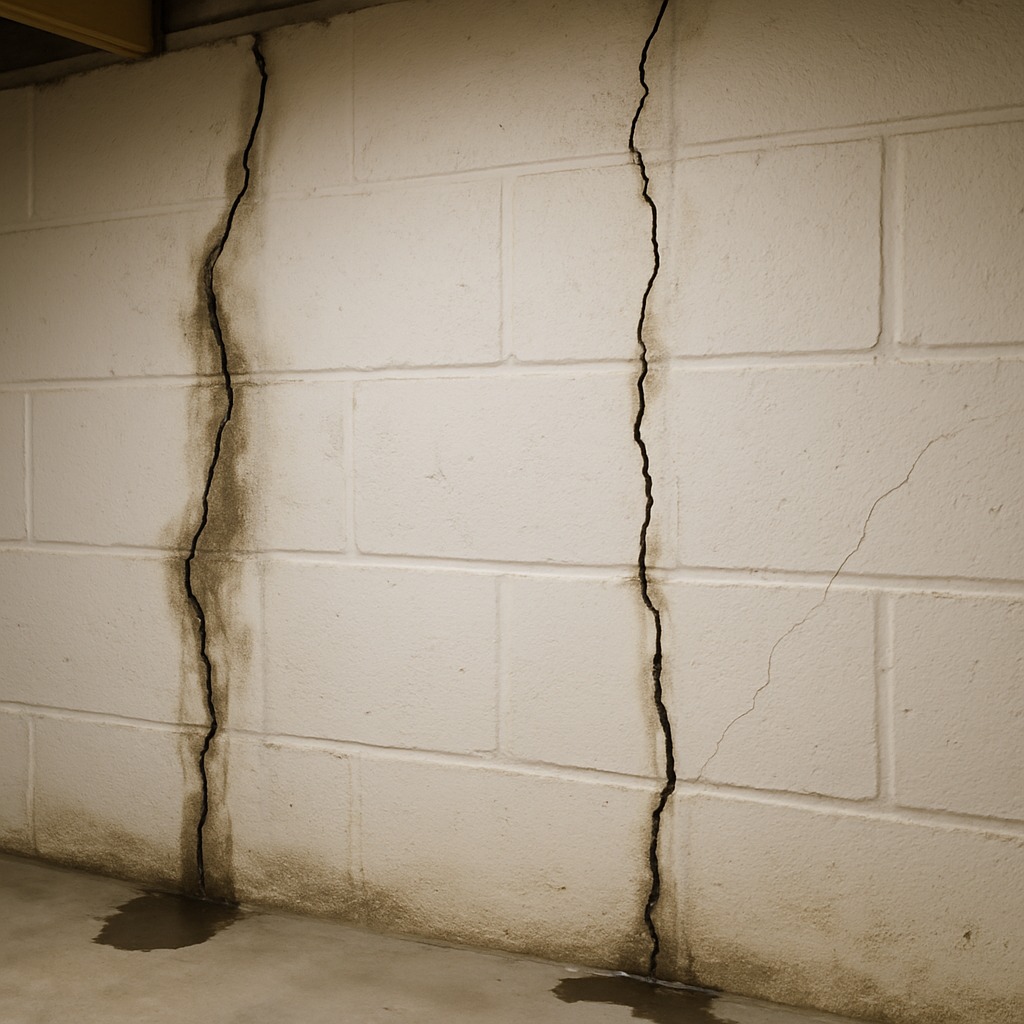
- Visible water seepage through wall cracks: You notice thin streams or beads of water actively trickling down the basement wall surface, typically following a vertical or stair-step crack line. During or after rainfall, these trickles intensify. You may see clean streaks cutting through dust or efflorescence on the concrete, and the floor at the base of the wall stays wet for hours or days after rain stops.
- White crystalline efflorescence deposits: A powdery, white, salt-like crust forms along crack edges and mortar joints. This is mineral residue left behind as water migrates through the concrete and evaporates on the interior surface. When you brush it with your hand, it feels chalky and crumbles easily. It reappears within days of cleaning, confirming ongoing moisture migration through the wall matrix.
- Persistent musty or earthy odor: The basement carries a damp, mildewy smell that intensifies in humid weather or after rain events. This odor is produced by mold colonies and bacteria thriving in moisture trapped behind drywall, insulation, or on bare concrete surfaces. You notice it strongest within three to five feet of the affected wall, and it does not dissipate with normal ventilation.
- Peeling paint and spalling concrete surface: Paint bubbles, flakes, or peels away from the interior face of the basement wall near crack locations. Beneath the peeling paint, you may see soft, chalky concrete that crumbles when scraped with a flathead screwdriver. This spalling indicates repeated freeze-thaw cycling and sustained hydrostatic pressure pushing moisture through the wall from the soil side.
- Damp or stained carpet and baseboards near walls: Carpet along the perimeter of the basement feels damp to the touch or shows dark water staining. Wooden baseboards warp, swell, or develop dark discoloration at their bottom edges. When you pull the carpet back, the tack strip may show rust, and the concrete slab beneath often has a visible wet line extending six to twelve inches from the wall.
What's Actually Causing This
- Hydrostatic pressure from saturated soil: When the soil surrounding your foundation becomes saturated during heavy rain or snowmelt, water exerts lateral pressure against the basement wall — sometimes exceeding 500 pounds per square foot at eight feet of depth. This force finds every weakness in the concrete: cold joints, honeycomb voids, and shrinkage cracks. It is the single most common cause of basement leaks, responsible for roughly 60–70 percent of all residential basement water intrusion. Poor grading that slopes toward the foundation or clogged gutters dumping concentrated roof runoff at the foundation line significantly worsen the pressure.
- Concrete shrinkage and curing cracks: Poured concrete walls shrink as they cure, losing roughly 0.5–0.6 inches per 100 linear feet during the first year. This shrinkage creates hairline cracks, typically vertical, that run from near the top of the wall to the footing. Nearly every poured concrete basement develops at least one or two of these cracks. They are structurally insignificant when narrow (under 1/16 inch), but they become direct water entry paths once exterior waterproofing membranes degrade or were never applied during original construction.
- Failing or absent exterior drainage system: Most homes built before 1980 either lack a proper footing drain or have one made of clay tile that has since crushed, separated, or clogged with silt and root intrusion. Without a functioning drain at the footing level, groundwater has nowhere to go except through the wall. Even modern perforated PVC drain systems fail if the gravel envelope becomes occluded with fine soil particles, typically after 25–40 years. When the drain fails, hydrostatic pressure spikes during every rain event, and cracks that were previously dry begin leaking.
- Settlement and structural movement: Differential settlement occurs when the soil beneath one section of footing compresses more than another — common in homes built on backfill, expansive clay, or near mature trees whose roots extract moisture unevenly. This movement produces diagonal stair-step cracks in block walls or horizontal cracks at roughly one-third to one-half wall height in poured walls. These cracks are wider than shrinkage cracks, often 1/8 inch or more, and they worsen over time. Roughly 15–20 percent of leaking basement walls involve some component of structural movement, and the repair cost escalates significantly once bowing or displacement exceeds half an inch.
After 22 years in foundation repair, I'll tell you the single biggest mistake homeowners make: they seal a crack from the inside and assume the problem is solved. Hydraulic cement and even epoxy injections address the symptom, not the cause. Before you touch the crack, go outside during a rainstorm. Trace where water pools against your foundation. In roughly 7 out of 10 jobs I quote, the real fix is regrading the soil so it slopes away at a minimum of 1 inch per foot for the first 6 feet, adding proper downspout extensions, and sometimes installing a simple $20 window-well cover. Those corrections — totaling under $200 in materials — eliminate the hydrostatic pressure that's driving water through the crack in the first place. Skip this step and you'll be re-repairing in 18 months.
Step-by-Step Diagnosis
Work through these steps before calling a contractor. Each step tells you what to look for and what it means.
Identify and map every crack location
🔧 LED work light, crack comparator card, tape measure, permanent markerWalk the entire interior perimeter of the basement with a strong flashlight or work light held at a low angle to the wall surface. This raking light reveals hairline cracks you would miss under overhead fluorescent lighting. Use a permanent marker or painter's tape to mark each crack's full length. Measure the width at its widest point using a crack comparator card (available for under five dollars at masonry supply stores). Note whether the crack is vertical, horizontal, or stair-stepped. Photograph each crack with a ruler for scale. This documentation helps you decide which repairs are DIY-appropriate — generally only vertical or diagonal cracks under 1/8 inch wide with no wall displacement. Any horizontal crack or crack wider than 1/8 inch needs professional evaluation before you touch it.
Clean cracks and remove loose material
🔧 Cold chisel, 3-lb hand sledge, shop vacuum, spray bottle, safety glasses, leather glovesUsing a cold chisel and a three-pound hand sledge, carefully chase each crack to create a slight V-groove approximately 1/4 inch wide and 1/4 inch deep. This keying provides a mechanical bond for the repair material. Wear ANSI Z87-rated safety glasses and leather gloves — concrete chips are razor-sharp. After chiseling, vacuum all dust and loose debris from the groove using a shop vacuum with a crevice attachment. Then dampen the crack with a spray bottle of clean water; epoxy and polyurethane injection products bond poorly to bone-dry concrete but also reject standing water, so the surface should be damp but not dripping. This preparation step is where most DIY failures originate — skip it and your patch peels out within one season.
Inject cracks with polyurethane foam sealant
🔧 Polyurethane crack injection kit, caulk gun (if kit requires one)For non-structural cracks under 1/8 inch wide, a polyurethane injection kit is your best option because the foam expands to fill voids and remains flexible to accommodate minor seasonal movement. Quality kits from brands like Simpson Strong-Tie or Emecole run $30–$80 per crack. Start by installing the plastic injection ports at six- to eight-inch intervals along the crack using the included epoxy surface paste. Allow the surface paste to cure for the time specified — typically six to eight hours at 70°F. Then, beginning at the lowest port, insert the dispensing nozzle and inject until material appears at the next port up. Cap the lower port, move to the next, and repeat your way to the top. Over-injection is better than under-injection; excess material simply compresses. Successful injection means foam has visibly exited at every port. Allow a full 24-hour cure before disturbing.
Apply hydraulic cement to active leaks
🔧 Hydraulic cement, mixing container, nitrile gloves, putty knifeIf a crack is actively weeping water and you need a temporary stop before a full injection, hydraulic cement like Drylok Fast Plug or Quikrete Hydraulic Water-Stop sets in three to five minutes even against running water. Mix a small batch — only what you can use in 90 seconds — in a disposable container. Roll it into a tapered plug shape with gloved hands and press it firmly into the widest leak point, holding constant pressure for three to four minutes until the heat of the exothermic reaction confirms a set. This is a bandage, not a permanent fix. Hydraulic cement is rigid and will crack again if the wall moves or if hydrostatic pressure remains unaddressed. Use it to buy time while you source injection materials or schedule a professional, but do not consider the job complete.
Correct exterior grading and gutter discharge
🔧 4-ft level, tape measure, spade shovel, hand tamper, PVC downspout extensionsAfter sealing from inside, address the water source outside. The ground within six feet of the foundation should slope away from the house at a minimum of one inch per foot — that means six inches of fall over six feet. Use a four-foot level and tape measure to check. If the grade is flat or slopes toward the house, add clean fill dirt (not topsoil, which holds water) and compact it with a hand tamper. Extend all downspout discharge points at least four to six feet from the foundation using rigid PVC extensions or splash blocks. Each inch of rain on a 1,500-square-foot roof produces roughly 935 gallons of water — concentrated at four downspout locations, that is over 230 gallons per spout hammering the soil right beside your basement wall. Correcting grade and gutter discharge alone eliminates the leak in an estimated 40–50 percent of cases where cracks are minor.
When to Stop DIY and Call a Pro
Stop all DIY work and call a licensed general contractor or structural engineer if you observe any of the following: horizontal cracks in a poured concrete or block wall, especially at mid-height — these indicate bowing from lateral soil pressure and can progress to catastrophic wall failure. Any crack wider than 1/4 inch or showing measurable displacement where one side of the crack is offset from the other. Active water flow that exceeds a slow seep, particularly if it involves cloudy or silt-laden water, which signals soil is being carried through the wall — a precursor to void formation and settlement. Stair-step cracking in block walls spanning more than four courses. Any bowing that exceeds 1/2 inch from plumb. From a financial standpoint, once your DIY materials list exceeds $300–$400 or you are dealing with more than two or three cracks, professional crack injection typically costs $400–$800 per crack and comes with a transferable warranty — often lifetime. A full interior drainage system with sump pump runs $3,000–$7,000 for an average basement and solves the problem permanently rather than chasing individual cracks. At that threshold, the warranty alone justifies professional work. Structural wall repairs involving carbon fiber straps ($400–$600 per strap) or steel I-beam bracing ($500–$800 per beam) are never DIY — improper installation can accelerate failure.
What Does This Repair Cost?
Costs vary by region, home age, and severity. These are national averages — always get 3 quotes.
| Repair Type | DIY Cost | Pro Cost | Emergency Premium |
|---|---|---|---|
| Epoxy or polyurethane crack injection (poured wall, hairline) | $30–$60 | $250–$600 | $400–$900 |
| Hydraulic cement patch (small active leak) | $12–$25 | $150–$350 | $250–$500 |
| Interior drain tile + sump pump system | Not recommended | $3,500–$8,500 | $5,500–$12,000 |
| Carbon fiber strap reinforcement (bowing wall) | Not recommended | $1,600–$5,600 | $2,500–$7,500 |
| Full exterior excavation and waterproofing (per wall) | Not recommended | $8,000–$15,000 | $12,000–$20,000 |
| Emergency weekend/after-hours service call | N/A | $200–$450 | $350–$700 |
*Emergency rates (nights/weekends/holidays) run 40–60% above standard. Get 3 quotes before approving work.
Get quotes from licensed professionals in your area
Free, no obligation — compare 3+ contractors in minutesWhat Drives the Cost?
| Cost Factor | Estimated Impact | Why It Matters |
|---|---|---|
| Crack location and type (hairline vs. horizontal vs. stair-step) | Adds $0–$8,000 | Structural cracks require engineered solutions; cosmetic cracks need only sealing — misdiagnosis is the most expensive mistake |
| Foundation material (poured concrete vs. cinder block vs. stone) | Adds $500–$3,000 | Block and stone walls can't be injection-sealed, requiring more invasive and costly interior or exterior drainage approaches |
| Depth of water table and soil type | Adds $1,000–$5,000 | High water tables in clay-heavy soil create persistent hydrostatic pressure that demands a drainage system, not just crack repair |
| Permit and engineering report requirements | Adds $300–$1,200 | Many municipalities require a structural engineer's stamp for foundation repairs; skipping this can void your homeowner's insurance and complicate resale |
Here's a red flag most guides won't mention: if you see a horizontal crack at roughly the mid-height of a poured or block basement wall, and the wall is bowing inward even a quarter inch, do not attempt a DIY fix. That crack pattern indicates lateral earth pressure exceeding the wall's design load — common in clay-heavy soils across the Midwest and Mid-Atlantic after wet winters. The repair protocol is carbon fiber straps ($400–$700 each installed) or steel I-beam braces ($500–$900 each), and the wall must first be straightened with hydraulic jacks if deflection exceeds 2 inches, adding $2,000–$4,000. Getting three quotes is critical here because pricing swings 30–40% regionally, and some contractors push full excavation at $12,000+ when strapping would perform identically per engineering specs.
⚠️ Stop DIY — Call a Pro If You See These
- Horizontal crack at mid-wall height with visible inward bowing — This indicates lateral soil pressure is exceeding the wall's capacity. Without bracing, the wall can bow beyond two inches within two to five years, at which point full wall replacement ($15,000–$40,000) becomes the only option instead of carbon fiber reinforcement ($3,000–$6,000).
- Crack width increasing over weeks or months — Active movement means the underlying cause — settlement, expansive clay, or failed drainage — is ongoing and worsening. Cracks that grow from 1/8 inch to 1/4 inch within a single season often indicate the need for underpinning or helical pier stabilization, which adds $1,200–$1,500 per pier. Delaying allows more piers to become necessary.
- Visible mold growth covering more than 10 square feet — The EPA threshold for professional mold remediation is 10 square feet. Unaddressed mold behind drywall or on framing can cause respiratory illness and will reduce your home's appraised value. Professional remediation runs $1,500–$4,000 for a typical basement area. Ignoring it allows colonization of HVAC systems, spreading contamination to upper floors.
- Silt, sand, or soil deposits on the basement floor near the wall — Soil piping through a wall crack means the backfill around your foundation is eroding into the basement. This creates voids under footings, porches, and exterior flatwork. Within one to three years, you may see settling of adjacent concrete slabs, porch separation, or additional foundation cracking. Void filling via mudjacking or polyurethane foam injection costs $500–$2,500 per affected area.
Frequently Asked Questions
How much does it cost to fix Basement Wall Cracks Leaking?
The national average to professionally inject a single leaking crack is $400–$800, with simple hairline cracks at the low end and wider, harder-to-access cracks at the high end. If multiple cracks require repair, expect $1,500–$3,500 for a typical basement. A full interior perimeter drainage system with sump pump installation averages $4,500–$7,000 for a 1,000-square-foot basement. Two major cost drivers are the number of cracks and whether exterior excavation is needed — exterior waterproofing with membrane and drainage board runs $8,000–$15,000 because it involves excavating down to the footing around the affected walls.
Can I fix Basement Wall Cracks Leaking myself?
Yes, but only for non-structural vertical or diagonal cracks narrower than 1/8 inch with no wall displacement or bowing. Polyurethane injection kits designed for homeowners cost $30–$80 per crack and work well when applied correctly to clean, properly prepared surfaces. The critical limitation is that you are sealing from the interior, which does not address the exterior water source. If grading and gutters are not also corrected, the water will eventually find another path. Any horizontal crack, any bowing, or any crack wider than 1/4 inch is beyond safe DIY scope and risks masking a structural problem.
How urgent is Basement Wall Cracks Leaking?
A hairline crack with minor dampness after heavy rain is a weeks-to-months urgency — you have time to plan a proper repair. A crack actively streaming water or showing silt deposits is a days-level concern because soil erosion and mold growth accelerate quickly. A horizontal crack with visible bowing is an immediate structural concern — get a structural engineer's evaluation within one to two weeks. Every rain cycle that pushes water through a crack erodes concrete, widens the opening, and deposits moisture that fuels mold colonization within 24–48 hours at typical basement temperatures.
What causes Basement Wall Cracks Leaking?
The two most common causes are hydrostatic pressure from saturated soil pressing against the wall and normal concrete shrinkage cracks that provide a pathway for that pressurized water. Saturated soil is often the result of poor surface grading — ground sloping toward the house — combined with missing or clogged footing drains. A third common cause is differential settlement, where part of the foundation sinks unevenly, opening cracks wider than shrinkage alone would produce. In clay-heavy soils, seasonal expansion and contraction of the clay creates cyclical pressure that repeatedly stresses the wall.
Will homeowners insurance cover Basement Wall Cracks Leaking?
In most cases, no. Standard homeowners policies exclude groundwater seepage, hydrostatic pressure, and gradual deterioration — the three mechanisms behind nearly all basement wall crack leaks. Insurance typically covers sudden and accidental water damage, such as a burst pipe inside the wall. If a covered peril like a broken water heater causes flooding that then exacerbates an existing crack, the water heater damage may be covered but the crack repair usually is not. Some insurers offer a separate water backup or sump pump failure endorsement for $40–$75 per year that covers damage from sump pump failure or sewer backup — worth adding if your basement has a history of water issues. Always document damage with photos and file a claim promptly if you believe a covered event occurred.
How do I find a licensed general contractor for this?
First, verify the contractor holds an active license in your state — check your state's contractor licensing board website by name or license number. Second, confirm they carry both general liability insurance (minimum $1 million) and workers' compensation; ask for a certificate of insurance and call the carrier to verify it is current. Third, get a detailed written quote — not a verbal estimate — that specifies the repair method, materials, warranty terms, and timeline. Vague quotes like 'waterproof the basement' without specifying interior drain tile versus crack injection versus exterior membrane are a red flag. Fourth, request and actually call three references from jobs completed in the last 12 months for the same type of repair. Reputable basement waterproofing contractors typically offer transferable lifetime warranties on crack injection and interior drainage systems.
Fixing leaking basement wall cracks comes down to three decisions: correctly diagnosing whether the crack is structural or cosmetic, choosing the right repair method for the crack type and width, and addressing the exterior water source so the repair lasts. A non-structural hairline crack can be a straightforward $50 DIY injection job. A bowing wall with active soil erosion is a $5,000–$15,000 professional project that demands engineering oversight. The difference between those two outcomes often comes down to how quickly you act — every rain event that pushes water through an unrepaired crack makes the eventual fix more expensive.
Your recommended next step: walk your basement with a flashlight and crack comparator card today. Measure and photograph every crack. Check your exterior grading with a level and inspect your gutter downspout discharge locations. If all cracks are vertical, under 1/8 inch wide, and the wall is plumb, order a polyurethane injection kit and correct your grading this weekend. If you find any horizontal cracking, bowing, displacement, or cracks wider than 1/4 inch, schedule a structural engineer inspection — expect to pay $300–$500 for the evaluation — before any repair work begins. Acting on the correct diagnosis now prevents the $15,000 wall replacement later.
Ready to Solve This for Good?
Get matched with pre-screened, licensed general contractors in your area. Free quotes, no obligation, no spam.
GET FREE QUOTES NOW