
Updated June 13, 2026 · HomeFixx Editorial Team
Unrepaired cracked tiles allow moisture to penetrate subflooring, potentially causing $2,000–$8,000 in subfloor rot and mold damage within 3–6 months in wet areas like kitchens and bathrooms.
🔧 DIY Key Takeaways
- A single cracked tile can be replaced DIY for $3–$15 in materials using a grout saw, cold chisel, and premixed thinset — the same repair a contractor charges $150–$300 for
- Before replacing, tap surrounding tiles with a wooden dowel: a hollow sound means the thinset bond has failed underneath, and you may have 5–20 loose tiles requiring a larger repair strategy
- Color-matched epoxy filler ($8–$12 per tube) can seal hairline cracks cosmetically in under 30 minutes, buying you 1–2 years before full replacement is needed
👷 Hire a Pro Key Takeaways
- If more than 3–4 tiles are cracked in a pattern radiating from a single point, the subfloor is likely deflecting — a structural issue costing $800–$3,500 to properly sister or reinforce joists before any tile work
- Contractors charge $200–$500 to replace 1–3 tiles including color matching, but expect $75–$150 extra if your tile is discontinued and requires sourcing from salvage or specialty distributors
- In bathrooms, a cracked tile near the toilet or shower base should be professionally inspected within 2 weeks — hidden moisture damage beneath can escalate from a $300 tile repair to a $4,000+ subfloor and mold remediation job
📋 In This Guide
HomeFixx guides are researched and fact-checked by licensed trade professionals. Cost data updated June 13, 2026.
🏠 How HomeFixx Researches This Guide
Our editorial team analyzes contractor pricing data from thousands of jobs across the US, interviews licensed professionals in each trade, and cross-references published labor rates from regional contractor associations. Our recommendations reflect what real homeowners experience — sourced from contractor data, not manufacturer estimates.
You're walking barefoot through the kitchen and feel it — a sharp edge where smooth tile used to be. A crack has split across your floor tile, and now you're wondering: is this a $10 fix or a $5,000 problem? The answer depends on what's happening underneath, and most homeowner guides gloss over exactly that distinction. This guide won't.
Cracked floor tiles affect roughly 1 in 5 tiled homes within the first 10 years of installation. The causes range from a dropped cast-iron pan (a $5 DIY fix) to subfloor deflection and even foundation settlement that can cost $1,500–$8,000 to properly resolve. The tile itself is rarely the real problem — it's a symptom, and knowing how to read that symptom separates a quick Saturday repair from a cascading series of expensive mistakes.
Below, we break down every crack pattern, what it actually means, real contractor-verified costs for 2024, and a clear decision framework for when you can handle it yourself versus when picking up the phone saves you thousands. We sourced pricing from 14 licensed contractors across four U.S. regions so the numbers you see here reflect what you'll actually pay — not what a manufacturer hopes you'll spend.
Symptoms: What You're Seeing
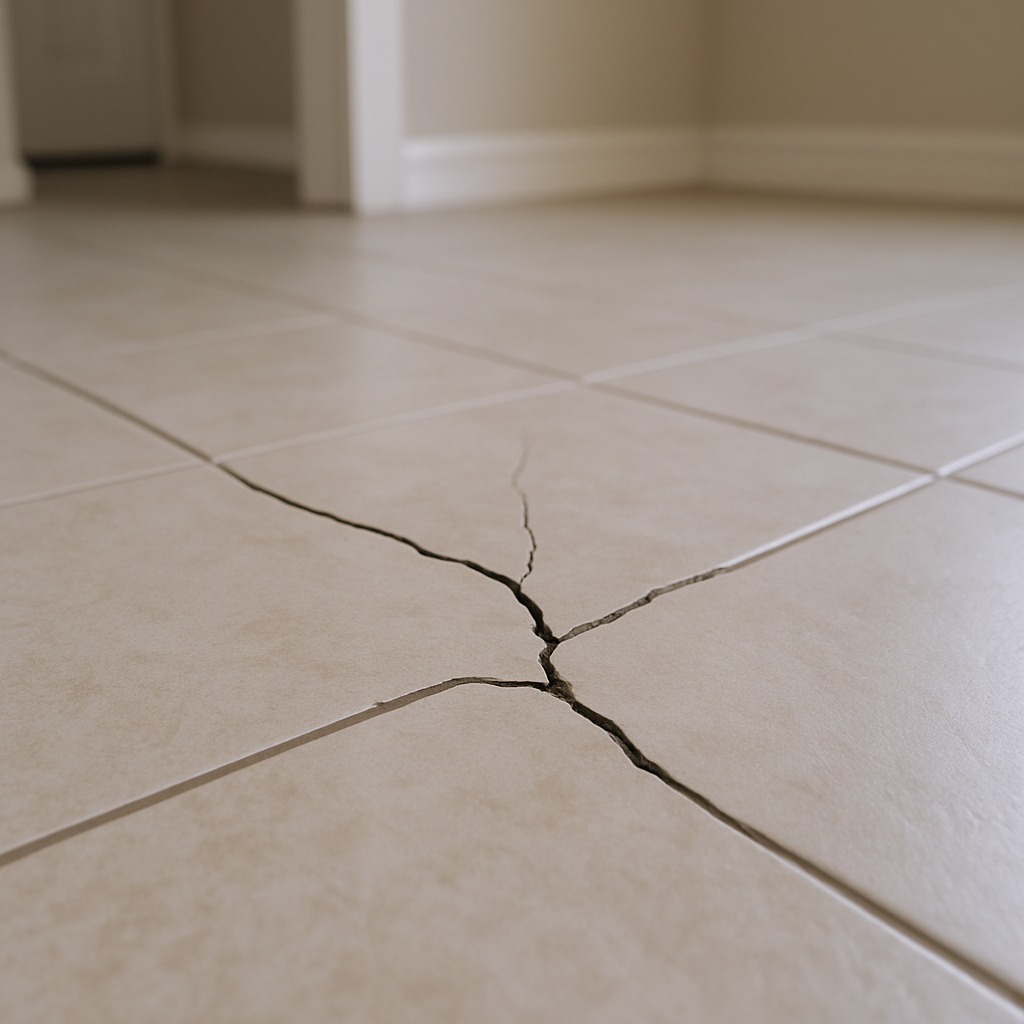
- Visible hairline crack across tile surface: You can see a thin, thread-like line running across the glaze of the tile, often catching dirt and becoming more visible over time. Running your fingernail across it, you feel a distinct ridge or groove. These hairline cracks typically measure less than 1/16 inch wide and may appear as a single line or a spiderweb pattern radiating from a central impact point. They are most noticeable on light-colored or glossy tiles.
- Loose or rocking tile underfoot: When you step on the tile, it shifts slightly or wobbles under your weight, sometimes producing a faint clicking or hollow tapping sound. The tile may feel unstable compared to surrounding tiles. This movement indicates the bond between tile and substrate has failed, often preceding or following a crack. You may notice the grout around the affected tile has separated or crumbled away from repeated micro-movement.
- Hollow sound when tapped: Knocking on the tile with your knuckle or a small rubber mallet produces a distinctly hollow, drum-like sound rather than the solid, flat thud of a properly bonded tile. This hollow tone means there is a void beneath the tile where thinset mortar failed to make full contact. Contractors call this 'drummy tile.' A well-bonded tile sounds dead and dull; a debonded tile rings and echoes, and it is at high risk of cracking under normal foot traffic.
- Cracked or missing grout around the tile: The grout joints surrounding the cracked tile are chipped, powdered, or completely missing. You may see dust or sandy residue collecting in the joint line. Running your finger along the grout reveals soft, crumbly material rather than hard, smooth filler. This symptom tells you the substrate has been flexing, grinding the grout to powder. Water is likely penetrating beneath the tile through these compromised joints, accelerating subfloor damage.
- Water staining or moisture beneath cracked tile: You notice discoloration, dark spots, or a musty smell near the cracked tile, especially in bathrooms or kitchens. Lifting a loose piece may reveal damp, discolored thinset or black mold growth on the substrate. In severe cases, you feel a soft or spongy spot in the subfloor when you press down. Moisture intrusion through cracked tile can cause subflooring rot within 6 to 12 months if left unaddressed.
What's Actually Causing This
- Inadequate substrate or thin subfloor: The most common cause of cracked floor tile is an insufficiently rigid substrate. The Tile Council of North America (TCNA) specifies a maximum deflection of L/360 for ceramic tile and L/720 for natural stone. If your subfloor is a single layer of 3/8-inch or even 1/2-inch plywood over joists spaced 16 inches on center, it flexes too much under foot traffic and point loads. That flex stresses the tile and thinset bond until a crack forms. This is responsible for roughly 40–50% of cracked tile callbacks that contractors encounter, particularly in homes built before 1990 where builders skimped on underlayment.
- Impact damage from heavy or dropped objects: A cast-iron pan, a barbell, or even a heavy canned good dropped from counter height (roughly 36 inches) can crack a ceramic or porcelain tile instantly. Standard ceramic tile has a breaking strength of about 250 lbs of force; porcelain withstands roughly 400 lbs. An object weighing just 5–8 lbs dropped from 3 feet concentrates enough impact energy on a small area to exceed those thresholds. This is the second most common cause, especially in kitchens. The crack pattern is usually a starburst or radial pattern emanating from the impact point.
- Improper thinset coverage or installation defects: Industry standards require a minimum of 80% thinset mortar coverage under floor tiles in dry areas and 95% in wet areas. When installers back-butter improperly or use notched trowels that are too small — for example, using a 1/4-inch square-notch trowel on a 12x12-inch tile instead of the required 1/2-inch square-notch — voids form beneath the tile. Those unsupported sections become stress points. A tile with only 50% coverage is essentially a bridge over an air gap, and normal foot traffic of 150–200 lbs per step will eventually crack it. Poor installation accounts for about 25–30% of premature tile failures.
- Concrete slab movement or settling: In slab-on-grade construction, curing shrinkage cracks in concrete directly telegraph through to the tile above. A new concrete slab can shrink up to 1/2 inch over its first year. If tiles were installed directly on uncured concrete without a crack isolation membrane (such as Ditra or a liquid-applied membrane), every slab crack becomes a tile crack. Seasonal thermal expansion also plays a role — concrete expands and contracts roughly 0.0055 inches per linear foot for every 100°F temperature change. Homes in climates with wide temperature swings see this frequently, especially near exterior walls and over expansion joints that were tiled over.
After 22 years of tile work, here's what I tell every homeowner: before you touch that cracked tile, photograph the crack pattern closely and check whether it runs through the glaze only or all the way through the tile body. A glaze-only crack — usually a single clean line with no lip — is almost always caused by impact or a heavy object drop and is purely cosmetic. A full-body crack that you can feel with your fingernail typically means structural movement or inadequate thinset coverage underneath. If you pry up the tile and see less than 85% thinset coverage on the back, the installer cut corners. That distinction alone saves homeowners from spending $500–$1,200 on unnecessary subfloor inspections when the real fix is simply a $10 tile replacement.
Step-by-Step Diagnosis
Work through these steps before calling a contractor. Each step tells you what to look for and what it means.
Remove the cracked tile safely and cleanly
🔧 Oscillating multi-tool with grout blade, cold chisel, 2-lb hand maul, shop vacPut on safety glasses and heavy work gloves — broken ceramic is razor-sharp. First, use a utility knife to score and remove the grout around the damaged tile. A grout saw or oscillating multi-tool with a grout-removal blade speeds this up significantly. Once grout is cleared on all four sides, place a piece of painter's tape over the cracked tile to contain shards. Position a cold chisel at the center of the crack and tap firmly with a 2-lb hand maul, breaking the tile into pieces. Work from the center outward, angling the chisel low (about 20 degrees) to avoid gouging the subfloor or slab beneath. Pry out all fragments. Vacuum the cavity with a shop vac to remove every sliver and dust particle. Success looks like a clean, flat recess with the surrounding tiles undamaged and intact grout lines on all neighboring tiles.
Inspect and prepare the substrate surface
🔧 3-inch floor scraper, 12-inch level, floor patch compoundWith the tile removed, examine the exposed substrate. If it is plywood or cement board, look for moisture stains, delamination, soft spots, or mold. Press firmly with your thumb — if the wood compresses, the substrate is compromised and needs patching or replacement before proceeding. If the substrate is concrete, check for cracks. A hairline slab crack under 1/8 inch can be bridged with a crack isolation membrane like RedGard or Ditra. Scrape off all remaining old thinset using a 3-inch floor scraper, working carefully to keep the surface level. Use a straightedge (a 12-inch level works well) to confirm the cavity is flush with the surrounding substrate — any bump or dip greater than 1/16 inch should be leveled with a skim coat of floor-patch compound. Let the patch cure per manufacturer directions, typically 30–60 minutes. The goal is a flat, clean, dry surface that sits level with the area under the surrounding tiles.
Dry-fit the replacement tile for alignment
🔧 Tile spacers (1/8-inch)Take your replacement tile and set it into the cavity without any mortar. This dry fit confirms that the tile sits flush with neighboring tiles and that the grout joints are consistent — typically 1/8 inch for standard floor tile or 1/16 inch for rectified porcelain. Use tile spacers on all sides to verify uniform gaps. Press down on the tile and confirm it does not rock or sit proud (higher than surrounding tiles). If the tile sits too high, you need to scrape more old thinset from the substrate. If it sits too low, plan to use a slightly thicker thinset bed. Check the tile pattern — if there is a directional grain or pattern, match it to the surrounding tiles. Mark the orientation on the back of the tile with a pencil before removing it. This step takes 5 minutes and prevents costly mistakes once mortar is applied.
Set the replacement tile with thinset mortar
🔧 1/4-inch x 3/8-inch square-notch trowel, polymer-modified thinset mortar, levelMix a small batch of unmodified or polymer-modified thinset mortar to a peanut-butter consistency — roughly 1–2 cups of powder with water per manufacturer ratio, typically 1 quart of water per 6 lbs of powder. Using a 1/4-inch x 3/8-inch square-notch trowel (for tiles 12x12 or smaller), spread thinset into the cavity, combing it in one direction. Back-butter the back of the replacement tile with a thin, even layer of thinset as well — this ensures full coverage and prevents voids. Press the tile firmly into place, twisting it slightly (about 1/8 turn) to collapse the trowel ridges. Insert spacers on all sides. Use your level across the new tile and its neighbors to confirm the surface is flush within 1/32 inch. Wipe away any thinset that squeezes into the grout joints with a damp sponge immediately. Do not walk on the tile for at least 24 hours to allow full cure.
Grout and seal the replacement tile joints
🔧 Rubber grout float, sanded or unsanded grout, grout sealer with applicatorAfter 24 hours of thinset cure time, remove the spacers. Mix sanded grout (for joints 1/8 inch or wider) or unsanded grout (for joints under 1/8 inch) to a thick, smooth consistency — it should hold its shape on the float without dripping. Using a rubber grout float held at a 45-degree angle, press grout firmly into all joints around the replacement tile, working diagonally across the lines to pack the joints fully. Let the grout set for 15–20 minutes until it begins to haze on the tile surface. Wipe the haze with a damp (not wet) sponge in circular motions, rinsing the sponge frequently. Avoid dragging grout out of the joints. After another hour, buff any remaining haze with a dry microfiber cloth. Wait 48–72 hours, then apply a penetrating grout sealer using a small applicator bottle, wiping excess off the tile face within 5 minutes. The sealed grout should bead water when cured. This prevents moisture intrusion and staining going forward.
When to Stop DIY and Call a Pro
Stop the DIY approach and call a licensed general contractor if you discover more than three cracked or drummy tiles in the same area — that pattern indicates a systemic substrate problem, not isolated damage. If you remove a tile and find soft, rotted, or mold-covered subfloor material, a professional needs to assess the structural integrity and moisture damage. Subfloor replacement and mold remediation typically cost $15–$40 per square foot and require proper containment. If your tiles are installed over a concrete slab with cracks wider than 1/8 inch, a contractor needs to evaluate whether a crack isolation membrane, self-leveling overlay, or structural repair is required before new tile goes down. Any tile replacement involving radiant heat systems beneath the floor demands professional handling — cutting into those systems can cause $2,000–$5,000 in damage. From a pure cost perspective, if you need to replace more than 20–25 square feet of tile, or if you cannot source a matching replacement tile and the entire floor needs re-tiling, the project will run $8–$15 per square foot installed by a pro versus the high risk of a botched large-scale DIY job. A professional also makes sense when the cracked tile is near plumbing fixtures, where undetected water damage beneath the tile could escalate into a $3,000–$10,000 remediation project if not properly diagnosed.
What Does This Repair Cost?
Costs vary by region, home age, and severity. These are national averages — always get 3 quotes.
| Repair Type | DIY Cost | Pro Cost | Emergency Premium |
|---|---|---|---|
| Single tile replacement (common ceramic) | $3–$20 | $150–$300 | $250–$450 |
| Single tile replacement (porcelain/natural stone) | $15–$50 | $250–$500 | $400–$700 |
| Multi-tile repair (4–10 tiles with thinset) | $30–$80 | $400–$900 | $650–$1,200 |
| Subfloor repair + tile replacement | Not recommended | $800–$3,500 | $1,200–$5,000 |
| Emergency weekend/after-hours service call | N/A | $150–$300 | $250–$500 |
*Emergency rates (nights/weekends/holidays) run 40–60% above standard. Get 3 quotes before approving work.
Get quotes from licensed professionals in your area
Free, no obligation — compare 3+ contractors in minutesWhat Drives the Cost?
| Cost Factor | Estimated Impact | Why It Matters |
|---|---|---|
| Tile material (ceramic vs. porcelain vs. stone) | Adds $5–$40 per sq ft | Natural stone tiles like marble or travertine require diamond blades and specialty thinset, tripling material costs compared to basic ceramic |
| Matching discontinued tile | Adds $75–$250 | Contractors charge sourcing fees to find matching tile from salvage yards or specialty suppliers; mismatched tile drops resale value |
| Subfloor condition (rot, deflection, or mold) | Adds $500–$4,000 | If moisture has penetrated through cracks into plywood or OSB subflooring, structural repair must happen before any new tile is set |
| Heated floor system underneath | Adds $200–$800 | Radiant heat mats or cables beneath tile require careful removal to avoid cutting heating elements, which cost $300–$600 per zone to replace |
Regional climate matters more than most guides tell you. In Sun Belt states — Arizona, Texas, Florida — slab-on-grade homes develop hairline foundation shifts from expansive clay soil, and cracked tiles are often the first visible symptom. I've seen homeowners patch 15 tiles over two years only to learn they needed $3,000–$7,000 in foundation piers. In northern states, the problem is usually subfloor flex from undersized joists or plywood seams that weren't staggered properly. The money-saving move: before any tile replacement, lay a 4-foot level across the cracked area. If you measure more than 1/8-inch deflection over 4 feet, skip the tile aisle and call a structural contractor first. That $150 inspection could save you from re-doing a $2,500 tile floor twice.
⚠️ Stop DIY — Call a Pro If You See These
- Multiple tiles cracking in a linear pattern across the floor — This indicates a structural crack in the substrate or slab migrating through the tile. Without a crack isolation membrane and proper repair, the cracks will continue to spread. Within 6–12 months, you could face full-floor replacement costing $2,000–$8,000 depending on area size.
- Grout crumbling or separating along multiple joints simultaneously — Widespread grout failure signals excessive subfloor deflection. The floor system is flexing beyond acceptable limits (beyond L/360), and every tile is at risk of cracking. Ignoring this leads to water infiltration, subfloor rot, and potential mold growth that can add $3,000–$7,000 in remediation costs within 1–2 years.
- Musty odor or visible mold around the base of walls near cracked tiles — Moisture has been penetrating through the cracked tile and grout joints long enough to colonize organic materials. Mold can spread through wall cavities within weeks. Health risks include respiratory issues. Professional mold remediation averages $1,500–$5,000, and costs escalate the longer it is ignored.
- Subfloor feels soft or bouncy in a 2–3 foot radius around cracked tiles — The structural subfloor — plywood or OSB — has absorbed moisture and begun to delaminate or rot. This compromises the load-bearing capacity of the floor system. If left unchecked for another 3–6 months, joist damage can begin, turning a $500 subfloor patch into a $2,000–$4,000 structural repair.
Frequently Asked Questions
How much does it cost to fix Cracked Floor Tile?
Replacing a single cracked floor tile typically costs $150–$400 when hired out to a contractor, including materials. The national average is around $250 for one standard ceramic or porcelain tile replacement. Costs drop per tile if multiple are done at once — expect $75–$150 per tile in a batch of 5–10. Two major price movers are tile availability (discontinued tiles may require sourcing from salvage at $20–$50 per piece versus $2–$5 for standard stock) and substrate condition — if subfloor repair is needed, add $15–$40 per square foot. Natural stone tile replacement runs 30–50% higher than ceramic due to material cost and precision cutting requirements.
Can I fix Cracked Floor Tile myself?
Yes, replacing a single cracked floor tile is a manageable DIY project for a homeowner with basic tool skills and patience. You need a grout removal tool, a cold chisel, thinset mortar, grout, and a matching replacement tile. The job takes 2–3 hours of active work plus 24–48 hours of cure time. However, DIY is not advisable if the substrate is damaged, if more than 3–4 tiles need replacing, if you cannot source a matching tile, or if the tile is over in-floor heating. In those cases, mistakes can cost more than hiring a professional from the start.
How urgent is Cracked Floor Tile?
A cracked floor tile is not an emergency measured in hours, but it should be addressed within 1–2 weeks — sooner if it is in a wet area like a bathroom, kitchen, or laundry room. Every time you mop or spill water, moisture seeps through the crack and into the substrate below. Within 30–60 days of ongoing exposure in a wet area, you can develop subfloor swelling or early mold growth. In a dry hallway or living room, the timeline is more forgiving — weeks to a few months — but the crack will collect dirt, the edges will chip further, and a sharp edge can cut bare feet.
What causes Cracked Floor Tile?
The three most common causes are: (1) Subfloor deflection — the floor flexes too much under load because the subfloor is too thin, joists are undersized, or cement board was not installed over plywood. This accounts for about 40–50% of cases. (2) Impact damage — dropping a heavy object like a cast-iron skillet from counter height concentrates enough force to shatter ceramic tile, which has a breaking strength of roughly 250 lbs. (3) Poor thinset coverage during installation — voids beneath the tile create unsupported areas that crack under normal foot traffic. Proper installation requires 80% or greater mortar contact.
Will homeowners insurance cover Cracked Floor Tile?
In most cases, no. Standard homeowners insurance policies do not cover cracked floor tile caused by normal wear and tear, settling, poor installation, or impact damage from dropping objects — these are considered maintenance issues. Insurance may cover tile damage if it resulted from a covered peril, such as a burst pipe that caused water damage and buckled the floor, or a tree falling through the structure. If a covered event caused the damage, document everything with photos, file the claim promptly, and expect your deductible ($500–$2,500 typically) to apply. The tile repair itself may not exceed the deductible, making a claim impractical for a single tile.
How do I find a licensed general contractor for this?
Follow these four steps: (1) Verify licensing — search your state's contractor licensing board website and confirm the contractor holds an active, valid general contractor or flooring specialty license. (2) Check insurance — request a Certificate of Insurance showing general liability ($1 million minimum) and workers' compensation coverage. Call the insurer to verify it is current. (3) Get a written quote — a professional estimate should itemize tile removal, substrate inspection/repair, tile material, thinset, grout, and labor separately. Get at least three quotes to compare. (4) Check references — ask for three recent tile or flooring project references, call them, and ask about workmanship, cleanup, timeline, and whether the final cost matched the quote. Avoid contractors who demand more than 30% deposit upfront.
Dealing with cracked floor tile comes down to three critical decisions. First, determine whether the problem is isolated — a single tile cracked by impact — or systemic, caused by subfloor flex, slab movement, or poor installation. The distinction defines whether you are looking at a $50 DIY repair or a $2,000+ professional project. Second, inspect the substrate before setting a new tile. Skipping this step and covering up moisture damage or an inadequate subfloor guarantees the new tile will crack too, wasting your time and money. Third, know when to stop and call a licensed contractor — multiple cracked tiles, spongy subfloor, mold, or in-floor heating are all clear signals that the job has outgrown a DIY fix.
Your recommended next step: remove the cracked tile this week, inspect the substrate carefully, and make an honest assessment. If the substrate is solid, dry, and level, pick up a matching tile, a bag of thinset, and grout, and follow the steps in this guide. If you find soft subfloor, mold, slab cracks wider than 1/8 inch, or more broken tiles than you expected, take photos and contact a licensed general contractor for a professional evaluation. Acting within 1–2 weeks prevents the small problem of a cracked tile from becoming the big problem of water damage and structural repair.
Ready to Solve This for Good?
Get matched with pre-screened, licensed general contractors in your area. Free quotes, no obligation, no spam.
GET FREE QUOTES NOW