
Updated June 13, 2026 · HomeFixx Editorial Team
A stuck garage door can trap vehicles, compromise home security, and indicate a broken spring under lethal tension that worsens within hours.
🔧 DIY Key Takeaways
- Replace dead remote batteries ($5–$8) and reprogram the opener — this fixes roughly 25% of 'won't open' calls according to door techs
- Check and realign the safety sensor eyes at the bottom of the tracks using a level and a soft cloth; misalignment by even 1/8 inch blocks the door and costs $0 to fix
- Lubricate metal rollers, hinges, and torsion spring with white lithium or silicone-based spray ($6–$10 can) every 6 months to prevent binding and extend hardware life by 3–5 years
👷 Hire a Pro Key Takeaways
- Torsion spring replacement runs $200–$350 per spring installed and should never be DIYed — a loaded torsion spring stores enough energy to cause fatal injuries
- If the opener motor hums but the door doesn't move, the gear-and-sprocket assembly is likely stripped; a pro replaces it for $150–$250 versus $400–$700 for a full opener swap
- Severely bowed or off-track panels require a technician with proper lifting brackets — forcing them risks the door crashing down, causing $800–$2,000 in panel and track damage
📋 In This Guide
HomeFixx guides are researched and fact-checked by licensed trade professionals. Cost data updated June 13, 2026.
🏠 How HomeFixx Researches This Guide
Our editorial team analyzes contractor pricing data from thousands of jobs across the US, interviews licensed professionals in each trade, and cross-references published labor rates from regional contractor associations. Our recommendations reflect what real homeowners experience — sourced from contractor data, not manufacturer estimates.
It's 7:15 a.m. on a Monday, you hit the garage remote, and nothing happens. You press again — the opener light blinks, maybe the motor hums, but the door sits there like a 400-pound wall between you and your commute. A garage door that refuses to open is one of the most common and most misunderstood home repair issues, and the fix can range from a free 30-second sensor adjustment to a $1,500 opener-and-spring overhaul.
The stakes aren't just inconvenience. A stuck door can leave your home's largest entry point either wide open to intruders or sealed shut with your car trapped inside. Worse, the most common mechanical cause — a broken torsion spring — puts a component under hundreds of pounds of tension within arm's reach, creating a genuine safety hazard that injures thousands of homeowners every year.
This guide walks you through every possible reason your garage door isn't opening, from dead batteries and tripped GFCI outlets to catastrophic spring failure and stripped opener gears. We include contractor-verified cost data, step-by-step diagnosis you can safely do yourself, and clear red lines for when you absolutely need a professional on-site. Let's get that door moving.
Symptoms: What You're Seeing
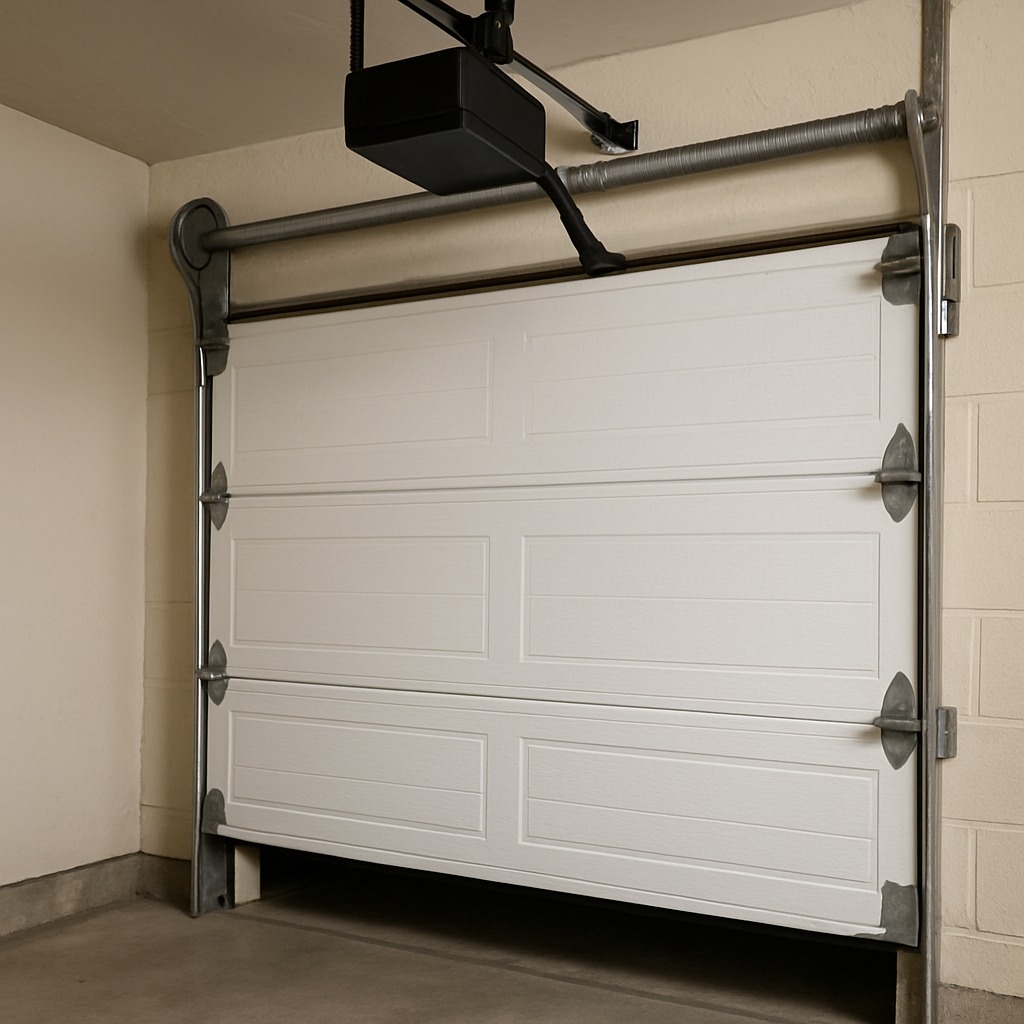
- Motor runs but door stays put: You press the wall button or remote and hear the opener motor hum or buzz for a few seconds before it shuts off, yet the door does not move at all. You may notice the chain, belt, or screw drive spinning freely without engaging the door. This indicates the trolley carriage has disconnected from the door bracket, the drive coupler has stripped, or the door itself is mechanically locked and cannot travel.
- Door moves a few inches then reverses: The door lifts 4–6 inches off the ground, hesitates, and immediately slides back down. You may hear a clicking sound from the opener unit and see the overhead light on the motor housing blink — typically 10 blinks on Chamberlain or LiftMaster units — signaling a force or limit-switch error. The safety sensors at the bottom of the tracks may also show a blinking amber or red LED.
- Loud bang followed by complete failure: You hear a sharp, gunshot-like crack from inside the garage, and the door will not budge manually or with the opener. A visual inspection reveals one of the torsion springs above the door header has snapped in two, with a visible gap of 2–3 inches in the coil. You may smell a faint metallic odor from the friction of the break. The door feels extremely heavy — 150 to 250 pounds of dead weight without spring counterbalance.
- Remote and keypad unresponsive but wall button works: Pressing the remote produces no response — no motor sound, no light activation — yet the hardwired wall console operates the door normally. This tells you the issue is isolated to the radio receiver or the remote itself rather than the motor or door mechanics. Battery replacement does not solve the problem. The antenna wire hanging from the motor housing may be damaged or coiled up against the ceiling.
- Door hangs crooked or jams mid-travel: One side of the door sits lower than the other by 3–6 inches, or the door binds and stops partway up with a grinding metal-on-metal screech. Rollers may have jumped out of the vertical track, or a lift cable on one side has frayed and slipped off the cable drum. You can see the cable hanging loose or bunched at the bottom bracket. The horizontal tracks may also be misaligned, with a visible gap between the track and the wall-mounted bracket.
What's Actually Causing This
- Broken torsion or extension springs: Garage door springs are rated for a specific cycle life — most standard torsion springs last 10,000 cycles, which translates to roughly 7–10 years for a household opening the door 3–4 times daily. When a spring snaps, the opener motor cannot lift the door's full weight (typically 130–250 lbs for a standard 16×7 steel door). This is the single most common cause of a door that will not open, accounting for roughly 40–50 percent of service calls according to industry repair data. Springs fail due to metal fatigue, corrosion from humidity, or cold-weather brittleness.
- Misaligned or obstructed safety photo-eyes: Federal law (UL 325) requires two infrared photo-eye sensors mounted within 6 inches of the garage floor on each side of the door. When these sensors are bumped, dirty, or hit by direct sunlight, the beam breaks and the opener refuses to close or may reverse immediately upon closing. Misalignment is responsible for about 15–20 percent of service calls. Even 1/4 inch of sensor shift can interrupt the beam. Cobwebs, condensation, or a shifted bracket after a lawnmower bump are typical culprits.
- Stripped or broken drive gear in the opener: Inside belt-drive and chain-drive openers, a small nylon main drive gear meshes with a worm gear on the motor shaft. After 8–15 years of use, this nylon gear strips its teeth, producing a grinding or whirring sound while the motor runs but nothing moves. This is especially common in Chamberlain and Craftsman 1/2-HP models manufactured before 2015. The gear costs $10–$15 as a part, but the labor to disassemble the motor housing runs $125–$175 at most shops. Roughly 10–15 percent of non-opening complaints trace to this gear.
- Dead transmitter batteries or radio frequency interference: Remote controls use 3V CR2032 lithium coin-cell batteries or 12V A23 alkaline batteries depending on model. Average battery life is 2–3 years. When the battery voltage drops below the minimum threshold, the remote cannot transmit its rolling-code signal to the receiver. Additionally, newly installed LED light bulbs — particularly cheap, non-shielded LEDs — emit radio frequency interference in the 310–390 MHz range that garage door openers use, effectively jamming the signal. This accounts for about 10 percent of service calls and is rising as LED adoption grows.
A 20-year garage door tech will tell you that most homeowners overlook the manual release cord — the red handle hanging from the opener rail. If your opener clicks but the door stays put, pull this cord toward the door (not down toward the floor) to disengage the trolley, then try lifting the door by hand. If it's heavy or won't budge, your springs are broken and you need a pro immediately. If it glides up easily, the problem is the opener motor or logic board, not the door itself. This 30-second test can save you $75–$125 in diagnostic fees because you'll know exactly what to tell the technician before they arrive.
Step-by-Step Diagnosis
Work through these steps before calling a contractor. Each step tells you what to look for and what it means.
Check the power supply and reset opener
🔧 Plug-in circuit testerStart at the outlet. Confirm the motor unit is plugged in and the outlet has power by testing it with a plug-in circuit tester or plugging in a known-working device like a phone charger. Many garage circuits share a GFCI outlet — check the GFCI in the garage and any related one in the adjacent bathroom or exterior for a tripped state and press the reset button. Next, unplug the opener for 60 seconds, then plug it back in. This hard reset clears the logic board and can resolve lock-out modes triggered by power surges. After the reset, the opener light should illuminate and the unit should respond to the wall button. If the outlet is dead, check the breaker panel for a tripped 15A or 20A breaker labeled 'garage.' Success looks like the opener light turning on and the unit responding to a button press.
Inspect and realign safety photo-eye sensors
🔧 Microfiber clothLocate the two photo-eye sensors mounted on brackets at the base of each vertical track, within 6 inches of the floor. Each sensor has a small LED indicator — the sending unit typically shows a steady amber or yellow light, and the receiving unit shows a steady green light when properly aligned. If the receiving sensor's LED is off or blinking, the beam is broken. Use a clean microfiber cloth to wipe both lenses. Then loosen the wing nut on the receiving sensor's bracket just enough to pivot the sensor. Slowly adjust the angle while watching for the green LED to turn solid. Tighten the wing nut by hand — do not over-torque or you will crack the plastic housing. Verify alignment by placing your hand in the beam path; the opener should refuse to close. Remove your hand and test full operation. If sunlight is the issue, install a small cardboard shade tube around the receiving sensor lens.
Disengage trolley and test manual operation
Pull the red emergency release handle hanging from the trolley carriage on the opener rail — pull it toward the motor unit to disengage. This disconnects the door from the opener so you can test if the problem is mechanical or electrical. With the trolley disengaged, attempt to lift the door manually from the bottom using both hands. A properly balanced door with intact springs should lift with about 8–10 pounds of force and stay open at any position — waist height, halfway, fully open. If the door is extremely heavy (over 25–30 lbs of effort), a spring is likely broken or losing tension and you should stop here and call a professional. If the door lifts smoothly, the problem is in the opener — proceed to check the drive gear and logic board. To re-engage the trolley, pull the handle toward the door and run the opener; the trolley will re-latch automatically on the next full open cycle.
Replace remote batteries and reprogram transmitters
🔧 Phillips screwdriver, stepladderOpen the battery compartment on each remote — most slide open or require a small Phillips screwdriver. Replace the battery (typically a CR2032 coin cell or A23 12V cell) with a fresh one, ensuring correct polarity. If the remote still does not work, reprogram it: locate the 'Learn' or 'Smart' button on the back or side of the motor housing — you may need a stepladder to reach it. Press and release the Learn button; the indicator LED beside it will glow for 30 seconds. Within that window, press and hold the button on your remote until the opener light blinks or you hear two clicks, confirming the code has been stored. Test the remote from 20 feet away. If multiple remotes all fail simultaneously and the wall button works fine, suspect RF interference from LED bulbs — swap in a shielded, opener-rated LED bulb (Chamberlain and Genie both sell them for $8–$12) or temporarily reinstall an incandescent bulb to test.
Lubricate tracks rollers and hinges thoroughly
🔧 White lithium grease spray, clean ragsBinding rollers and dry hinges create enough drag to exceed the opener's force limit, causing the door to stall or reverse. Use a white lithium grease spray — not WD-40, which is a solvent, not a lubricant — and apply a 2-second burst to each roller stem where it meets the hinge bracket. Hit all roller stems on both sides (a standard 16-foot door has 12–14 rollers). Spray the center pivot point of each hinge as well. For the torsion spring, apply a light coat of spray along the coils to prevent corrosion; do not touch or attempt to adjust the spring. Wipe excess drip with a rag. Then use a damp cloth to clean the inside of both vertical tracks — do not grease the tracks themselves, as this attracts grit that accelerates roller wear. After lubricating, run the door through two full open-close cycles to distribute the grease. You should notice quieter, smoother operation and the door should no longer stall at the same spot.
When to Stop DIY and Call a Pro
Stop all DIY work and call a licensed general contractor or garage door specialist immediately if you see a broken torsion spring — that gap in the coil above the header. Torsion springs are under roughly 100–200 foot-pounds of torque, and a failed adjustment attempt can cause the spring or winding bar to release violently, resulting in severe lacerations, broken bones, or death. There are documented fatalities from DIY spring replacement. Similarly, if a lift cable has snapped or frayed, the cable drum is under spring tension and is equally dangerous to service without proper winding bars and experience. Call a pro if the door is visibly off-track on one or both sides, as forcing it can collapse the entire door panel assembly — a replacement door runs $800–$2,500 installed. From a financial standpoint, if the repair estimate is under $350, the professional route almost always makes sense because you avoid the injury risk and get a warranty on parts and labor (typically 90 days to 1 year). If your opener is over 15 years old and the logic board or motor has failed, replacement of the full unit ($250–$550 installed) is more cost-effective than a $200+ board repair on obsolete equipment.
What Does This Repair Cost?
Costs vary by region, home age, and severity. These are national averages — always get 3 quotes.
| Repair Type | DIY Cost | Pro Cost | Emergency Premium |
|---|---|---|---|
| Remote/keypad battery or reprogram | $5–$10 | $75–$125 | $125–$200 |
| Safety sensor realignment or replacement | $0–$25 | $85–$175 | $150–$250 |
| Torsion spring replacement (pair) | Not recommended | $250–$550 | $400–$750 |
| Opener motor or logic board replacement | Not recommended | $200–$700 | $350–$900 |
| Off-track door / panel repair | Not recommended | $150–$450 | $300–$650 |
| After-hours emergency service call | N/A | $125–$250 | $200–$400 |
*Emergency rates (nights/weekends/holidays) run 40–60% above standard. Get 3 quotes before approving work.
Get quotes from licensed professionals in your area
Free, no obligation — compare 3+ contractors in minutesWhat Drives the Cost?
| Cost Factor | Estimated Impact | Why It Matters |
|---|---|---|
| Door size and weight (single vs. double) | Adds $75–$300 | Double-wide doors use heavier springs and larger openers, increasing both parts and labor costs significantly |
| Spring type (torsion vs. extension) | Adds $50–$200 | Torsion springs cost more but last 15,000–20,000 cycles versus 10,000 for extension; many pros refuse to install extension on new jobs |
| Opener age and brand availability | Saves $100–$400 | Openers older than 15 years often lack replacement parts, forcing a full unit swap instead of a $150 gear kit repair |
| Geographic region and season | Adds $50–$150 | Winter months in cold climates and high-cost metro areas push trip charges and labor rates up by 20–40% over national averages |
Seasoned installers in cold-weather states like Minnesota, Michigan, and Colorado see a spike in 'door won't open' calls every November through March. Metal tracks contract in freezing temperatures, hardened grease binds rollers, and weatherstripping freezes to the concrete floor. Before calling a pro, try using a heat gun or hair dryer ($0–$35) along the bottom seal and the track edges. Also swap standard lubricant for a cold-rated silicone spray rated to −40°F (about $9 at any hardware store). This seasonal prep alone prevents roughly 30% of winter service calls, saving homeowners the $85–$150 trip charge that most companies apply on top of repair costs.
⚠️ Stop DIY — Call a Pro If You See These
- Visible gap in torsion spring coil above the door header — The door is now held only by the remaining spring (if a two-spring system) or has zero counterbalance. Operating the opener in this state burns out the motor within 1–3 attempts, adding $200–$450 in opener replacement to the $200–$350 spring repair cost.
- Frayed or loose lift cable hanging near the bottom bracket — A frayed cable can snap completely during the next cycle, causing the door to drop uncontrolled. A falling 200-lb door can crush objects, vehicles, or people underneath. Cable replacement runs $150–$250 per side; delaying risks a full door panel replacement at $800–$2,500.
- Burning smell or smoke from the opener motor housing — The motor capacitor or winding is overheating, typically because the door is mechanically jammed and the opener is straining against a locked load. Continued operation creates a fire risk in the ceiling-mounted unit. Disconnect power immediately. Motor or opener replacement runs $250–$550.
- Door panels visibly bowed or cracked at the hinge sections — Structural panel damage means the door can fold or collapse inward during travel, potentially dropping the full weight of the upper sections. Individual panel replacement costs $250–$700; if the panel style is discontinued, you face a full door replacement at $1,000–$3,000+.
Frequently Asked Questions
How much does it cost to fix Garage Door Not Opening?
The national average for a garage door repair service call runs $125–$350, with the low end covering sensor realignment, remote reprogramming, or a gear replacement ($150–$200 parts and labor). The high end covers a torsion spring replacement, which averages $200–$350 for a single spring or $250–$450 for a pair. Two major price movers: the spring wire gauge (heavier doors need thicker, pricier springs) and whether you need one spring or two. If the opener itself is dead, full replacement with installation runs $250–$550 for a 1/2-HP chain-drive up to $500–$800 for a 1-1/4-HP belt-drive with Wi-Fi. Emergency or after-hours service typically adds a $75–$150 surcharge.
Can I fix Garage Door Not Opening myself?
Yes — but only for specific low-risk tasks. Replacing remote batteries, reprogramming transmitters, realigning photo-eye sensors, lubricating rollers and hinges, and resetting the opener are all safe, straightforward DIY fixes that resolve roughly 30–40 percent of non-opening issues. Do not attempt to replace or adjust torsion springs, lift cables, or cable drums yourself. These components are under extreme tension, and the specialized winding bars, experience, and safety knowledge required put this firmly in the professional category. A stripped drive gear is borderline — it requires disassembling the motor housing and is manageable if you have mechanical aptitude and follow the manufacturer's teardown guide.
How urgent is Garage Door Not Opening?
It depends on the cause. A dead remote battery or tripped GFCI is a 5-minute fix with zero urgency. A broken torsion spring should be addressed within 24–48 hours — not because the problem worsens rapidly, but because your garage is either inaccessible or unsecurable. Do not try to manually force the door open repeatedly with a broken spring; each attempt risks stripping the opener gear or bending a track, turning a $300 repair into a $700+ one. If you smell burning from the motor, unplug the unit immediately — this is a same-day urgent call due to fire risk. A frayed cable is also same-day: the door could free-fall on the next cycle.
What causes Garage Door Not Opening?
The three most common causes account for about 75 percent of cases. First, broken torsion or extension springs — these fatigue after 10,000 cycles (7–10 years of average use) and snap without warning, removing the counterbalance the opener needs. Second, misaligned or dirty photo-eye sensors — a bump, cobweb, or direct sunlight breaks the infrared beam and triggers the safety circuit, preventing the door from moving or forcing an immediate reversal. Third, a stripped nylon drive gear inside the opener — the motor runs and buzzes but cannot transfer torque to the drive system. Less common but notable causes include dead remote batteries, RF interference from unshielded LED bulbs, and a disconnected trolley carriage.
Will homeowners insurance cover Garage Door Not Opening?
Standard homeowners insurance (HO-3) covers garage door damage caused by named perils — a tree falls on the door, a vehicle impact, wind damage, or fire. In these cases, the insurer typically covers replacement minus your deductible, which averages $1,000–$2,500. Mechanical failure, wear and tear, and broken springs are explicitly excluded under virtually every policy as maintenance items. If a power surge from a lightning strike fries the opener's logic board, that may be covered under the dwelling coverage or through a separate equipment breakdown rider if you carry one. Document the damage with dated photos and contact your adjuster before authorizing repairs.
How do I find a licensed general contractor for this?
Follow a four-step vetting process. First, verify the contractor's license through your state's licensing board website — in many states, garage door work falls under a general contractor or specialty door license. Second, confirm they carry general liability insurance (minimum $1 million) and workers' compensation; ask for a certificate of insurance and call the insurer to verify it is current. Third, get a written, itemized quote before any work begins — it should list parts by name and part number, labor hours, and warranty terms. Walk away from any contractor who quotes a price over the phone without seeing the door. Fourth, check references: look for at least 15 reviews on Google or a similar platform with an average of 4.0 stars or higher, and call one or two past customers to confirm the work held up.
When your garage door refuses to open, the three decisions that matter most are: identify whether the cause is electrical (power, remotes, sensors) or mechanical (springs, cables, tracks); determine if the fix is safe to DIY or requires professional tools and training; and act on the right timeline — immediately for burning smells or frayed cables, within 48 hours for broken springs, and at your convenience for dead batteries or dirty sensors. Most homeowners can resolve about a third of non-opening issues themselves in under 30 minutes using nothing more than a circuit tester, a microfiber cloth, fresh batteries, and white lithium grease.
Your recommended next step: pull the emergency release, try to lift the door manually, and assess its weight. If it glides up smoothly with 8–10 pounds of effort, the problem is in the opener — work through the electrical and programming steps in this guide. If the door feels dangerously heavy or a spring is visibly broken, stop there, lock the door down, and call a licensed garage door contractor for a same-day or next-day appointment. Budget $200–$450 for a spring replacement with professional installation and expect the job to take 45–90 minutes on site.
Ready to Solve This for Good?
Get matched with pre-screened, licensed general contractors in your area. Free quotes, no obligation, no spam.
GET FREE QUOTES NOW