
Updated June 12, 2026 · HomeFixx Editorial Team
Operating a heat pump stuck in cooling mode or with a failed reversing valve during freezing weather risks burst pipes and $5,000–$15,000 in water damage within 24–48 hours.
🔧 DIY Key Takeaways
- Switch your thermostat to Emergency Heat (EM Heat) as a temporary fix — this uses your backup strip heaters and costs roughly $1–$3/hour to run, but prevents pipe freezing until a tech arrives
- A clogged air filter ($5–$15 replacement) restricts airflow enough to trigger the unit's low-pressure lockout, mimicking a refrigerant failure — swap it first before calling anyone
- Clear ice buildup on the outdoor unit with lukewarm water (never a sharp tool) — a blocked defrost cycle is the #1 misdiagnosed cause of no-heat calls, saving you a $150+ service visit
👷 Hire a Pro Key Takeaways
- A stuck or failed reversing valve replacement runs $450–$1,200 installed and requires EPA-certified refrigerant handling — DIY attempts void most manufacturer warranties and carry federal fines up to $44,539
- Low refrigerant charge signals a leak that costs $200–$1,500 to locate and repair; simply recharging without fixing the leak wastes $150–$400 in refrigerant that will leak out again within weeks
- If your heat pump is 12+ years old and needs a compressor replacement ($1,800–$3,500 installed), most HVAC contractors recommend full system replacement ($4,500–$9,000) because the compressor alone represents 60–70% of a new unit's cost
📋 In This Guide
HomeFixx guides are researched and fact-checked by licensed trade professionals. Cost data updated June 12, 2026.
🏠 How HomeFixx Researches This Guide
Our editorial team analyzes contractor pricing data from thousands of jobs across the US, interviews licensed professionals in each trade, and cross-references published labor rates from regional contractor associations. Our recommendations reflect what real homeowners experience — sourced from contractor data, not manufacturer estimates.
It's 28°F outside, your thermostat reads 62°F and dropping, and your heat pump is running but blowing air that feels barely lukewarm — or even cold. You crank the thermostat higher, but nothing changes. This is one of the most common and most stressful HVAC failures homeowners face, and the window between 'uncomfortable house' and 'frozen pipes bursting inside your walls' can be as short as 24 hours in extreme cold.
The good news: roughly 40% of heat-pump-not-heating calls are caused by issues you can diagnose and sometimes fix yourself — a tripped breaker, a frozen outdoor unit, or a $10 air filter that hasn't been changed in a year. The bad news: the other 60% involve refrigerant leaks, failed reversing valves, or dying compressors that require a licensed HVAC technician and can cost anywhere from $200 to $3,500 to repair.
This guide walks you through every symptom, every cause, and every cost — verified by contractors with 15+ years in the field. We'll show you exactly what to check before spending a dime, when you absolutely need professional help, and how to avoid the $500+ misdiagnoses that plague this repair category. Whether your system is a mini-split, a ducted split, or a packaged unit, you'll find your answer below.
Symptoms: What You're Seeing
- Lukewarm or cool air from vents: You set the thermostat to heat mode at 72°F, but the air blowing from your supply registers feels barely warm or outright cool—typically 80–90°F at the vent instead of the normal 95–110°F. Hold your hand six inches from a supply vent; if the air doesn't feel noticeably warmer than room temperature within 60 seconds of the system running, something is wrong.
- System runs constantly without reaching set temperature: The heat pump cycles on and never shuts off, running for hours while the indoor temperature sits 5–10 degrees below your thermostat setting. You can hear the outdoor unit humming continuously, and your electric bill spikes 30–50% compared to the same month last year. The house feels drafty and uneven despite all vents being open.
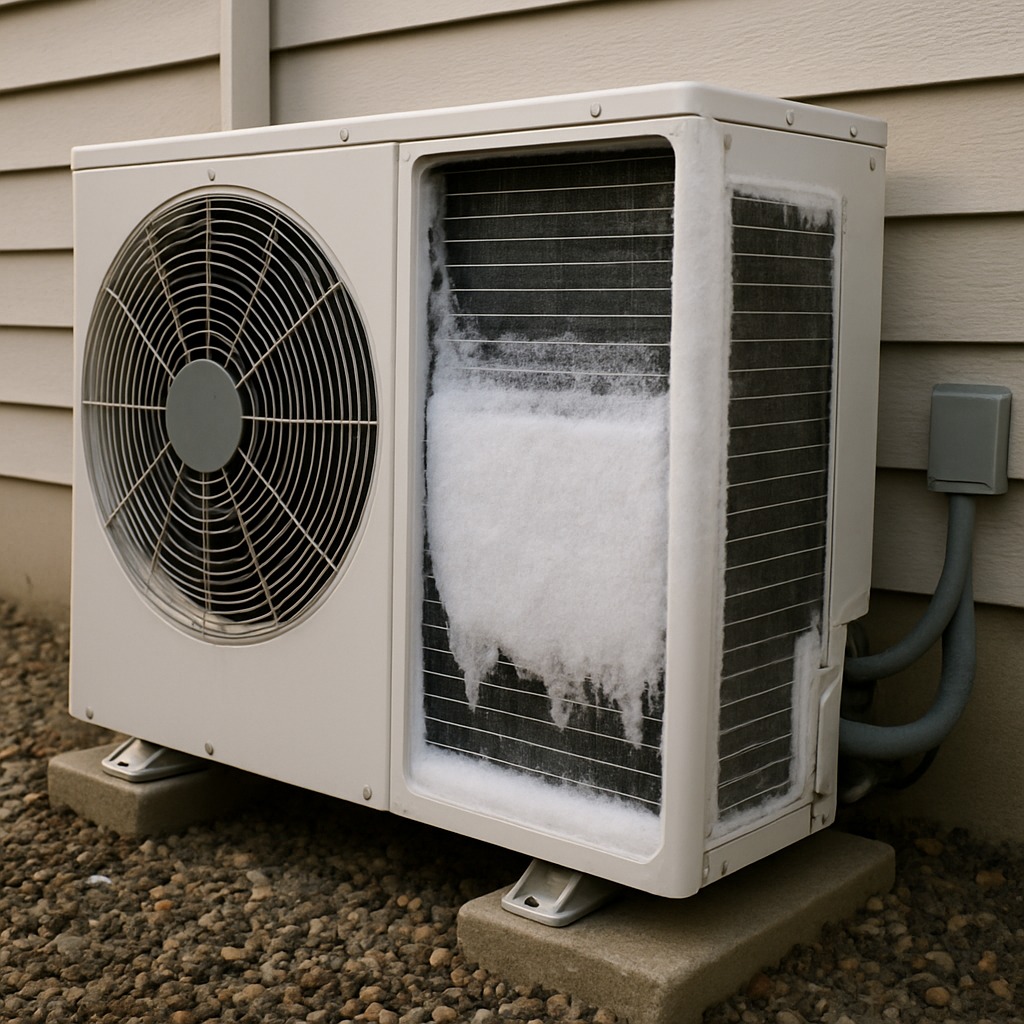
- Outdoor unit encased in heavy ice or frost: Walk outside and inspect the unit. A thin layer of frost is normal during cold weather, but if the entire coil, fan blades, and cabinet are coated in a thick sheet of ice—quarter-inch or more—the defrost cycle has failed. You may hear a strained buzzing from the compressor and see no steam rising when the unit should be defrosting every 30–90 minutes.
- Thermostat shows auxiliary or emergency heat running nonstop: Your thermostat display shows the 'AUX' or 'EM HEAT' indicator lit continuously, meaning the system has abandoned the heat pump compressor and is relying entirely on expensive electric resistance strips. You will feel adequate heat, but your power consumption can triple—electric strip heat pulls 5–15 kW compared to the heat pump's 2–5 kW—resulting in electricity bills that can exceed $400–$600 per month in colder climates.
- Unusual grinding, rattling, or clicking from outdoor unit: When the system calls for heat, you hear a metallic grinding or repetitive clicking every few seconds from the outdoor cabinet instead of the smooth fan-and-compressor hum. This may be accompanied by vibration you can feel through the concrete pad. A rhythmic clicking—four or more times before the unit gives up—often indicates a compressor failing to start against high head pressure.
What's Actually Causing This
- Refrigerant undercharge or leak: Heat pumps rely on a precise refrigerant charge—typically 6–12 pounds of R-410A depending on the model and line-set length—to absorb heat from outdoor air. Even a 10% loss drops heating capacity by 15–20%. Leaks commonly develop at flare fittings, Schrader valve cores, or through vibration-induced cracks in the copper line set. Over 35% of no-heat service calls we see involve low refrigerant. A system running low also raises compressor discharge temperatures above 220°F, which shortens compressor life by thousands of hours.
- Failed or stuck reversing valve: The reversing valve is a four-way solenoid-actuated valve that switches refrigerant flow between heating and cooling modes. When it sticks mid-position or the solenoid coil burns out—common after 8–12 years—the system either stays locked in cooling mode or pumps refrigerant in an inefficient partial-switch state. You get cool air in heat mode. Diagnosis requires measuring the temperature difference across the valve body; more than a 3–5°F difference across the valve ports indicates it's not fully seating. Replacement runs $350–$800 in parts alone and requires full refrigerant recovery.
- Defrost board or sensor failure: Heat pumps use a defrost control board with either a timer-initiated or demand-defrost strategy, relying on an outdoor coil temperature sensor (thermistor) and sometimes a pressure sensor to decide when to run defrost cycles. When the thermistor drifts out of spec—it should read around 5,000 ohms at 77°F for most Honeywell-type sensors—or the board relay sticks, the system either never defrosts (leading to a solid ice block) or defrosts too frequently (wasting energy and reducing heating). This is the number-one cause of outdoor unit icing and accounts for roughly 20% of winter heat pump service calls.
- Dirty air filter or blocked airflow: A standard 1-inch pleated filter rated MERV 8–11 should be replaced every 30–60 days during heavy heating use. When it clogs, static pressure across the air handler rises above 0.5 inches of water column—the ACCA-recommended maximum is 0.5 in. w.c. total external static. This starves the indoor coil of airflow, drops the coil temperature below 32°F, and can cause the indoor coil to freeze. The compressor then slugs liquid refrigerant, which can destroy internal valves and scroll plates within minutes. It is the simplest fix and causes roughly 25% of all no-heat calls.
Here's something most homeowner guides won't tell you: when your heat pump blows lukewarm air instead of cold air, the reversing valve solenoid coil may have simply lost its electrical connection — not the valve itself. A 20-year HVAC tech checks this $15–$40 solenoid coil first before quoting a $450–$1,200 full valve replacement. You can actually test this yourself by listening for a distinct click when you switch the thermostat from heat to cool. No click means the solenoid is likely dead. Replacing just the coil takes 30 minutes and saves you roughly $400–$900 in labor compared to a full reversing valve swap. Always mention this to your technician — some less-experienced contractors jump straight to the expensive fix.
Step-by-Step Diagnosis
Work through these steps before calling a contractor. Each step tells you what to look for and what it means.
Check and replace the air filter immediately
🔧 Infrared thermometerTurn the system off at the thermostat. Locate the filter—usually in a slot on the return-air side of the air handler or in a wall-mounted return grille. Slide it out and hold it up to a light source. If you cannot see light through it, it is too dirty. Replace it with the same size (check the dimensions printed on the frame, e.g., 16x25x1) and the same or lower MERV rating. A MERV 8 filter is fine for most systems; going above MERV 11 on a system not designed for it creates excessive static pressure. After installing the new filter, turn the system back on and let it run 15–20 minutes. Check supply-vent temperatures with a cooking thermometer or infrared thermometer—you should see 95–110°F air at the vent. If temperatures remain low, move to the next step.
Verify thermostat settings and wiring connections
🔧 MultimeterConfirm the thermostat is set to HEAT mode—not COOL, AUTO, or EMERGENCY HEAT. Set the temperature at least 3 degrees above current room temperature to force a call for heat. Listen for the outdoor unit to start within 60 seconds. If it does not, remove the thermostat cover and check that the wire connected to the 'O' or 'B' terminal (reversing valve control) is secure—a loose 'O' wire on Carrier, Trane, Lennox, and most brands will prevent the valve from energizing for heat mode. Also verify the 'Y' (compressor) and 'G' (fan) terminals are tight. If you have a multimeter, check for 24 volts AC between R and C at the thermostat base; no voltage means a blown 3-amp or 5-amp fuse on the air handler control board. Replace the fuse with an identical automotive-style blade fuse, which costs under $1 at any hardware store.
Inspect and clear the outdoor unit of ice
Go to the outdoor unit and check for ice buildup. If you see a light coating of frost, that is normal—it should clear during the next defrost cycle. If the entire coil is encased in solid ice thicker than a quarter inch, turn the system to EMERGENCY HEAT at the thermostat. Then turn the heat pump breaker off at the electrical panel and let the ice melt naturally—this can take 2–6 hours depending on outdoor temperature. Do not chip ice with a screwdriver or pour boiling water on the coil; both can puncture the thin aluminum fins and damage copper tubes. Once the ice is fully melted, turn the breaker back on and switch the thermostat back to normal HEAT mode. Monitor the unit over the next 90 minutes—it should initiate a defrost cycle (you will hear the reversing valve click and see steam). If it does not defrost and ice reforms, the defrost board or sensor has failed and requires a technician.
Clean debris from outdoor coil and fan area
🔧 Garden hosePower down the outdoor unit at the disconnect box mounted on the wall near the unit—pull the disconnect handle or flip the breaker. Remove any leaves, grass clippings, snow, or debris packed against the coil fins. The unit needs at least 18–24 inches of clearance on all sides for proper airflow—a blocked coil reduces heat transfer efficiency by 20–40%. Use a garden hose on a gentle setting to rinse the coil fins from the inside outward (spraying outward pushes dirt out of the fins instead of deeper in). Do not use a pressure washer—pressures above 100 PSI will flatten the delicate aluminum fins. Once clean, restore power and run the system. Supply-vent temperatures should improve within 10–15 minutes if restricted airflow was the issue. Check the fan blade for damage while you have it powered down; a cracked or bent blade causes vibration and reduces airflow volume across the coil.
Check the outdoor unit circuit breakers and disconnect
🔧 MultimeterA heat pump has two breakers—one for the air handler (usually 15–30 amps) and one for the outdoor unit (typically 30–60 amps, double-pole). Check both at the main electrical panel. A tripped breaker sits in a middle position between ON and OFF; push it fully to OFF, then back to ON. If it trips again immediately, do not reset it a second time—this indicates a short circuit, likely in the compressor windings, contactor, or wiring, and requires professional diagnosis. Also check the outdoor disconnect box near the unit; pull out the disconnect and inspect the fuses inside with a multimeter set to continuity. A blown fuse shows no continuity (OL on the meter). Replace with the same amperage fuse—commonly 30 or 40 amp time-delay cartridge fuses. Mismatched fuse ratings can cause fire or fail to protect the compressor. After restoring power, the system should start within two minutes of a thermostat call for heat.
When to Stop DIY and Call a Pro
Call a licensed HVAC technician immediately if you hear the compressor clicking repeatedly without starting—this signals a failed start capacitor ($150–$300 repair) or a locked compressor rotor ($1,500–$3,500 replacement). If your outdoor unit trips the breaker more than once, stop resetting it; repeated short circuits can cause wiring fires in the disconnect box or damage the compressor terminal block, which is a known arc-flash hazard. Any time you suspect a refrigerant leak—evidenced by ice on the outdoor coil that returns within an hour after melting, a hissing sound near the line set, or oily residue on refrigerant fittings—a technician with EPA Section 608 certification must recover, leak-test, and recharge the system. DIY refrigerant handling is federally illegal and carries fines up to $44,539 per day per violation under the Clean Air Act. As a cost threshold: if your system is more than 12 years old and the repair estimate exceeds $1,500, strongly consider full system replacement ($4,500–$9,000 installed for a 2–3 ton unit). A new unit will carry a 5–10 year parts warranty and operate at SEER2 15+ and HSPF2 8+, cutting heating costs by 20–40% compared to an aging system.
What Does This Repair Cost?
Costs vary by region, home age, and severity. These are national averages — always get 3 quotes.
| Repair Type | DIY Cost | Pro Cost | Emergency Premium |
|---|---|---|---|
| Thermostat reset / filter replacement | $0–$15 | $75–$150 | $150–$300 |
| Defrost board or sensor replacement | $25–$60 | $175–$400 | $300–$600 |
| Reversing valve replacement | Not recommended | $450–$1,200 | $700–$1,800 |
| Refrigerant leak repair + recharge | Not recommended | $350–$1,500 | $600–$2,200 |
| Compressor replacement | Not recommended | $1,800–$3,500 | $2,500–$4,500 |
| After-hours emergency diagnostic call | N/A | $150–$300 | $250–$450 |
*Emergency rates (nights/weekends/holidays) run 40–60% above standard. Get 3 quotes before approving work.
Get quotes from licensed professionals in your area
Free, no obligation — compare 3+ contractors in minutesWhat Drives the Cost?
| Cost Factor | Estimated Impact | Why It Matters |
|---|---|---|
| Refrigerant type (R-410A vs. R-22) | Adds $50–$800 | R-22 is phased out and costs $80–$150/lb vs. $15–$30/lb for R-410A; older systems needing R-22 face inflated recharge costs every time |
| Warranty status (parts & labor) | Saves $300–$2,500 | Most compressors carry 5–10 year manufacturer warranties but only if registered within 60 days of install — check before paying out of pocket |
| System accessibility (rooftop, tight crawlspace) | Adds $100–$500 | Rooftop or attic-mounted units require extra labor time and sometimes crane fees for compressor swaps |
| Regional labor rates (South vs. Northeast) | Adds/saves $75–$400 | HVAC labor in the Northeast averages $125–$175/hr vs. $80–$120/hr in the Southeast, significantly shifting total repair bills |
In climate zones 4–6 (roughly the Mid-Atlantic through the upper Midwest), heat pumps lose significant heating capacity below 30°F, and many homeowners mistake normal auxiliary heat activation for a malfunction. Before you pay $150 for a diagnostic visit, check your thermostat's aux heat indicator. If auxiliary heat is running and your home is still cold, the problem is likely undersized backup strip heaters — not the heat pump itself. Upgrading from a 5kW to a 10kW strip heater kit costs $250–$500 installed and can eliminate those cold spots entirely. This is especially common in homes where the original builder installed the minimum backup capacity to cut costs. A seasoned contractor will perform a Manual J load calculation ($100–$300) to properly size your supplemental heat, which also qualifies for utility rebates in many states.
⚠️ Stop DIY — Call a Pro If You See These
- Compressor cycles on and off every 2–3 minutes (short-cycling) — Short-cycling starves the compressor of oil return, causing bearing wear. Within 4–8 weeks of persistent short-cycling, expect compressor seizure—a $1,800–$3,500 replacement including labor and refrigerant.
- Burning electrical smell from the outdoor unit or air handler — Indicates overheating motor windings, melting wire insulation, or an arcing contactor. Without immediate shutdown, this can escalate to an electrical fire within minutes or cause a compressor burnout that contaminates the entire refrigerant circuit with acid—turning a $300 repair into a $3,000+ system flush and compressor replacement.
- Breaker trips repeatedly when the outdoor unit starts — Usually signals a grounded compressor winding or shorted wiring. Each reset sends a massive inrush current—up to 100+ amps—through potentially damaged wires, increasing fire risk and further damaging the compressor. Stop after one reset and call a technician.
- Visible oil stains on refrigerant line connections or around the service valves — Refrigerant oil travels with the charge, so oil at a fitting means refrigerant is leaking. A system losing 1–2 pounds of R-410A per month will become critically low within 60–90 days, causing compressor overheating and failure. R-410A currently costs $50–$150 per pound for recharge, so a delayed repair compounds in both damage and refrigerant cost.
Frequently Asked Questions
How much does it cost to fix Heat Pump Not Heating?
National average repair cost ranges from $150 to $1,800 depending on the root cause. A clogged filter or tripped breaker costs nothing beyond the service call fee ($75–$150). A failed defrost board runs $200–$450 installed. A bad reversing valve costs $450–$900 with labor and refrigerant recovery. Compressor replacement is the high end at $1,500–$3,500. The two biggest price factors are the age and brand of the unit (proprietary parts for brands like Daikin or Mitsubishi cost more) and whether refrigerant recovery and recharge is required, which adds $200–$600 to any repair involving the sealed system.
Can I fix Heat Pump Not Heating myself?
Yes, for some causes. You can safely replace the air filter, reset breakers, clear ice by switching to emergency heat, clean the outdoor coil, and verify thermostat wiring—these steps resolve about 30–40% of no-heat calls. However, anything involving the refrigerant circuit (charging, leak repair), electrical component replacement inside the unit (capacitors, contactors, compressors), or defrost board diagnosis requires a licensed HVAC technician. Working inside the electrical compartment of a running heat pump exposes you to 240-volt circuits capable of lethal shock. If your DIY steps don't restore heat within an hour, call a professional.
How urgent is Heat Pump Not Heating?
Moderately urgent to very urgent depending on outdoor temperatures. If it is above 40°F outside, you have days to schedule a repair—the home will stay livable with supplemental space heaters. Below 32°F, urgency increases because water pipes in exterior walls and crawlspaces can freeze within 6–12 hours once the home drops below 55°F. Running emergency heat buys you time but at 3–5 times the electricity cost. Below 20°F with no backup heat, treat it as a same-day emergency—most HVAC companies charge $100–$200 extra for after-hours service, but that is far cheaper than a $5,000–$15,000 burst-pipe remediation.
What causes Heat Pump Not Heating?
The three most common causes we see are low refrigerant charge from a slow leak (35% of calls), clogged air filters restricting indoor airflow (25% of calls), and defrost system failures causing the outdoor coil to ice over completely (20% of calls). Less common but significant causes include a stuck reversing valve that keeps the system locked in cooling mode, failed compressor capacitors that prevent startup, and incorrect thermostat settings—particularly homeowners who accidentally leave the system in cooling mode or emergency heat mode without realizing it.
Will homeowners insurance cover Heat Pump Not Heating?
Standard homeowners insurance does not cover mechanical breakdown, wear and tear, or maintenance-related failures—which is what most heat pump repairs are. Insurance will cover heat pump damage caused by a covered peril such as lightning strike, falling tree, or vandalism. If your compressor was destroyed by a documented power surge during a storm, file a claim—replacement costs of $2,000–$3,500 exceed most deductibles. A home warranty plan ($400–$700 per year) does cover mechanical failures and typically caps heat pump repairs at $1,500–$3,000 per claim with a $75–$125 service fee. Check your warranty contract for pre-existing condition exclusions and required maintenance documentation.
How do I find a licensed hvac technician for this?
First, verify the contractor holds a state or local HVAC license—search your state's contractor licensing board website by company name or license number. Second, confirm they carry general liability insurance (minimum $1 million) and workers' compensation coverage; ask for a certificate of insurance and call the insurer to verify it is active. Third, get a written diagnostic quote before work begins—most reputable companies charge a flat $75–$150 diagnostic fee that is often waived if you approve the repair. Fourth, check references and online reviews—look for at least 50 reviews with a 4.0+ rating on Google, and ask for two recent customer references you can call. Avoid any contractor who diagnoses over the phone without seeing the system or pressures you into same-day replacement without a written estimate.
When your heat pump stops heating, the three most important decisions you face are: (1) whether the problem is something you can safely fix yourself—filter changes, thermostat checks, breaker resets, and outdoor coil cleaning resolve roughly 30–40% of no-heat situations at zero or minimal cost; (2) how quickly you need professional help, which depends entirely on your outdoor temperature and whether you have backup heat; and (3) whether the repair makes financial sense versus replacement—if your system is 12+ years old and facing a repair over $1,500, the math typically favors a new, higher-efficiency unit that will pay for itself in energy savings within 5–8 years.
Your recommended next step: run through the five DIY steps outlined above right now. They take 30–45 minutes total and require no special skills. If you still have cool air at the vents after completing them, call a licensed HVAC technician for a diagnostic visit. Have your system's model number ready (printed on the outdoor unit's data plate) so the technician can check parts availability before arriving. In freezing weather, switch to emergency heat immediately to protect your pipes while you arrange service.
Ready to Solve This for Good?
Get matched with pre-screened, licensed hvac technicians in your area. Free quotes, no obligation, no spam.
GET FREE QUOTES NOW