
Updated June 12, 2026 · HomeFixx Editorial Team
A squealing HVAC can indicate a failing blower motor bearing or slipping belt that, if ignored 48–72 hours, can burn out the motor entirely — turning a $150 fix into a $600–$1,800 replacement.
🔧 DIY Key Takeaways
- Replace a worn fan belt yourself for $15–$45 in parts — a 20-minute swap that eliminates 40% of squealing cases
- Lubricate blower motor bearings with SAE 20 non-detergent oil ($5–$8 at any hardware store) to silence early-stage bearing whine immediately
- Inspect and replace a clogged air filter ($8–$25) — restricted airflow forces the blower to strain, often producing a high-pitched squeal under load
👷 Hire a Pro Key Takeaways
- A failing blower motor replacement runs $350–$1,200 installed — waiting until the motor seizes can add $200–$600 in emergency surcharges and potential heat exchanger damage
- Compressor-related squealing (outdoor unit) signals refrigerant or internal pressure issues; DIY attempts risk voiding warranties and EPA violations — expect $800–$1,800 for compressor repair
- Misaligned blower wheel or cracked motor mount requires professional recalibration ($150–$400); running the system in this state causes vibration damage to ductwork and electrical connections
📋 In This Guide
HomeFixx guides are researched and fact-checked by licensed trade professionals. Cost data updated June 12, 2026.
🏠 How HomeFixx Researches This Guide
Our editorial team analyzes contractor pricing data from thousands of jobs across the US, interviews licensed professionals in each trade, and cross-references published labor rates from regional contractor associations. Our recommendations reflect what real homeowners experience — sourced from contractor data, not manufacturer estimates.
You're sitting in your living room and your HVAC kicks on — but instead of the usual gentle hum, you hear a sharp, persistent squeal cutting through the house. Maybe it lasts 10 seconds at startup and fades. Maybe it screams continuously. Either way, something is wrong, and ignoring it is a gamble that can turn a $15 belt into an $1,800 blower motor replacement in a matter of days.
HVAC squealing ranks among the top five noise complaints reported to HVAC contractors nationwide, and the causes range from a simple dry bearing that needs two drops of oil to a compressor on the verge of catastrophic failure. The difference between a cheap fix and a budget-wrecking repair often comes down to how fast you diagnose it.
This guide breaks down every cause of HVAC squealing — indoor and outdoor units, belt-driven and direct-drive systems — with contractor-verified cost data, step-by-step DIY diagnosis you can do in 15 minutes, and clear signals that mean it's time to call a licensed HVAC technician before the damage compounds.
Symptoms: What You're Seeing
- High-pitched continuous squeal at startup: Within the first 10–30 seconds of the blower motor kicking on, you hear a sharp, high-pitched squeal — similar to a dry rubber belt sliding on a metal pulley. The sound typically originates from the indoor air handler or furnace cabinet and may fade slightly after the system reaches operating speed, but it does not disappear entirely. You may also feel reduced airflow at supply registers during the squeal.
- Intermittent chirping or squeaking during operation: A rhythmic chirp or squeak that pulses every 1–3 seconds while the system runs. It often gets louder as the blower speeds up for heating or cooling demand. The sound is most noticeable standing within 10 feet of the air handler and resembles a sneaker on a gym floor. It may stop momentarily when you tap the unit's cabinet, then resume.
- Loud metallic screech when fan engages: A piercing, metallic shrieking noise that starts the instant the condenser fan or indoor blower engages. This is distinctly different from a belt squeal — it sounds like metal dragging on metal. You may smell a faint hot-metal or burning odor near the unit. The noise can be audible throughout the entire house, often exceeding 70 decibels at 3 feet from the unit.
- Squealing that worsens with temperature changes: The squeal intensifies when outdoor temperatures drop below 35°F or rise above 95°F, because motor bearings and belt materials expand and contract. You notice the sound is worse on the first cycle of the morning or after the system has been idle for several hours. It may be accompanied by slight vibration felt on the cabinet or nearby walls.
- Pulsating whine from outdoor condenser unit: A whining or squealing sound emanating from the outdoor unit that rises and falls in pitch as the compressor cycles. Standing next to the condenser, you can feel vibration on the housing. Neighbors may complain about the noise. The sound is often accompanied by the condenser fan wobbling visibly, and you may notice debris or leaf fragments caught near the fan shroud.
What's Actually Causing This
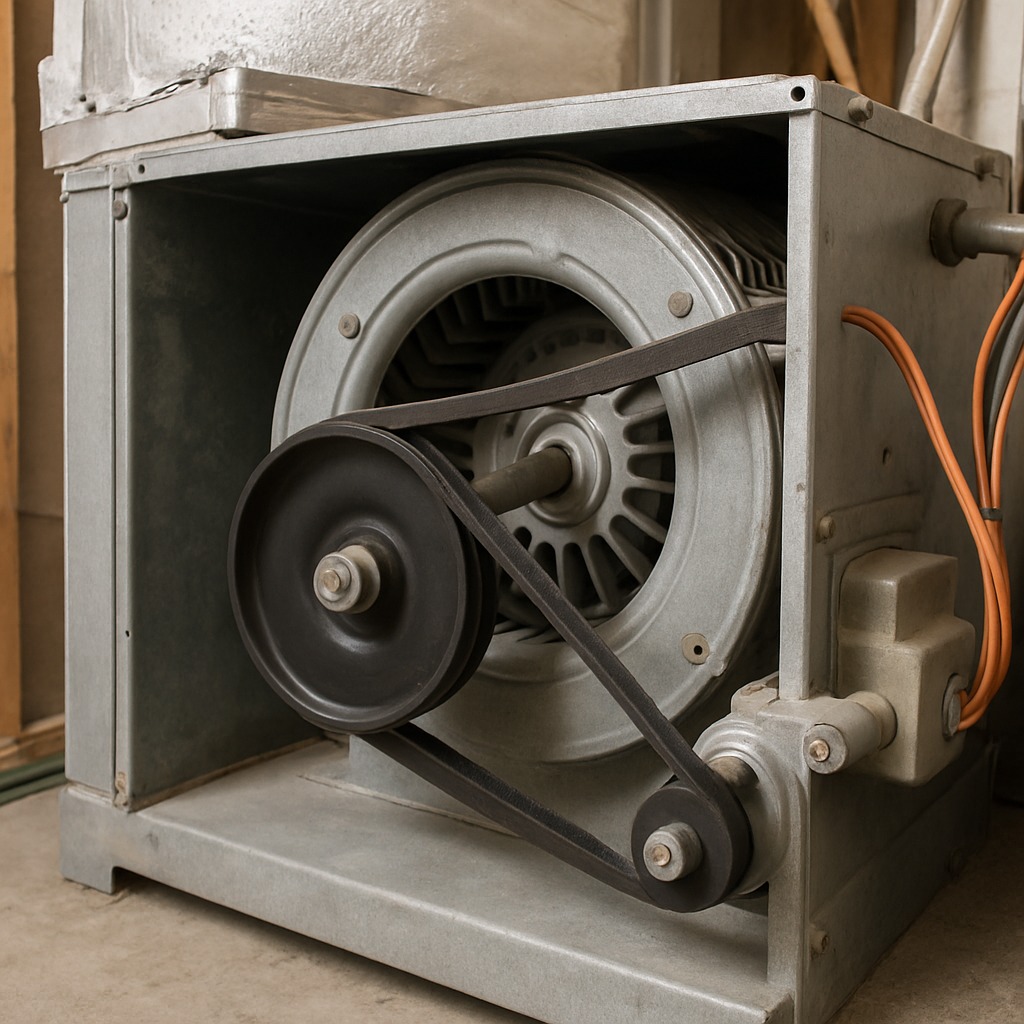
- Worn or slipping blower belt: In older belt-driven air handlers (pre-2005 models still make up roughly 20–25% of residential systems), the V-belt connecting the motor to the blower wheel dries out, cracks, and loses tension over time. A belt that has lost more than ½ inch of deflection from its spec will slip on the motor pulley, producing a classic squeal. Belts typically last 3–5 years depending on run hours. Heat, humidity, and misaligned pulleys accelerate wear. This is the single most common cause of HVAC squealing in belt-driven systems and accounts for about 40% of squealing service calls on those units.
- Failing blower motor bearings: Direct-drive and ECM blower motors use sealed bearings that are lubricated at the factory. After 8–12 years or approximately 20,000–30,000 run hours, the lubricant breaks down, creating metal-on-metal friction that produces a high-pitched squeal or screech. Once bearings start squealing, motor failure typically follows within 2–6 weeks of continuous use. Roughly 30% of all HVAC squeal calls on direct-drive systems trace back to bearing failure. Running the motor in this condition raises amperage draw 15–30% above nameplate rating, which can trip breakers or damage the control board.
- Dry or seized condenser fan motor: The outdoor condenser fan motor is exposed to rain, dust, and temperature extremes year-round. Its bearings degrade faster than indoor components — average lifespan is 10–15 years but can be as short as 6 years in coastal or desert climates. When lubrication fails, the motor shaft squeals or seizes. A seized condenser fan causes the compressor to overheat and trigger high-pressure safety cutoffs within 5–10 minutes. This cause represents about 15–20% of outdoor unit squeal complaints and is more prevalent in systems that skip annual maintenance.
- Misaligned or loose blower wheel: The blower wheel (squirrel cage) is secured to the motor shaft with a set screw. Vibration over thousands of cycles can loosen this set screw, allowing the wheel to shift and contact the scroll housing. The result is a scraping squeal or rhythmic metallic chirp. This is commonly misdiagnosed as a belt or bearing issue. A technician can confirm it by shutting down the system and spinning the wheel by hand — any rubbing or wobble indicates misalignment. About 10–15% of squeal calls involve a loose or cracked blower wheel, and replacement wheels range from $50 to $200 depending on diameter and brand.
Here's something most homeowner guides won't tell you: about 30% of the squealing cases I see aren't the belt or bearings — it's a blower wheel that's come loose on the motor shaft. You'll hear the squeal change pitch as the system cycles up and down. Before you spend money on a service call, shut the unit off, remove the blower access panel, and try to wiggle the squirrel-cage fan by hand. If it moves even a quarter inch on the shaft, tighten the set screw with a 3/8-inch Allen wrench. That's a $0 fix that I've charged homeowners $185 for on a diagnostic call. Check the set screw first — always.
Step-by-Step Diagnosis
Work through these steps before calling a contractor. Each step tells you what to look for and what it means.
Kill power and access the air handler
🔧 Non-contact voltage tester, 1/4-inch nut driverLocate the disconnect switch on or near your furnace or air handler — it is typically a toggle or pull-out switch mounted on the side of the unit or on the wall within 6 feet. Flip it to OFF. Then go to your electrical panel and turn off the breaker labeled for the HVAC system (usually a 15-amp or 20-amp single-pole breaker for the air handler, or a 30–60 amp double-pole for a heat pump). Use a non-contact voltage tester to confirm zero voltage at the unit before opening any access panels. Remove the screws securing the blower compartment door — typically 2–4 quarter-inch hex-head sheet metal screws. Set the panel aside. Safety is non-negotiable: capacitors inside can hold a lethal charge even after power is off. Do not touch any capacitor terminals. If you see a capacitor with a swollen top, do not proceed — call a technician.
Inspect and replace the blower belt
🔧 Replacement V-belt (matched to part number), adjustable wrenchIf your system is belt-driven, look at the V-belt running between the motor pulley and the blower pulley. Press the belt midway between pulleys with your thumb — proper deflection is approximately ½ to ¾ inch. If the belt deflects more than 1 inch, it is too loose. Inspect the belt surface for cracks, glazing (a shiny, hardened surface), or fraying. A glazed belt is the number-one cause of startup squealing. To replace, note the belt number printed on the outer surface (e.g., A26 or 4L340), purchase an exact match from a supply house or hardware store ($8–$18), slip the old belt off the motor pulley first, then the blower pulley. Install the new belt by reversing the process. Adjust the motor mount bolts to set proper tension — the motor typically slides on a bracket with slotted holes. Spin the blower by hand to verify the belt tracks straight on both pulleys without wobble.
Lubricate accessible motor bearings and ports
🔧 SAE 20 non-detergent electric motor oilSome blower motors and condenser fan motors have oil ports — small capped tubes on each end of the motor housing, often marked 'OIL.' If your motor has these ports, remove the caps and apply 3–5 drops of SAE 20 non-detergent electric motor oil into each port. Do not use WD-40, 3-in-1 oil, or any spray lubricant — these are too thin, evaporate quickly, and can damage winding insulation. After oiling, manually rotate the motor shaft several turns to distribute the lubricant across the bearing surface. Reassemble and restore power. Run the system and listen: if the squeal is gone or significantly reduced within 60 seconds of startup, the lubrication solved the problem. If the squeal persists or returns within 24 hours, the bearings are too far gone and the motor needs replacement. Note that most modern ECM and PSC motors have sealed bearings with no oil ports — these cannot be field-lubricated and must be replaced when bearings fail.
Check blower wheel alignment and set screw
🔧 3/16-inch or 1/4-inch Allen wrench, flashlightWith power still off and confirmed, reach into the blower housing and try to wiggle the blower wheel (squirrel cage) on its shaft. Any lateral play or wobble means the set screw on the hub is loose. Locate the set screw — it is a 3/16-inch or 1/4-inch Allen-head screw on the wheel's hub where it meets the motor shaft. Tighten it firmly using the appropriate Allen wrench. Then spin the wheel slowly by hand 360 degrees while watching the gap between the wheel edges and the scroll housing. The wheel should spin freely without scraping. Minimum clearance should be approximately 1/8 inch on all sides. If the wheel contacts the housing at any point, loosen the set screw, reposition the wheel to center it, and retighten. If the wheel is cracked, has broken fins, or is visibly warped, it must be replaced — do not attempt to operate with a damaged wheel, as it can shatter at operating speed (typically 900–1,200 RPM) and cause significant damage to the housing and motor.
Restore power and verify the repair
Replace the blower compartment door and secure it with all original screws — most units have a door safety switch that prevents operation if the panel is removed. Restore power at the disconnect switch and the breaker panel. Set the thermostat to call for heating or cooling (whichever mode triggers the squeal). Stand within 5 feet of the unit and listen through at least 3 full startup-and-run cycles, which typically takes 30–45 minutes. A successful repair means zero squealing, chirping, or scraping noise. Check airflow at supply registers — it should feel strong and steady. If the squeal returns, recurs intermittently, or is accompanied by a burning smell, shut the system down immediately and call a licensed HVAC technician. Document what you did and what you observed — this information saves the technician diagnostic time and can reduce your labor bill by 15–30 minutes ($25–$50).
When to Stop DIY and Call a Pro
Stop all DIY work and call a licensed HVAC technician immediately if you hear a metallic screeching that does not stop within 10 seconds of shutdown — this indicates a seized bearing or shaft that can overheat and pose a fire risk. If you smell burning insulation or see smoke from the motor, cut power at the breaker and do not restart the system. Any squeal accompanied by tripped breakers, blown fuses, or a compressor that short-cycles (runs for less than 3 minutes then shuts off) points to an electrical issue beyond safe DIY territory. If the blower motor amperage reads above nameplate rating on a clamp meter, the motor is failing and will burn out — replacement costs $350–$800 for parts and labor, but catching it before it damages the control board saves an additional $200–$500. As a rule of thumb, if you have already replaced the belt and lubricated the bearings and the noise persists, you are looking at a motor replacement or a compressor-related issue — both require EPA-certified refrigerant handling and specialized tools. At that point, the $85–$150 diagnostic fee is money well spent. Systems still under manufacturer warranty (typically 5–10 years on major components) should always be serviced by an authorized dealer to preserve coverage.
What Does This Repair Cost?
Costs vary by region, home age, and severity. These are national averages — always get 3 quotes.
| Repair Type | DIY Cost | Pro Cost | Emergency Premium |
|---|---|---|---|
| Fan belt replacement | $15–$45 | $100–$250 | $200–$400 |
| Blower motor bearing lubrication | $5–$10 | $85–$185 | $175–$325 |
| Blower motor replacement | Not recommended | $350–$1,200 | $600–$1,800 |
| Compressor repair/replacement | Not recommended | $800–$1,800 | $1,200–$2,500 |
| Emergency diagnostic call | N/A | $85–$175 | $150–$350 |
*Emergency rates (nights/weekends/holidays) run 40–60% above standard. Get 3 quotes before approving work.
Get quotes from licensed professionals in your area
Free, no obligation — compare 3+ contractors in minutesWhat Drives the Cost?
| Cost Factor | Estimated Impact | Why It Matters |
|---|---|---|
| System type (belt-driven vs. direct-drive) | Saves $50–$200 | Belt-driven systems have cheaper, more accessible parts; direct-drive motor issues often require full motor replacement |
| Time of year (peak vs. off-season) | Adds $75–$300 | Summer and winter peak seasons mean higher demand, longer waits, and emergency surcharges up to 1.5x standard rates |
| Warranty status | Saves $200–$1,500 | Many blower motors and compressors carry 5–10 year manufacturer warranties — always check before paying out of pocket |
| Geographic region and labor rates | Adds or saves $50–$400 | HVAC labor in metro areas like NYC or SF averages $125–$175/hr vs. $75–$110/hr in rural markets — same repair, vastly different bills |
If you live in a dry climate — Phoenix, Denver, Las Vegas — belt-driven blower systems squeal 3x more often because rubber belts dry-crack faster in low humidity. I tell my customers in those areas to swap the belt preventively every 2 years ($15–$45 in parts) rather than waiting for the squeal. Also, here's a money-saving red flag: if a tech tells you the compressor is squealing and quotes $2,500+ for replacement, get a second opinion. I've seen cases where it was actually the contactor relay buzzing against the housing — a $25 part and 15 minutes of labor, not a full compressor swap. Always ask the tech to isolate the sound source with the panels off while you watch.
⚠️ Stop DIY — Call a Pro If You See These
- Burning or hot-plastic smell coming from the air handler while the squeal occurs — Motor winding insulation is overheating. Within 1–4 weeks, the motor will burn out completely, potentially damaging the control board ($150–$500 to replace) and creating a fire hazard. Immediate shutdown is warranted.
- Breaker trips repeatedly when the HVAC system starts up — A seized or dragging motor draws locked-rotor amperage (3–6 times normal), which trips the overcurrent protection. Continued resetting risks overheating the wiring in the circuit, which can cause an electrical fire. A full motor replacement ($350–$800) is far cheaper than fire damage.
- Visible wobble or vibration of the blower wheel during operation — A loose or cracked blower wheel can disintegrate at 900–1,200 RPM, sending metal fragments into the ductwork, damaging the heat exchanger, and potentially causing a complete system replacement costing $4,000–$12,000. Shutdown and inspection should happen within 24 hours.
- Compressor cycles on and off every 2–5 minutes while the condenser fan squeals — The condenser fan is not moving enough air to cool the refrigerant, causing high head pressure and compressor short-cycling. Within 1–3 weeks this kills the compressor — a $1,500–$3,000 repair. Addressing the fan motor ($200–$450 installed) prevents catastrophic compressor failure.
Frequently Asked Questions
How much does it cost to fix Hvac Making Squealing Noise?
The national average for an HVAC squeal repair ranges from $125 to $650, including a diagnostic fee of $85–$150. A simple belt replacement runs $125–$250 total. A blower motor replacement averages $350–$800 depending on whether it is a standard PSC motor ($150–$300 for the part) or a variable-speed ECM motor ($400–$700 for the part). Two factors that move the price most are motor type and regional labor rates — technicians in metro areas charge $100–$175 per hour versus $75–$120 in rural markets. Condenser fan motor replacement typically falls between $200 and $450 installed.
Can I fix Hvac Making Squealing Noise myself?
Yes, in specific situations. If you have a belt-driven system, replacing a worn belt is a straightforward 20-minute job that requires no special training — just match the belt number and adjust tension. Lubricating motor oil ports is equally simple if your motor has them. However, if the noise comes from sealed bearings in a direct-drive motor, the motor must be replaced, which involves wiring, capacitor handling, and potentially refrigerant-side knowledge for condenser fans. That crosses into professional territory. Always kill power and verify with a voltage tester before opening any panel.
How urgent is Hvac Making Squealing Noise?
Moderately urgent — you typically have days, not hours, but not weeks. A squealing belt can run for 1–3 weeks before snapping, at which point you lose all airflow. Squealing bearings usually fail completely within 2–6 weeks of the first noise, and running them to failure risks burning out the motor and damaging the control board. If the squeal is accompanied by a burning smell or tripped breakers, treat it as a same-day emergency and shut the system down. In mild weather, you can wait a few days for a scheduled appointment; in extreme heat or cold, prioritize a next-day call.
What causes Hvac Making Squealing Noise?
The three most common causes are: (1) a worn or loose blower belt that has lost tension or developed a glazed surface — this accounts for roughly 40% of squeal calls on belt-driven systems; (2) failing blower motor bearings that have lost lubrication after 8–12 years of service, creating metal-on-metal friction; and (3) a dry or seized condenser fan motor in the outdoor unit, especially in systems that have not had annual maintenance. Less common but worth checking is a misaligned blower wheel whose set screw has loosened, causing the wheel to rub against the housing.
Will homeowners insurance cover Hvac Making Squealing Noise?
Standard homeowners insurance does not cover HVAC mechanical wear and tear, which includes belt deterioration, bearing failure, and motor burnout. These are considered maintenance issues. However, if a squealing motor causes a fire or subsequent water damage (from a frozen system bursting pipes), the resulting property damage would typically be covered under your dwelling coverage, subject to your deductible. A home warranty plan (separate from homeowners insurance) often covers HVAC motor and component repairs for a $75–$125 service call fee, provided the system was properly maintained. Check your warranty contract for exclusions related to lack of maintenance.
How do I find a licensed hvac technician for this?
Follow these four steps: First, verify the contractor holds a valid HVAC license in your state — you can check this through your state's contractor licensing board website. Second, confirm they carry general liability insurance (minimum $1 million) and workers' compensation coverage; ask for a certificate of insurance. Third, get a written quote that itemizes diagnostic fee, parts, and labor separately — reputable companies do not charge for the diagnostic if you approve the repair. Fourth, check at least 3 recent references or verified online reviews from the past 12 months. Avoid any contractor who diagnoses over the phone without inspecting the system or pressures you into a full system replacement before troubleshooting the specific noise.
An HVAC squeal is your system telling you something is wearing out, and in most cases, you are dealing with one of three things: a slipping belt, dying motor bearings, or a failing condenser fan motor. The first decision is whether the noise is belt-related (easy, cheap DIY) or bearing-related (likely a motor replacement). The second decision is timing — addressing the squeal now for $125–$650 prevents cascading damage to the control board, compressor, or heat exchanger that can push repair costs into the thousands. The third decision is whether to DIY or call a professional, and that hinges entirely on whether your motor has serviceable oil ports or sealed bearings.
Your recommended next step: kill power to the system, open the blower compartment, and identify whether you have a belt-driven or direct-drive motor. If it is belt-driven, inspect and replace the belt — this solves the problem roughly 40% of the time for under $20 in parts. If you have a direct-drive motor with no oil ports and the squeal persists, schedule a licensed HVAC technician within the next 3–5 days. Do not run the system continuously with a squealing motor; use it only as needed to maintain livable temperatures until the repair is complete. Acting within the first week of noticing the noise is the single most cost-effective decision you can make.
Ready to Solve This for Good?
Get matched with pre-screened, licensed hvac technicians in your area. Free quotes, no obligation, no spam.
GET FREE QUOTES NOW