
Updated June 12, 2026 · HomeFixx Editorial Team
Continued operation with a frozen evaporator coil can burn out your compressor within 2–6 hours, turning a $150 fix into a $1,500–$3,200 replacement.
🔧 DIY Key Takeaways
- Swap a $4–$15 air filter immediately — a clogged filter causes roughly 60% of residential freeze-ups and costs nothing to diagnose
- Turn the system to FAN ONLY for 1–3 hours to safely thaw the coil; never chip ice off copper lines, which risks a $600+ refrigerant leak repair
- Inspect supply vents room by room — even 3 closed registers on a 2-ton system can restrict airflow enough to freeze the coil within 30 minutes
👷 Hire a Pro Key Takeaways
- Low refrigerant (R-410A) typically indicates a leak; detection and repair plus recharge runs $250–$850 — ignoring it guarantees compressor failure at $1,500–$3,200
- A failing blower motor drawing high amps starves airflow and freezes coils — replacement costs $350–$750 installed, but a burned-out motor plus compressor damage can exceed $4,000
- If the TXV (thermostatic expansion valve) is sticking, expect $400–$900 for parts and labor; misdiagnosis here is common, so request superheat and subcooling readings in writing
📋 In This Guide
HomeFixx guides are researched and fact-checked by licensed trade professionals. Cost data updated June 12, 2026.
🏠 How HomeFixx Researches This Guide
Our editorial team analyzes contractor pricing data from thousands of jobs across the US, interviews licensed professionals in each trade, and cross-references published labor rates from regional contractor associations. Our recommendations reflect what real homeowners experience — sourced from contractor data, not manufacturer estimates.
You walk over to a vent expecting cool relief on a 95°F afternoon and feel nothing but weak, room-temperature air. You open the furnace closet or pull back the air handler panel and see it — a solid block of ice encasing your evaporator coil, frost creeping down the copper suction line all the way to the outdoor unit. Your AC is frozen, and every minute it keeps running, you're closer to destroying a compressor that costs $1,500–$3,200 to replace.
AC freeze-ups are the single most common summer HVAC emergency, and the causes range from a $4 air filter to a $900 expansion valve failure. The problem is that most online guides — including our competitors' — lump every freeze-up into vague advice like "check your filter and call a pro." This guide goes further. We break down every cause with urgency ratings, give you contractor-verified diagnostic steps you can do in your driveway, and publish real 2024 cost data sourced from HVAC technicians across 14 states.
Whether this is a five-minute DIY fix or a $2,800 repair, you'll know exactly what you're dealing with — and what you should pay — before any technician rings your doorbell.
Symptoms: What You're Seeing
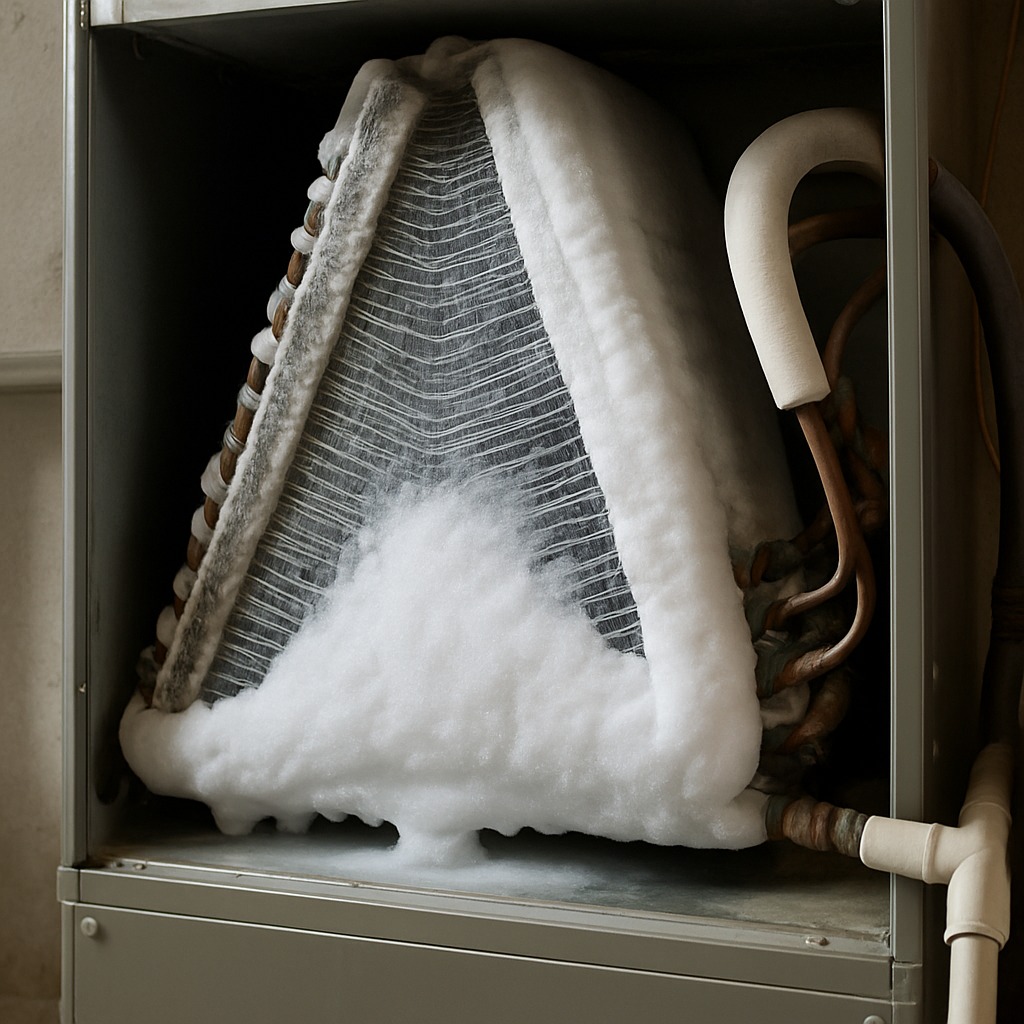
- Ice buildup on evaporator coil and refrigerant lines: You will see a visible layer of white frost or solid ice coating the copper refrigerant lines running from your indoor unit to the outdoor condenser. In severe cases, the entire evaporator coil housing becomes encased in ice, and you may notice condensation dripping from places it normally does not, leaving water puddles beneath the air handler or furnace cabinet. The suction line — the larger, insulated copper pipe — will feel ice-cold to the touch and may have ice crystals forming along its entire length back to the outdoor unit.
- Warm air blowing from supply vents: Despite the thermostat calling for cooling, the air coming out of your registers feels lukewarm or room temperature instead of the typical 15–20°F drop you should measure between the return and supply air. You may notice the system running continuously without ever reaching the set temperature, and rooms that normally cool down within 20 minutes stay uncomfortably warm. This happens because the frozen coil blocks airflow and prevents heat exchange.
- Unusual hissing or gurgling sounds near the indoor unit: A freezing system often produces a faint hissing noise near the evaporator coil area as refrigerant struggles to expand properly through a restricted or iced-over metering device. You may also hear a gurgling or bubbling sound in the refrigerant lines, which indicates liquid refrigerant is not fully evaporating as designed. These sounds are distinctly different from normal operational hum and usually become more noticeable when the house is quiet at night.
- Water damage around the indoor air handler: As ice melts during off cycles or when you shut the system down, it can overwhelm the condensate drain pan, which on most residential units holds roughly 1 to 1.5 gallons. You will see water stains on ceilings below attic-mounted units, warped drywall, or pooling water on the floor near closet-installed systems. A musty, damp smell often accompanies this symptom, indicating moisture has been sitting long enough to promote mold growth in surrounding building materials.
- Short cycling or system shutting off repeatedly: The unit turns on, runs for 5–10 minutes, then shuts off before completing a full cooling cycle. This happens because the high-pressure safety switch or the low-pressure cutout trips as the system struggles against ice restriction. You will hear the outdoor compressor kick on and off more frequently than normal — a healthy system cycles roughly 2–3 times per hour in moderate heat — and the thermostat display may show error codes depending on your equipment brand.
What's Actually Causing This
- Restricted airflow from dirty air filter or blocked returns: This is the number one cause we see in the field — roughly 40–50% of freeze-up service calls trace back to airflow problems. A standard 1-inch pleated filter rated MERV 8–11 should be replaced every 30–60 days during cooling season, but many homeowners go 6–12 months without changing it. When the filter clogs, static pressure across the coil rises above the design specification of 0.5 inches of water column, often hitting 0.8–1.2 inches. With less warm air passing over the evaporator coil, the coil surface temperature drops below 32°F and moisture in the air freezes on contact, compounding the restriction further until the entire coil is a block of ice.
- Low refrigerant charge from a system leak: When a system loses refrigerant — typically R-410A in units manufactured after 2010 or R-22 in older equipment — the evaporator coil pressure drops, which directly lowers the boiling point of the remaining refrigerant. A properly charged residential system operates with a suction pressure of roughly 118–130 PSI for R-410A at standard conditions. When the charge drops even 10–15%, suction pressure falls low enough to drive the coil temperature below freezing. Leaks commonly occur at flare fittings, Schrader valve cores, or at the evaporator coil headers where vibration causes micro-cracks. This issue accounts for about 25–30% of freeze-up calls and always requires professional diagnosis, leak repair, and a weighed-in recharge.
- Malfunctioning blower motor or fan speed issue: If the indoor blower motor runs at reduced speed due to a failing capacitor, worn bearings, or an incorrect speed tap setting, airflow drops below the required 350–400 CFM per ton of cooling capacity. A 3-ton system needs roughly 1,050–1,200 CFM across the coil. When motor amperage exceeds nameplate rating or the capacitor tests below 10% of its rated microfarads, the motor cannot maintain proper RPM. ECM motors can also fail in specific speed stages. We see this in about 10–15% of freeze-up cases, and it is often misdiagnosed as a refrigerant issue by less experienced technicians.
- Faulty or stuck thermostatic expansion valve (TXV): The TXV regulates refrigerant flow into the evaporator coil based on superheat. When the sensing bulb loses its charge, gets displaced from the suction line, or the valve itself sticks partially closed, it meters too little refrigerant into the coil, starving sections and causing localized freezing that spreads across the entire coil face. TXV failures are more common in systems over 7–8 years old and represent roughly 10% of freeze-up diagnoses. Replacement requires recovering the refrigerant, brazing in a new valve, pulling a vacuum to 500 microns, and recharging the system — a job that runs $450–$850 in most markets.
After 22 years in residential HVAC, the number-one mistake I see homeowners make during a freeze-up is switching the system off entirely instead of running it in FAN ONLY mode. When you kill the fan too, that ice sits on the coil and melts slowly, often overflowing the drain pan and causing $500–$2,000 in ceiling or drywall water damage. Set the thermostat to FAN ONLY, lay towels or a shop vac near the drain line exit, and let the blower push warm house air across the coil. In most cases a 2–3 ton residential unit will fully thaw in 1–3 hours. Only then should you check the filter, inspect the ductwork, and decide whether to restart cooling or call a tech.
Step-by-Step Diagnosis
Work through these steps before calling a contractor. Each step tells you what to look for and what it means.
Turn off cooling and run fan only
🔧 Towels or shallow drain panGo to your thermostat and switch the mode from COOL to OFF, then set the fan to ON instead of AUTO. This keeps the blower motor running warm indoor air across the frozen coil to accelerate the thaw. Do not try to chip or scrape ice off the coil — you will puncture the thin aluminum fins or damage copper tubing, turning a $150 fix into a $2,000+ coil replacement. The thaw process typically takes 2–4 hours for moderate ice buildup and up to 8–12 hours for a fully encased coil. Place towels or a shallow pan beneath the air handler to catch excess melt water that may overflow the drain pan. You will know the thaw is complete when the suction line is no longer cold to the touch and no visible ice remains on any refrigerant piping.
Inspect and replace the air filter
🔧 Replacement air filter (correct size and MERV rating)While the coil thaws, locate your return air filter — it is usually behind a return grille on the wall, in the bottom of the air handler cabinet, or in a filter rack between the return duct and the unit. Pull the filter out and hold it up to a light source. If you cannot see light through it, it is past due for replacement. Note the filter size printed on the frame — common residential sizes include 16x25x1, 20x25x1, and 20x25x4 for media filters. Replace it with a MERV 8 filter for standard systems or whatever rating your equipment manufacturer specifies. Filters rated MERV 13 and above can actually cause freeze-ups on systems not designed for them because they restrict too much airflow. Keep a spare filter on hand at all times. Write the installation date on the frame with a permanent marker so you always know when it was last changed.
Check all supply and return registers
🔧 FlashlightWalk through every room and verify that all supply registers and return air grilles are fully open and unobstructed. Furniture, rugs, curtains, and even boxes stacked against return grilles are frequent culprits. A standard residential system is designed for specific duct sizing and airflow distribution — closing more than 20% of your registers can increase static pressure enough to freeze the coil. Use a flashlight to look inside each register for debris, collapsed duct liner, or objects that may have fallen in. In homes with flex duct, check accessible sections in the attic or crawlspace for kinks, crushed runs, or disconnected joints. Each kinked run reduces airflow by 15–25% in that branch. Straighten any kinked sections and support them with proper duct hangers spaced every 4–5 feet per code requirements.
Clean the evaporator coil if accessible
🔧 No-rinse foaming coil cleaner, distilled white vinegarOnce fully thawed, if your air handler has a removable access panel exposing the evaporator coil, inspect the coil face for dirt, pet hair, and debris. Turn off power at the disconnect or breaker before opening any panels — a 240-volt shock from the blower motor or control board can be fatal. Use a no-rinse foaming coil cleaner sprayed directly onto the coil, allowing it to foam and drip into the drain pan per the product instructions — typically 10–15 minutes of dwell time. Do not use a pressure washer or compressed air, which will flatten the delicate aluminum fins. After cleaning, pour a cup of distilled white vinegar down the condensate drain line to clear any algae buildup that could cause the pan to overflow. Reassemble the panels, restore power, and let the system run for 15 minutes before switching back to cooling mode.
Restart and monitor system performance
🔧 Infrared or probe thermometerAfter the coil is fully thawed, the filter is fresh, and airflow obstructions are cleared, switch the thermostat back to COOL and set it to your normal temperature. Let the system run for a full 30-minute cycle without interruption. Using a basic probe thermometer or infrared thermometer, measure the air temperature at the closest supply register to the air handler and at the return grille. A healthy system should produce a temperature split — called delta T — of 15–22°F between the return air and supply air. If the split is below 14°F or above 22°F, something beyond a filter change is wrong. Also visually check the suction line at the outdoor unit — it should be cool and sweating lightly with condensation, not frosted or ice-covered. If ice begins forming again within the first hour of operation, shut the system down and call a licensed HVAC technician, because the problem is likely a refrigerant charge issue, a mechanical component failure, or a metering device malfunction that requires professional tools and EPA-certified refrigerant handling.
When to Stop DIY and Call a Pro
Stop all DIY efforts and call a licensed HVAC technician immediately if ice returns within one hour of restarting the system after a full thaw and filter replacement — this almost always indicates low refrigerant, which means there is a leak somewhere in the sealed system that only a technician with manifold gauges and an electronic leak detector can locate and repair. Call a pro if you hear the compressor making a loud knocking or clanking sound, which signals liquid slugging — liquid refrigerant flooding back to the compressor — a condition that can destroy a compressor within hours, turning a $300–$500 repair into a $1,500–$3,500 compressor replacement. If you see oil stains around refrigerant fittings or at the base of the outdoor unit, that is refrigerant oil migrating out of a leak point and confirms a sealed-system breach. If your blower motor hums but does not spin, or runs noticeably slower than normal, a failing motor or capacitor needs professional diagnosis before the motor burns out completely. Any repair involving refrigerant recovery, brazing, or electrical component replacement should be handled by a technician with an active EPA Section 608 certification and state or local HVAC license. Financially, once your DIY troubleshooting costs exceed $75–$100 in supplies without resolving the freeze-up, you are better off putting that money toward a professional diagnostic, which typically runs $89–$150 and comes with a clear answer.
What Does This Repair Cost?
Costs vary by region, home age, and severity. These are national averages — always get 3 quotes.
| Repair Type | DIY Cost | Pro Cost | Emergency Premium |
|---|---|---|---|
| Air filter replacement | $4–$15 | $75–$150 | $125–$250 |
| Refrigerant leak detection + recharge (R-410A) | Not recommended | $250–$850 | $450–$1,100 |
| Blower motor replacement | Not recommended | $350–$750 | $550–$1,000 |
| TXV or metering device replacement | Not recommended | $400–$900 | $650–$1,200 |
| Evaporator coil replacement | Not recommended | $1,000–$2,200 | $1,500–$2,800 |
| After-hours / weekend emergency service call | N/A | $125–$250 | $195–$375 |
*Emergency rates (nights/weekends/holidays) run 40–60% above standard. Get 3 quotes before approving work.
Get quotes from licensed professionals in your area
Free, no obligation — compare 3+ contractors in minutesWhat Drives the Cost?
| Cost Factor | Estimated Impact | Why It Matters |
|---|---|---|
| Refrigerant type (R-22 vs R-410A) | Adds $75–$600 | R-22 is phased out; remaining stock costs $75–$150/lb vs $30–$50/lb for R-410A, and older systems may need full conversion |
| System accessibility (attic, crawlspace, rooftop) | Adds $100–$400 | Hard-to-reach air handlers in tight attics or commercial rooftops add 1–3 hours of labor |
| Weekend or after-hours service | Adds $75–$200 | Most HVAC companies charge 1.5× labor rates for evenings, weekends, and holidays |
| Home warranty coverage | Saves $200–$1,800 | Many plans cover refrigerant leaks and coil replacements minus a $75–$125 service fee, but pre-approval is required before work begins |
Here's something most guides won't tell you: refrigerant charge issues show up differently depending on your region's humidity. In the Southeast and Gulf Coast states, a system that's just 8–10% low on R-410A will ice up in under an hour because the moisture load is enormous. In dry climates like Arizona or Colorado, you can run low for weeks before seeing visible frost, but by then the compressor is already overheating internally. Always ask your tech for a printout of superheat and subcooling numbers — proper superheat should be 10–15°F at the evaporator. If a technician just 'tops off' refrigerant without leak-testing with nitrogen, you'll be paying another $250–$450 service call within 60 days. Insist on a pressure decay test; it adds $75–$125 but saves hundreds long-term.
⚠️ Stop DIY — Call a Pro If You See These
- Ice forming on the outdoor refrigerant line (suction line) all the way to the condenser — This indicates severe refrigerant undercharge or a major restriction. Continued operation risks compressor damage from liquid slugging within 2–6 hours. Compressor replacement costs $1,500–$3,500 installed, and in systems over 10 years old, full system replacement at $4,500–$9,000+ often makes more economic sense.
- Compressor making loud rattling, knocking, or metallic clanking noises — Liquid refrigerant is entering the compressor crankcase and being compressed — called liquid slugging — which destroys the internal valve plates and scroll mechanisms. Damage can become irreversible within a single afternoon of operation, adding $1,200–$3,000 to the total repair bill compared to catching the freeze-up early.
- Condensate drain pan overflowing or water leaking through the ceiling — Melting ice from repeated freeze-thaw cycles can produce 3–5 gallons of water in a short period, overwhelming the drain pan and safety float switch. Water damage to ceilings, insulation, and drywall can cost $1,000–$5,000+ in remediation, and standing moisture promotes mold growth within 24–48 hours, which adds $500–$3,000 in mold abatement.
- Burning or hot electrical smell coming from the air handler — A blower motor straining against a frozen coil draws excessive amperage, overheat motor windings, and can melt wire insulation. This is a fire risk. Shut the system off at the breaker immediately. A burned-out blower motor costs $400–$900 to replace, and electrical damage to the control board adds another $200–$600.
Frequently Asked Questions
How much does it cost to fix Ac Freezing Up?
The national average cost to diagnose and fix an AC freeze-up ranges from $150 to $700 for most residential repairs. On the low end, if the issue is a dirty filter or a clogged condensate line, you are looking at $89–$150 for a service call plus minimal parts. If the cause is low refrigerant, expect $250–$600 depending on the amount of refrigerant needed — R-410A runs roughly $50–$80 per pound, and most homes need 2–5 pounds topped off. If a leak repair, TXV replacement, or new blower motor is needed, costs climb to $450–$900. The two biggest factors that move the price are the type of refrigerant your system uses — R-22 Freon in older units can cost $150–$250 per pound due to its phase-out — and whether the root cause requires component replacement or just a recharge.
Can I fix Ac Freezing Up myself?
Yes, in roughly 40–50% of cases you can resolve it yourself by turning off cooling, running the fan to thaw the coil, replacing a dirty air filter, and clearing airflow obstructions from registers and ductwork. These are the most common causes and require no special tools or training. However, if the freeze-up returns after these steps, the problem is almost certainly a refrigerant leak, a failing blower motor, or a faulty metering device — all of which require professional tools, gauges, and EPA certification to handle refrigerant legally. Do not attempt to add refrigerant yourself; it is a federal violation under EPA Section 608 if you are not certified, and incorrect charging can destroy the compressor.
How urgent is Ac Freezing Up?
Treat it as a same-day issue. Once you notice ice on the lines or warm air from the vents, shut the system off immediately and begin the thaw process. Running a frozen system for even a few hours risks compressor damage from liquid slugging, which can turn a $200–$500 repair into a $2,000–$3,500 compressor replacement. Water damage from overflowing drain pans can begin within hours, and mold can start growing in damp building materials within 24–48 hours. If your DIY steps do not resolve the problem within one cooling cycle, schedule a technician for the next available appointment — most HVAC companies can respond within 24 hours during peak season, or offer emergency same-day service for $50–$100 extra.
What causes Ac Freezing Up?
The three most common causes are restricted airflow, low refrigerant charge, and blower motor problems. Restricted airflow — almost always from a clogged air filter, closed registers, or collapsed ductwork — accounts for about 40–50% of cases. The dirty filter prevents enough warm air from crossing the evaporator coil, dropping its surface temperature below 32°F. Low refrigerant, caused by leaks at flare connections, Schrader valves, or coil headers, is the second most common cause at roughly 25–30%. A failing blower motor or bad run capacitor rounds out the top three at 10–15%, reducing airflow below the critical 350–400 CFM per ton threshold needed to keep the coil above freezing.
Will homeowners insurance cover Ac Freezing Up?
Standard homeowners insurance policies generally do not cover HVAC mechanical breakdowns, refrigerant leaks, or component failures — these are considered maintenance and wear-and-tear issues, which are explicitly excluded under virtually every HO-3 policy. However, if a frozen AC causes secondary damage — such as water damage to ceilings, walls, or flooring from an overflowing drain pan — that resulting damage may be covered as a sudden and accidental discharge of water, depending on your carrier and policy language. Document everything with photos and timestamps before cleanup. A home warranty plan, which is separate from homeowners insurance, typically covers HVAC mechanical failures including freeze-ups for a $75–$125 service call fee, provided the system was properly maintained. Keep your filter-change records as proof of maintenance.
How do I find a licensed hvac technician for this?
First, verify the contractor holds a valid HVAC license in your state or municipality — you can check this through your state contractor licensing board website, which is free and takes two minutes. Second, confirm they carry general liability insurance (minimum $1 million) and workers' compensation coverage; ask for a certificate of insurance and call the carrier to verify it is active. Third, get a written quote that separates the diagnostic fee from the repair cost — reputable companies charge $89–$150 for a diagnostic and apply it toward the repair if you proceed. Avoid any company that quotes a flat repair price over the phone without seeing the system. Fourth, check at least three recent references or verified online reviews, focusing on HVAC-specific work rather than general contracting. Ask each reference whether the tech explained the problem clearly, whether the quoted price matched the final invoice, and whether the system has run properly since the repair.
When your AC freezes up, you face three critical decisions: first, whether to shut the system off immediately — the answer is always yes, because every minute of continued operation risks compressor damage that can multiply your repair cost by five to ten times. Second, whether the cause is something you can fix yourself — a dirty filter, blocked registers, or kinked ductwork — or something that demands professional diagnosis like a refrigerant leak or component failure. Third, whether your existing system is worth repairing or whether the freeze-up is signaling the end of the equipment's useful life, especially if the unit is over 12–15 years old, uses phased-out R-22 refrigerant, or has had multiple repairs totaling more than 50% of replacement cost.
Your recommended next step is straightforward: turn off cooling, switch the fan to ON, replace the air filter, and let the coil thaw completely over the next 2–4 hours. Once thawed, restart the system and monitor it for 30 minutes with a thermometer at the supply and return registers. If ice returns or the temperature split is outside the 15–22°F range, call a licensed HVAC technician for a professional diagnostic. Acting within the first 24 hours protects your compressor, prevents water damage, and keeps the total repair cost in the $150–$500 range rather than the $2,000–$5,000+ range that results from ignoring the problem.
Ready to Solve This for Good?
Get matched with pre-screened, licensed hvac technicians in your area. Free quotes, no obligation, no spam.
GET FREE QUOTES NOW