
Updated June 12, 2026 · HomeFixx Editorial Team
Standing water beneath a leaking disposal can warp cabinet flooring and spawn mold within 48–72 hours, turning a $150 repair into a $2,000+ remediation project.
🔧 DIY Key Takeaways
- Tighten the sink flange mounting bolts and re-apply plumber's putty ($3–$6) — this fixes roughly 40% of top-mount leaks without calling anyone
- Replace cracked or hardened dishwasher inlet hose connector with a $7–$12 clamp-style fitting; hand-tighten only to avoid cracking the plastic nipple
- Swap a worn-out bottom-seal unit yourself for $15–$25 in gaskets, but only if the disposal is under 6 years old — otherwise full replacement is more cost-effective
👷 Hire a Pro Key Takeaways
- If water leaks from the bottom housing (internal seal failure), a plumber will recommend full unit replacement at $180–$450 installed — resealing is a temporary fix that fails within months
- A plumber can pressure-test the drain line connection and disposal simultaneously in 15 minutes, catching hairline cracks invisible to homeowners that cause slow leaks and $800+ mold damage
- Licensed plumbers carry OEM mounting assemblies for InSinkErator and Moen units; aftermarket flanges from big-box stores fail 3x more often, so pro-sourced parts save on callbacks
📋 In This Guide
HomeFixx guides are researched and fact-checked by licensed trade professionals. Cost data updated June 12, 2026.
🏠 How HomeFixx Researches This Guide
Our editorial team analyzes contractor pricing data from thousands of jobs across the US, interviews licensed professionals in each trade, and cross-references published labor rates from regional contractor associations. Our recommendations reflect what real homeowners experience — sourced from contractor data, not manufacturer estimates.
You open the cabinet beneath your kitchen sink and find a puddle soaking into the shelf liner — or worse, you notice a musty smell that's been building for days. A leaking garbage disposal is one of the most common kitchen plumbing issues in American homes, yet most online guides gloss over the critical detail: where the leak originates determines whether you're looking at a $5 DIY fix or a $450+ professional replacement. Get it wrong, and you're not just wasting money — you're letting water silently destroy your cabinet base, subfloor, and potentially the drywall behind it.
This contractor-verified guide walks you through a precise diagnostic method used by licensed plumbers to identify the exact leak source in under two minutes. We break down real-world repair costs across four common failure points — the sink flange, the dishwasher connection, the discharge drainpipe, and the internal housing seals — so you know exactly what to expect before you pick up a wrench or a phone. Whether your disposal is a $90 builder-grade unit or a $350 InSinkErator Evolution, the leak patterns and fixes are the same.
Below, you'll find urgency-rated guidance, step-by-step DIY instructions with tool lists, clear thresholds for when professional help saves you money long-term, and an itemized cost table covering standard and emergency pricing in 2024. No fluff — just the information you need to stop the leak and protect your kitchen.
Symptoms: What You're Seeing
- Puddle under the sink cabinet: You open the cabinet door beneath your kitchen sink and find standing water pooled on the cabinet floor, often discoloring particleboard shelving. The water may be clear or carry a gray-brown tint from food residue. You might notice a musty or sour smell from moisture that has been sitting for hours or days. The puddle often migrates toward the cabinet front, staining the kick-plate or reaching the kitchen floor.
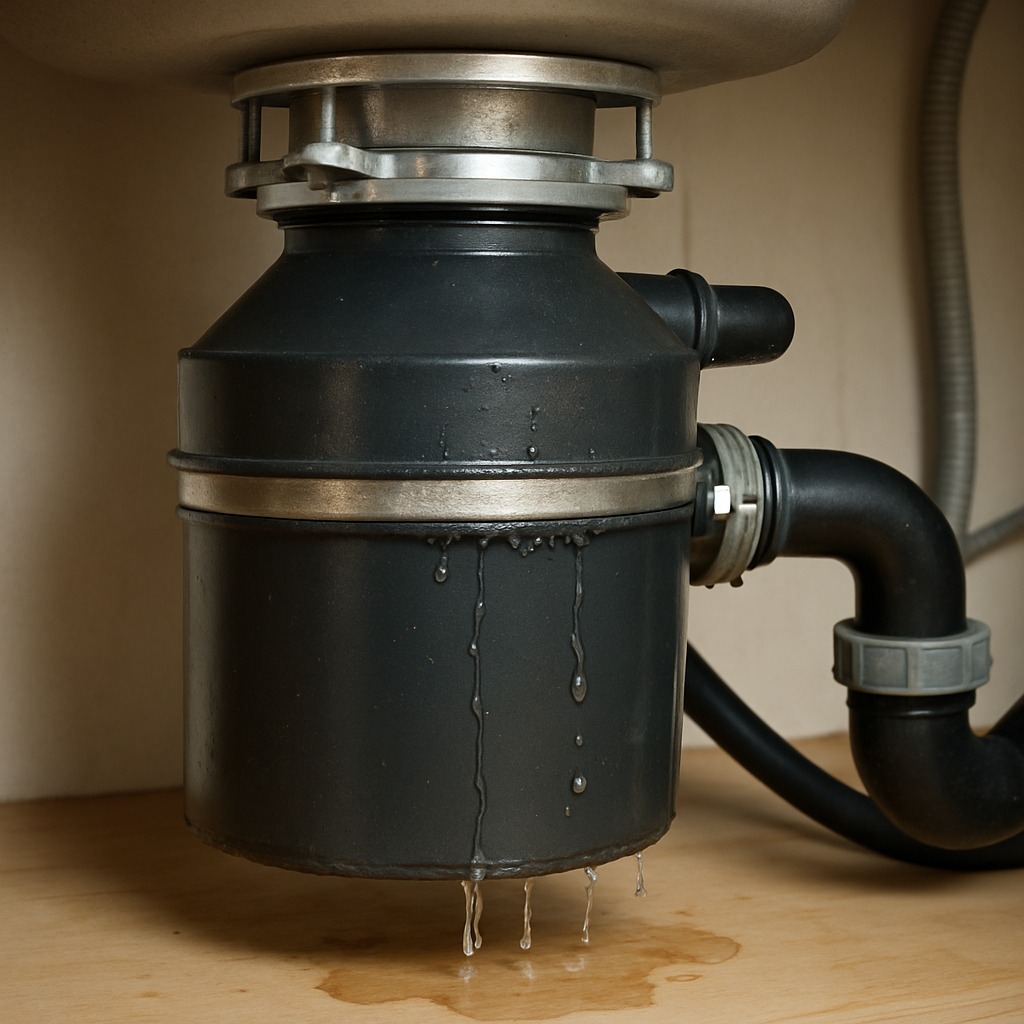
- Dripping from the disposal body seam: With a flashlight aimed upward, you can see individual water droplets forming along the horizontal seam where the upper and lower halves of the disposal housing meet. The drip rate is slow — typically one drop every 5–15 seconds during active use — but accelerates to a steady trickle when the faucet is running at full volume. The housing may feel damp to the touch even when the sink has not been used recently.
- Leak at the sink flange connection: Water seeps around the stainless-steel ring where the disposal meets the underside of the sink drain opening. You can spot it by running water with the stopper removed and watching the flange area with a flashlight. The leak appears as a thin, shimmering film that forms a drip on the mounting ring. Plumber's putty residue or rust-colored staining around the flange is a telltale visual clue.
- Water dripping from the dishwasher inlet hose: A small rubber or braided hose enters the side of the disposal body near the top. During or immediately after a dishwasher cycle, you notice water collecting at this connection and running down the outside of the disposal shell. The hose clamp may appear corroded or loose, and the rubber nipple inside the disposal where the hose connects can crack after 5–8 years of heat cycling from hot dishwasher water.
- Leak at the discharge pipe elbow: The PVC or metal elbow bolted to the side of the disposal with a flange gasket drips when the disposal drains. You may hear a faint gurgling followed by visible water running down the pipe joint. The rubber gasket inside the flange connection compresses and hardens over time, losing its seal. A paper-towel test — wrapping dry paper towel around the joint — will show a wet stripe confirming the exact leak point.
What's Actually Causing This
- Worn or dried-out sink flange putty: When a garbage disposal is installed, a ring of plumber's putty or a rubber gasket seals the sink flange to the sink bowl. Over 5–10 years, plumber's putty dries, shrinks, and cracks, breaking the watertight seal. Vibration from the disposal motor — typically spinning at 1,725–2,800 RPM — accelerates the breakdown. This is the single most common cause of disposal leaks, accounting for roughly 40 percent of service calls according to field data from plumbing contractors. Re-seating the flange with fresh putty usually resolves it completely.
- Failed discharge tube gasket: A fiber or rubber gasket sits between the disposal's discharge outlet and the drain pipe elbow. This gasket is compressed by two bolts and a metal flange plate. Repeated thermal cycling from hot water use causes the gasket to harden and lose elasticity. After 4–7 years, it no longer compresses enough to seal, allowing water to weep past during drainage. This accounts for roughly 25 percent of disposal leak calls and is the easiest fix — a replacement gasket costs under $3 at any hardware store.
- Cracked or corroded disposal housing: Continuous exposure to food acids, salt, and moisture corrodes the internal grinding chamber. Budget-tier disposals with galvanized steel components (common in the $80–$120 price range) are especially vulnerable. Once the housing develops a pinhole or crack, water seeps through the body itself. This is not repairable — a cracked housing means full unit replacement. This cause is most common in units older than 8–12 years and represents roughly 20 percent of leak-related service calls.
- Loose or damaged dishwasher hose connection: The ribbed dishwasher inlet on the disposal body accepts a 7/8-inch rubber hose secured by a spring or worm-drive clamp. Over time the rubber hose stretches, the clamp loses tension, or the inlet nipple cracks from heat fatigue caused by 140°F–160°F dishwasher drain water. This leak only appears during or immediately after a dishwasher cycle, which makes it harder to diagnose. It represents roughly 15 percent of disposal leak calls and is solved by replacing the hose, clamp, or both — parts totaling $6–$12.
After 20 years of under-sink work, I tell every homeowner the same thing: before you diagnose anything, stuff dry paper towels around every connection point — the flange at the top, the dishwasher inlet on the side, the discharge pipe at the bottom, and the unit's bottom plate. Run water for 60 seconds, then inspect each towel. The wet one pinpoints the exact leak source in one pass. This simple test prevents the most common DIY mistake I see: homeowners replacing the entire $300 disposal when all they needed was a $4 rubber gasket on the discharge tube. Location determines everything — top leaks mean putty or flange bolts, side leaks mean hose clamps or cracked fittings, and bottom leaks mean internal seals that usually justify replacement.
Step-by-Step Diagnosis
Work through these steps before calling a contractor. Each step tells you what to look for and what it means.
Disconnect power and confirm zero voltage
🔧 Non-contact voltage testerBefore touching anything, unplug the disposal from the outlet inside the cabinet. If the unit is hardwired, switch off the dedicated 15- or 20-amp breaker at the panel and confirm power is dead with a non-contact voltage tester held against the wire connection at the base of the disposal. Never rely on the wall switch alone — a faulty switch can still pass current. Confirm the disposal does not hum or respond when the switch is toggled. Place a strip of tape over the breaker to prevent someone from flipping it back on while you work. Safety here is non-negotiable; disposal motors draw 4–8 amps and the grinding plate can cause serious injury.
Identify the exact leak location
🔧 Flashlight, food coloring, rubber stopperPlace a dry towel or sheet of cardboard under the disposal. Plug the sink drain with a rubber stopper and fill the basin with 3–4 inches of water mixed with a few drops of food coloring. Remove the stopper and watch with a flashlight while the colored water drains. Check four zones in order: (1) the sink flange at the top, (2) the dishwasher inlet hose on the upper side, (3) the discharge pipe elbow on the lower side, and (4) the disposal body itself. Mark the leak point with a piece of painter's tape. Accurate diagnosis here saves you from replacing parts that are not the problem. Run the test twice to confirm.
Re-seal the sink flange with putty
🔧 Disposal wrench, plastic putty knife, plumber's puttyIf the leak is at the top flange, support the disposal from below with a small bucket or have a helper hold it. Use the disposal wrench or a flat-head screwdriver to rotate the lower mounting ring counterclockwise until the unit drops free. Remove the snap ring, mounting flange, and fiber gasket. Scrape away all old plumber's putty from the sink surface and the flange lip using a plastic putty knife to avoid scratching stainless steel. Roll fresh plumber's putty into a 1/2-inch-diameter rope roughly 10 inches long, press it around the flange lip, and re-seat the flange into the drain opening. Reassemble the mounting hardware, tighten evenly, and wipe excess putty from inside the sink. Reconnect the disposal and run a water test.
Replace the discharge pipe gasket
🔧 Screwdriver (Phillips or flat-head), replacement gasketIf the leak is at the side discharge elbow, loosen the two bolts holding the metal flange plate to the disposal outlet using a Phillips or flat-head screwdriver. Pull the discharge tube away and remove the old rubber or fiber gasket. Inspect the gasket — if it is flattened, cracked, or stiff, replace it with an exact-match gasket (typically 1-1/2-inch diameter, available at any hardware store for $2–$3). Seat the new gasket into the groove, reattach the discharge tube, and hand-tighten the bolts first, then snug them a quarter-turn with the screwdriver. Over-tightening can crack the disposal's plastic outlet, so stop as soon as the flange is firmly seated. Run water for 60 seconds and check for drips with a dry paper towel.
Tighten or replace the dishwasher hose
🔧 Flat-head screwdriver or pliers, replacement hose clamp, replacement hose if neededIf the leak is at the dishwasher inlet, loosen the hose clamp with a flat-head screwdriver or pliers (spring clamp). Pull the hose off the disposal's inlet nipple and inspect both the hose end and the nipple. If the rubber is cracked or the hose is swollen, cut 1/2 inch off the end for a fresh surface or replace the entire hose run — standard 7/8-inch dishwasher drain hose costs $8–$12 for a 6-foot length. Slide a new worm-drive hose clamp onto the hose before pushing it over the nipple, then position the clamp 1/4 inch from the hose end and tighten until snug. Run a short dishwasher rinse cycle and check the connection with a dry paper towel. A properly clamped connection should show zero moisture after a full cycle.
When to Stop DIY and Call a Pro
Stop DIY and call a licensed plumber if you see water leaking directly through the disposal body or housing — that means the internal shell is cracked or corroded, which is not repairable and requires a full unit replacement involving electrical disconnection, plumbing rework, and possible mounting-flange resizing. Likewise, if you smell sewage gas rising from the disposal area, the leak may have compromised the drain trap seal, creating a health hazard that needs professional diagnosis. If you attempt a flange re-seal and the leak returns within a week, the sink opening or mounting hardware is likely damaged — a plumber can assess whether the sink itself needs repair. From a financial standpoint, professional disposal replacement typically runs $180–$450 for a standard 1/2 HP to 3/4 HP unit including labor, so if your repair parts plus your time exceed $100–$120, a full professional replacement often makes more economic sense, especially for units over 8 years old. Any situation involving hardwired electrical connections (no plug) should be handled by a licensed professional to avoid code violations and shock risk.
What Does This Repair Cost?
Costs vary by region, home age, and severity. These are national averages — always get 3 quotes.
| Repair Type | DIY Cost | Pro Cost | Emergency Premium |
|---|---|---|---|
| Sink flange reseal (plumber's putty + bolt tightening) | $3–$8 | $75–$150 | $150–$275 |
| Dishwasher hose connector or clamp replacement | $7–$15 | $85–$160 | $160–$300 |
| Discharge tube gasket replacement | $4–$10 | $75–$140 | $140–$250 |
| Full disposal replacement (unit + labor) | Not recommended | $180–$450 | $350–$650 |
| Emergency weekend/after-hours service call | N/A | $150–$250 | $250–$400 |
*Emergency rates (nights/weekends/holidays) run 40–60% above standard. Get 3 quotes before approving work.
Get quotes from licensed professionals in your area
Free, no obligation — compare 3+ contractors in minutesWhat Drives the Cost?
| Cost Factor | Estimated Impact | Why It Matters |
|---|---|---|
| Disposal horsepower & brand (⅓ HP vs. 1 HP) | Adds $50–$200 | Higher HP units like InSinkErator Evolution Excel cost significantly more for the unit itself; labor stays roughly the same |
| Cabinet water damage requiring repair | Adds $150–$800 | Swollen particleboard shelving or delaminated cabinet bottoms often need partial rebuild once the leak is fixed |
| Mold remediation if leak was long-standing | Adds $500–$2,000 | Slow leaks undetected for weeks breed mold behind cabinets and in subfloor; professional remediation may be required by code |
| Permit requirements in your municipality | Adds $0–$75 | Some cities require a plumbing permit for disposal replacement; most do not for simple repairs, but check local codes to avoid fines |
Here's something most guides won't tell you: in hard-water regions like Phoenix, Tampa, and parts of the Midwest, mineral buildup accelerates internal seal degradation by roughly 30%. That means a disposal rated for 10 years may start leaking at 6 or 7. If your unit is approaching that age and you live in a hard-water area, don't waste $150 on a plumber to reseal it — invest $250–$400 in a new ¾ HP unit with stainless steel grinding components and a better warranty. Also, the most overlooked money-saving move is checking whether your homeowner's insurance covers resulting water damage under your dwelling policy. If the leak caused cabinet or subfloor warping, you may recover $500–$2,000 in restoration costs with a properly documented claim. Take timestamped photos before you fix anything.
⚠️ Stop DIY — Call a Pro If You See These
- Persistent musty or mildew smell inside the sink cabinet — Standing moisture breeds mold colonies within 24–48 hours. Remediation of mold-damaged cabinetry costs $300–$800 depending on spread. Ignoring the smell for a week can turn a $3 gasket fix into a cabinet replacement job.
- Soft, swollen, or discolored cabinet floor beneath the disposal — Particleboard absorbs water quickly and loses structural integrity within 1–2 weeks of continuous exposure. A warped cabinet bottom can cause the disposal to shift, cracking the drain line and escalating repair costs from under $50 to $500+.
- Visible corrosion or rust flakes on the disposal body — Surface rust on a galvanized or lower-grade disposal housing indicates the metal is thinning from the inside out. Within 1–3 months the corrosion will penetrate fully, causing an irreparable leak and requiring complete unit replacement at $180–$450 installed.
- Water dripping onto the electrical connection at the base — Moisture reaching the wire nuts or terminal block at the disposal's base plate creates a direct risk of electrical short, tripped breaker, or shock. This is an immediate safety hazard — cut power at the breaker and call a plumber the same day.
Frequently Asked Questions
How much does it cost to fix Garbage Disposal Leaking?
For a simple gasket or plumber's putty re-seal, DIY cost is $3–$15 in parts. A professional service call to diagnose and repair a leaking connection runs $125–$250 in most U.S. markets, with the national average around $175. If the disposal itself needs replacement, expect $180–$450 total (unit plus labor) for a standard 1/2 HP to 3/4 HP model. Two factors that move the price significantly: unit horsepower and whether the electrical hookup is plug-in or hardwired, since hardwired jobs require more labor time and sometimes a permit.
Can I fix Garbage Disposal Leaking myself?
Yes, in most cases. If the leak is at the sink flange, discharge gasket, or dishwasher hose connection, a homeowner with basic tools can complete the repair in 30–60 minutes. The critical requirement is correctly identifying the leak source first — using the food-coloring water test described above — so you do not waste time and money on the wrong part. However, if the disposal body itself is cracked, or if the unit is hardwired without a plug, you should hire a licensed plumber to handle the replacement safely and to code.
How urgent is Garbage Disposal Leaking?
A disposal leak is a same-day-to-48-hour priority, not a wait-and-see situation. Water under the sink damages particleboard cabinetry within days and can grow visible mold within 48 hours. If the leak drips onto the electrical connections at the disposal's base, you have a shock and fire risk that demands immediate action — kill the breaker right away. A slow weep at the discharge gasket gives you a day or two if you place a container underneath, but the flange and dishwasher hose leaks typically worsen with every use.
What causes Garbage Disposal Leaking?
The two most common causes are dried-out plumber's putty at the sink flange (about 40 percent of cases) and a failed discharge-tube gasket (about 25 percent). Both are age-related failures that happen after 5–10 years of normal use. The third most common cause is a cracked or corroded disposal housing, which accounts for about 20 percent of leak calls and requires full unit replacement because the body cannot be patched. Motor vibration accelerates all three failure modes.
Will homeowners insurance cover Garbage Disposal Leaking?
Standard homeowners insurance typically does not cover the repair or replacement of the disposal itself, as that is considered normal wear and maintenance. However, if a sudden disposal leak causes secondary water damage — such as warped flooring, mold, or destroyed cabinetry — your policy may cover the resulting damage under the dwelling or personal-property portion, minus your deductible (commonly $500–$1,000). Gradual leaks that you ignored are almost always excluded. Document the damage with photos and file a claim promptly. Check your policy's specific language or call your agent before assuming coverage.
How do I find a licensed plumber for this?
First, verify the plumber holds a valid state or municipal plumbing license — search your state's contractor licensing board website by name or license number. Second, confirm they carry general liability insurance (minimum $500,000) and workers' compensation if they have employees; ask for a certificate of insurance. Third, request a written quote that breaks out parts, labor, and any trip or diagnostic fee before work begins — most disposal repairs should be quoted flat-rate between $125 and $300. Fourth, check at least two recent references or online reviews on Google or the Better Business Bureau to confirm quality and reliability.
A leaking garbage disposal comes down to three decisions: identify exactly where the water is escaping, determine whether the fix is a $3 gasket swap or a $200+ unit replacement, and decide honestly whether the repair is within your skill set or demands a licensed plumber. The food-coloring diagnostic test is the single most valuable step — it prevents guesswork and wasted money. Most flange, gasket, and hose-connection leaks are straightforward 30- to 60-minute DIY repairs, but a cracked housing or any situation involving hardwired electrical connections should go to a professional every time.
Your recommended next step: tonight, open the sink cabinet, lay down a dry paper towel beneath the disposal, and run the water for 60 seconds. Check the towel. If it is wet, perform the food-coloring test to pinpoint the leak zone, then match your finding to the repair steps above. If the body itself is corroded or cracked, stop, turn off the breaker, and schedule a licensed plumber within 48 hours. Acting quickly keeps a minor plumbing repair from becoming a major cabinet and mold remediation project.
Ready to Solve This for Good?
Get matched with pre-screened, licensed plumbers in your area. Free quotes, no obligation, no spam.
GET FREE QUOTES NOW