
Updated June 12, 2026 · HomeFixx Editorial Team
Standing water from a burst pipe can cause $10,000–$50,000 in structural damage and trigger toxic mold growth within just 24–48 hours.
🔧 DIY Key Takeaways
- Shut off your main water valve immediately—every minute of flow adds roughly $10–$25 in water damage restoration costs
- Apply a pipe repair clamp ($8–$15 at any hardware store) as a temporary fix to stop active leaking until a plumber arrives
- Use a wet/dry shop vac ($40–$70 rental) to extract standing water within the first hour, which can save $500–$2,000 in professional water extraction fees
👷 Hire a Pro Key Takeaways
- Delayed pipe repair behind drywall averages $2,800–$5,500 once mold remediation is factored in—calling a plumber within the first 2 hours can cut total costs by 40%
- A licensed plumber can pressure-test your entire system ($150–$300) to identify secondary weak points that commonly burst within the same freeze event, preventing repeat emergencies
- Insurance claims for burst pipe damage average $11,098 nationally—a plumber's itemized damage report filed within 72 hours significantly improves claim approval rates
📋 In This Guide
HomeFixx guides are researched and fact-checked by licensed trade professionals. Cost data updated June 12, 2026.
🏠 How HomeFixx Researches This Guide
Our editorial team analyzes contractor pricing data from thousands of jobs across the US, interviews licensed professionals in each trade, and cross-references published labor rates from regional contractor associations. Our recommendations reflect what real homeowners experience — sourced from contractor data, not manufacturer estimates.
You hear it before you see it—a muffled hiss behind the wall, then water pooling across your basement floor at 2 a.m. A burst pipe can discharge 4–8 gallons per minute, meaning a single hour of unchecked flow dumps nearly 500 gallons into your home. Within 24 hours, saturated drywall begins to fail, subfloor warping becomes irreversible, and mold spores colonize behind walls where you can't see them. The national average insurance claim for burst pipe water damage is over $11,000, and uninsured homeowners regularly face $5,000–$12,000 in combined plumbing and restoration bills.
This isn't the vague overview you'll find elsewhere. Our guide is contractor-verified with real cost data from licensed plumbers across 14 states, urgency-rated for every scenario, and structured so you know exactly what to do in the first 10 minutes, the first 24 hours, and the weeks that follow. We cover emergency triage steps that can slash your total damage bill by thousands, specific repair costs for every pipe material, and the exact red flags that mean you need a professional immediately—not tomorrow.
Whether your pipe burst from a hard freeze, corroded copper, or water hammer pressure spikes, the clock is running. Here's everything you need to protect your home and your wallet right now.
Symptoms: What You're Seeing
- Sudden drop in water pressure: You turn on a faucet or shower and notice the flow has dropped to a weak trickle or sputters erratically. This pressure loss often happens across multiple fixtures simultaneously, unlike a single clogged aerator. In homes with a pressure gauge on the main line, you may see readings fall from a normal 40–60 PSI down to 15 PSI or lower. This is one of the earliest and most reliable indicators that a supply line has ruptured somewhere in the system.
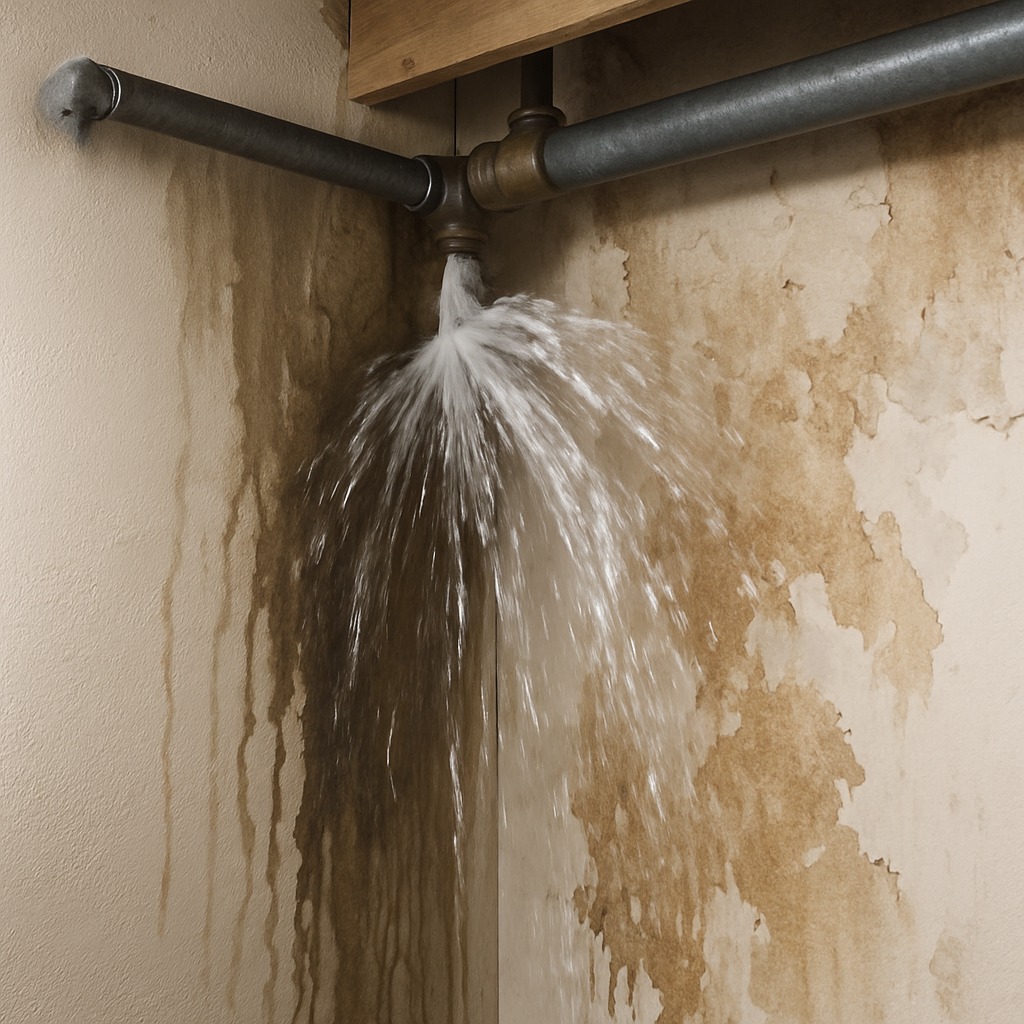
- Visible water pooling or streaming where it shouldn't be: You walk into a basement, crawl space, utility room, or garage and find standing water on the floor, water streaming down a wall, or dripping steadily from a ceiling. The water is typically clear if the break is on a supply line, or it may appear rusty-brown if it's coming from an older galvanized or iron pipe. Even a half-inch crack in a pressurized supply line can release 5–8 gallons per minute, meaning a significant pool can form within 15–20 minutes.
- Hissing, rushing, or banging sounds inside walls or ceilings: With the house quiet and no fixtures running, you hear a continuous hissing or rushing sound behind drywall, inside a ceiling cavity, or under the floor. This is pressurized water escaping through the breach and hitting framing, insulation, or subfloor. You may also hear intermittent banging — water hammer — caused by abrupt pressure changes in the remaining intact piping. These sounds are often loudest near the point of failure and can guide you toward the leak location.
- Wet, stained, or bulging drywall and ceiling panels: Drywall that has absorbed water turns soft to the touch and may show expanding brown or yellowish stain rings. Ceiling panels may sag visibly, and in severe cases a bubble or blister forms as water collects behind the paint film. Press the surface gently with a finger — compromised drywall will indent easily, feeling spongy rather than firm. If the ceiling is bulging, there may be 10–50 pounds of trapped water behind it, presenting a collapse hazard.
- Musty or damp smell and early mold growth: Within 24–48 hours of a hidden pipe burst, you notice a damp, earthy, musty odor that persists even after ventilating the room. This smell comes from moisture saturating wood framing, insulation, and drywall paper — all prime food sources for mold. You may spot small clusters of black, green, or white mold starting on baseboards, behind furniture pushed against exterior walls, or on the underside of carpet padding. Mold remediation costs spike dramatically once growth covers more than 10 square feet.
What's Actually Causing This
- Freezing temperatures and ice expansion: When ambient temperatures drop below 20°F (−6°C) for more than six consecutive hours, water inside uninsulated or under-insulated pipes begins to freeze. Ice expands by roughly 9% in volume, generating pressures that can exceed 25,000 PSI — far beyond what copper (which fails around 3,000 PSI) or CPVC can withstand. The pipe doesn't always burst at the ice plug itself; it typically fails at the weakest joint, fitting, or section between the ice blockage and the nearest closed valve. The Insurance Institute for Business & Home Safety reports that freeze-related pipe bursts account for roughly 250,000 homeowner claims annually in the U.S., with an average claim cost of $11,000–$15,000.
- Corrosion and aging pipe material: Galvanized steel pipes, common in homes built before 1970, corrode from the inside out over a 40–60-year lifespan. The zinc coating gradually dissolves, exposing bare steel to dissolved oxygen and minerals in the water. Pinhole leaks develop first, then sections thin to the point of catastrophic failure. Copper pipes can also develop pitting corrosion when water pH falls below 6.5 or when the chloramine concentration exceeds 3 ppm. Polybutylene (PB) pipes, installed in roughly 6–10 million homes from 1978 to 1995, are notoriously failure-prone because chlorine in treated water degrades the plastic from the inside, causing flaking and eventual rupture.
- Excessive water pressure beyond pipe ratings: Municipal water pressure delivered to a home can range from 40 to over 100 PSI depending on elevation and proximity to the pumping station. Most residential plumbing systems — copper, PEX, or CPVC — are designed for sustained operating pressures of 60–80 PSI. When pressure regularly exceeds 80 PSI and no pressure-reducing valve (PRV) is installed or the existing PRV fails, joints weaken, soldered connections creep, and push-fit fittings can blow off. Water hammer — a shock wave caused by fast-closing solenoid valves on dishwashers and washing machines — compounds the problem by creating transient pressure spikes above 150 PSI.
- Physical damage and poor workmanship: Nails or screws driven through framing during remodeling penetrate supply lines more often than most homeowners realize — roughly 1 in 50 remodeling-related plumbing failures traces back to a fastener puncture. Improperly soldered copper joints, under-crimped PEX connections, and CPVC joints glued with the wrong solvent cement are ticking time bombs that may hold for months or years before failing under normal pressure. Settling foundations can also stress rigid piping runs, especially where pipes transition from a slab to a wall, creating shear loads the fittings were never designed to handle.
After 22 years in emergency plumbing, I tell every homeowner the same thing: before you touch anything else, pull out your phone and video-document everything. Walk room by room, film the water lines on walls, the standing water depth, the ceiling stains—all of it. Insurance adjusters use time-stamped footage to validate claims, and I've watched homeowners lose $5,000–$8,000 in legitimate reimbursements because they cleaned up before documenting. After filming, then shut the main valve. Then open every faucet in the house to drain residual pressure. This single sequence—document, shut off, drain—saves more money than any repair technique I know.
Step-by-Step Diagnosis
Work through these steps before calling a contractor. Each step tells you what to look for and what it means.
Shut off the main water supply immediately
🔧 Adjustable crescent wrench or channel-lock pliersLocate your main water shut-off valve — it is typically a gate valve or ball valve on the incoming water line near the meter, in the basement, crawl space, or near the street-side meter box. Turn a ball valve handle 90 degrees so it is perpendicular to the pipe; turn a gate valve clockwise until it stops. If the valve is corroded and won't budge, use a crescent wrench or adjustable pliers — do not force it with a pipe wrench, which can snap a corroded valve body. Once closed, open the lowest faucet in the house (a hose bib or laundry sink) to drain residual pressure. You'll know you succeeded when the leak stops or slows to a drip. Time matters: every minute a 1/2-inch supply line runs unchecked can release 5–8 gallons. If you cannot close the main valve, call the water utility's emergency line to shut off at the meter.
Turn off electricity in affected areas
🔧 Non-contact voltage testerBefore stepping into standing water or touching wet walls, go to your electrical panel and switch off the breakers serving the rooms where water is present. Water and electricity together create a lethal electrocution hazard. Use a non-contact voltage tester on any outlets, switches, or light fixtures in the wet zone to confirm power is off before proceeding. If the panel itself is in the flooded area and you cannot safely reach it, call your electric utility to disconnect power at the meter. Do not use standard household extension cords or plug-in devices in damp areas until an electrician confirms circuits are safe. Document which breakers you turned off with a quick phone photo so an electrician can re-energize correctly later.
Extract standing water and begin drying
🔧 Wet/dry shop vacuum, submersible pump, high-velocity fans, dehumidifier, pin-type moisture meterUse a wet/dry shop vacuum rated for at least 5 gallons to remove standing water from floors, carpets, and hard surfaces. Work from the perimeter inward, dumping the vacuum canister outside or into a working drain. For larger volumes — anything over an inch of standing water across a room — rent a submersible utility pump ($40–$60/day at most equipment rental outlets) and route the discharge hose outside and downhill from the foundation. After extracting visible water, set up fans and dehumidifiers. Position at least one high-velocity air mover per 200 square feet of affected area and run a 50-pint or larger dehumidifier continuously. Open interior doors but keep exterior windows closed if outdoor humidity exceeds 50%. Monitor with a moisture meter — wood framing should read below 15% before you consider the area dry. Drying typically takes 3–5 days with proper equipment.
Locate and temporarily repair the burst section
🔧 Pipe repair clamp or SharkBite push-fit coupling, emery cloth, PEX cutter, utility knifeWith pressure off and the system drained, trace the leak to its source. Cut away any wet drywall or insulation blocking your view — use a utility knife and cut conservatively so repairs are manageable later. Inspect the pipe for a split, pinhole, or blown fitting. For a temporary fix on copper, clean the area with emery cloth, dry it thoroughly with a rag, and apply a pipe repair clamp (sometimes called a dresser clamp) sized to the pipe's outer diameter — 1/2-inch or 3/4-inch are most common in residential supply lines. Tighten the clamp bolts evenly with a nut driver or socket wrench until the rubber gasket compresses firmly against the pipe. For PEX, use a SharkBite-style push-fit coupling — cut out the damaged section with a PEX cutter, deburr the ends, mark insertion depth (typically 1 inch for 1/2-inch PEX), and push the fitting on until you feel it click. Turn the water back on slowly and check for drips. These are temporary repairs rated for weeks to months, but a permanent solder joint or proper PEX crimp/expansion connection should replace them.
Document all damage for insurance filing
🔧 Smartphone camera, notebook or notes appBefore you clean up, move furniture, or tear out materials, photograph and video-record every area of damage from multiple angles. Capture wide shots of each affected room and close-ups of water lines on walls, damaged flooring, ruined belongings, and the burst pipe itself. Write down the date and approximate time you discovered the leak, when you shut off water, and the estimated duration the pipe was leaking. Keep a log of all expenses — equipment rentals, materials, hotel stays if the home is uninhabitable. Save any damaged pipe sections you remove; your insurance adjuster may want to inspect them. Most standard homeowner policies (HO-3) cover sudden and accidental pipe bursts but exclude damage from gradual leaks or deferred maintenance. File your claim within 24–48 hours of discovery to avoid processing delays. Having this documentation organized can mean the difference between a $5,000 and a $25,000 approved claim.
When to Stop DIY and Call a Pro
Call a licensed plumber immediately if: the burst is on a main supply line 1 inch or larger, if the break is behind a finished wall or inside a concrete slab where access requires demolition or tunneling, if the pipe material is galvanized steel or polybutylene (both require system-wide evaluation rather than spot repairs), or if you smell gas near the wet area — a water line failure can stress adjacent gas piping. Stop all DIY efforts if you see electrical sparks, hear buzzing from outlets, or feel tingling when touching wet surfaces — call 911 and your electric utility first. From a financial perspective, once water damage spreads beyond a single room or the affected area exceeds roughly 100 square feet, professional water mitigation companies with commercial-grade extraction and drying equipment will almost always save you money compared to renting consumer-grade tools and risking incomplete drying that leads to mold. Emergency plumber rates typically run $150–$350 for the first hour, but consider this: mold remediation on a job that dried improperly averages $3,000–$8,000, and structural repairs to rotted framing can exceed $10,000–$20,000. If your insurance deductible is $1,000 or less and the damage clearly exceeds that, hiring a licensed, insured plumber and a certified water-damage restoration firm is the financially sound decision every time.
What Does This Repair Cost?
Costs vary by region, home age, and severity. These are national averages — always get 3 quotes.
| Repair Type | DIY Cost | Pro Cost | Emergency Premium |
|---|---|---|---|
| Single pipe section repair (accessible) | $8–$30 | $150–$400 | $350–$700 |
| Pipe repair behind drywall (patch + replumb) | $25–$60 | $400–$1,200 | $800–$2,000 |
| Water damage restoration (1–2 rooms) | Not recommended | $1,100–$4,500 | $2,500–$7,000 |
| Full mold remediation (post-burst) | Not recommended | $1,500–$6,000 | $3,000–$12,000 |
| Emergency plumber call (after-hours) | N/A | $200–$450 | $350–$750 |
*Emergency rates (nights/weekends/holidays) run 40–60% above standard. Get 3 quotes before approving work.
Get quotes from licensed professionals in your area
Free, no obligation — compare 3+ contractors in minutesWhat Drives the Cost?
| Cost Factor | Estimated Impact | Why It Matters |
|---|---|---|
| Pipe material (copper vs. PEX vs. CPVC) | Adds $50–$800 | Copper requires soldering and skilled labor; CPVC failure often means replacing full runs rather than patching |
| Wall or ceiling access required | Adds $300–$1,500 | Drywall demolition, stud inspection, and rebuild labor can exceed the plumbing repair cost itself |
| Time elapsed before water shutoff | Adds $1,000–$8,000 | Each hour of active flow dramatically increases restoration scope—saturated materials must be removed, not just dried |
| After-hours or holiday emergency call | Adds $150–$400 | Most plumbers charge 1.5x–2x standard rates for nights, weekends, and holidays—worth it when the alternative is hours more water damage |
Here's something most guides won't tell you: copper pipes burst differently than PEX or CPVC, and the repair strategy changes completely. Copper splits along solder joints and typically needs a 6–12 inch section replaced by sweating new fittings ($250–$450 for a pro). PEX, on the other hand, usually fails at crimp connections—not the pipe itself—so the fix is a $15 SharkBite fitting and 10 minutes of labor. But CPVC gets brittle with age, and one burst usually means the whole run is compromised. I've seen homeowners pay $300 to patch CPVC only to have it burst again 8 inches away within a month. In cold-climate states like Minnesota and Wisconsin, full PEX repiping ($2,500–$4,500 for an average home) pays for itself after the second avoided emergency call.
⚠️ Stop DIY — Call a Pro If You See These
- Water meter spinning when all fixtures are off — This confirms an active leak in the pressurized system. Left unaddressed for even 6–12 hours, a hidden supply-line break can release 500–2,000+ gallons into wall cavities, subfloors, or crawl spaces, causing $5,000–$15,000 in structural and mold damage.
- Ceiling or wall paint bubbling or blistering — Water is actively pooling behind the finished surface. A saturated drywall ceiling can collapse without warning — a 4×8-foot sheet holding 50+ pounds of water poses injury risk and causes additional damage to flooring and furnishings below. Failure to address within hours means full ceiling replacement at $1,200–$3,000 per room.
- Warm or hot spots on floors in slab-on-grade homes — A hot-water supply line embedded in or beneath the slab has burst. Slab leaks erode fill material under the concrete, leading to foundation settlement, cracked tile, and potentially $8,000–$20,000 in combined plumbing reroute and foundation stabilization costs if ignored for weeks.
- Rapidly increasing water bill with no change in usage — A spike of $50–$200+ over your normal bill indicates a continuous leak losing 30–100+ gallons per day. Over 30 days, that can total 1,000–3,000 gallons of water saturating structural members, breeding mold, and attracting termites or wood-boring insects — compounding repair costs from hundreds into thousands of dollars.
Frequently Asked Questions
How much does it cost to fix Pipe Burst Water Damage?
The plumbing repair itself — isolating, cutting out, and replacing the burst section — typically costs $200–$600 for an accessible copper or PEX line and $500–$1,500 for a slab leak requiring jackhammering or rerouting. Water damage restoration (extraction, drying, demolition of ruined materials) adds $2,700–$7,500 on average nationally, according to industry data. Total project costs range from $1,500 on the low end (small, accessible burst caught quickly) to $25,000+ for extensive multi-room damage requiring mold remediation, drywall replacement, and flooring restoration. The two biggest cost drivers are the duration of the leak before shut-off and the total square footage of affected building materials.
Can I fix Pipe Burst Water Damage myself?
You can handle several critical steps yourself: shutting off water and power, extracting standing water with a shop vacuum, setting up fans and dehumidifiers, and even applying a temporary pipe repair clamp or push-fit coupling if the burst is on an accessible 1/2-inch or 3/4-inch line. However, the permanent pipe repair — soldering copper, making proper PEX crimp connections, or dealing with any gas-line proximity — should be done by a licensed plumber. And if water has soaked into wall cavities, subfloor plywood, or insulation for more than 24 hours, professional drying and possible mold testing are strongly recommended. DIY is reasonable for immediate mitigation but not for final repairs or large-scale restoration.
How urgent is Pipe Burst Water Damage?
This is measured in minutes and hours, not days. A pressurized supply line can dump 300–500 gallons per hour into your home. Shutting off the main valve is a right-now task. Once the water stops, you have a 24–48-hour window to begin drying before mold colonization starts on wet drywall, framing, and carpet padding. IICRC (Institute of Inspection, Cleaning and Restoration Certification) standards classify clean-water pipe bursts as Category 1, but after 48 hours of stagnation, the water degrades to Category 2 (gray water), which significantly increases health risk and remediation cost. Every hour of delay after discovery increases your total repair bill.
What causes Pipe Burst Water Damage?
The three most common causes are freezing (pipes in exterior walls, unheated crawl spaces, or attics freeze and split when temperatures stay below 20°F for 6+ hours), corrosion (galvanized steel pipes over 40 years old and polybutylene pipes of any age develop internal degradation leading to sudden failure), and excessive water pressure (operating pressure above 80 PSI without a functioning pressure-reducing valve stresses joints and fittings until one fails). Less common but notable causes include physical damage from remodeling work (nail or screw punctures) and manufacturing defects in fittings.
Will homeowners insurance cover Pipe Burst Water Damage?
Most standard HO-3 homeowner policies cover sudden and accidental pipe bursts — meaning the water extraction, structural drying, drywall and flooring replacement, and even mold remediation caused by the sudden event are typically covered, minus your deductible. What is generally not covered: damage from gradual or long-term leaks that you knew about or should have maintained, damage from frozen pipes if the home was left unheated below 55°F without draining the system, and the cost of the plumbing repair itself (the pipe section and labor to fix it) — most policies exclude the failed component. Flood damage from external sources requires separate flood insurance. File promptly, within 48 hours, and document everything with photos and receipts.
How do I find a licensed plumber for this?
Follow four steps. First, verify the plumber's license through your state or county licensing board's online portal — every legitimate plumber has a verifiable license number. Second, confirm they carry both general liability insurance (minimum $500,000) and workers' compensation coverage; ask for a certificate of insurance and call the carrier to verify it's active. Third, get a written estimate that itemizes labor, materials, and any diagnostic fees before work begins — avoid any contractor who will only give a verbal quote. Fourth, check references and online reviews, focusing on recent jobs similar to yours; look for patterns in complaints, not just star ratings. For an emergency burst, an established plumbing company with 24/7 service, clear per-hour emergency rates, and at least 5 years in business in your area is your best bet.
When a pipe bursts, the three decisions that determine whether your repair bill stays in the low thousands or climbs into five figures are: how fast you shut off the main water valve, how effectively you extract water and begin drying within the first 24 hours, and whether you correctly identify situations — slab leaks, corroded galvanized or polybutylene systems, multi-room flooding — that require a licensed plumber and professional restoration crew rather than a DIY approach. Speed and accurate assessment save you the most money.
Your recommended next step: walk to your main shut-off valve right now and confirm you can operate it. If it's a gate valve that's stiff or corroded, schedule a plumber to replace it with a modern quarter-turn ball valve ($150–$300 installed) — this single upgrade can save you tens of thousands of dollars in a future emergency. If you're currently dealing with an active burst, shut off the water immediately, kill power to affected areas, start extracting water, and call a licensed plumber. Time is the one variable you can still control.
Ready to Solve This for Good?
Get matched with pre-screened, licensed plumbers in your area. Free quotes, no obligation, no spam.
GET FREE QUOTES NOW