
Updated June 12, 2026 · HomeFixx Editorial Team
Natural gas or propane leaks can reach explosive concentrations in as little as 5–10 minutes, risking fatal explosion, fire, or carbon monoxide poisoning.
🔧 DIY Key Takeaways
- A $15–$30 combustible gas detector (like the Ridgid micro CD-100) lets you pinpoint small leaks at appliance connections before calling a pro
- Apply a soapy water solution (dish soap + water in a spray bottle, $0 cost) to exposed gas fittings — active bubbling confirms a leak location you can report precisely to your utility or plumber
- Never use matches, light switches, phones, or garage door openers inside the home — a single spark across a 5%–15% gas-air mixture triggers ignition; evacuate first, then call 911 and your gas utility from outside
👷 Hire a Pro Key Takeaways
- A licensed plumber pressure-tests the entire gas line system ($150–$350) using a manometer to detect drops as small as 0.5 psi, catching micro-leaks DIY methods miss
- Replacing a corroded gas supply line from meter to appliance typically runs $250–$800 per line, but ignoring it risks a catastrophic failure that averages $45,000+ in fire damage restoration
- Emergency after-hours gas leak calls average $250–$500 for the service visit alone — but your gas utility will typically perform the initial shutoff and basic inspection at no charge, so always call them first
📋 In This Guide
HomeFixx guides are researched and fact-checked by licensed trade professionals. Cost data updated June 12, 2026.
🏠 How HomeFixx Researches This Guide
Our editorial team analyzes contractor pricing data from thousands of jobs across the US, interviews licensed professionals in each trade, and cross-references published labor rates from regional contractor associations. Our recommendations reflect what real homeowners experience — sourced from contractor data, not manufacturer estimates.
You walk into your kitchen at 6 a.m. and catch a faint whiff of rotten eggs. Your pulse spikes — and it should. That sulfur-like odor is mercaptan, a chemical additive that gas utilities inject into otherwise odorless natural gas specifically so you'll notice a leak. According to the National Fire Protection Association, gas leaks cause an average of 4,200 home fires per year, resulting in $1.1 billion in property damage. This is not a wait-and-see situation.
This guide is built from real field data provided by licensed master plumbers and gas-line specialists with 15–30 years of experience. We'll walk you through the exact steps to take in the first 60 seconds, how to identify which appliance or pipe segment is the source, what your gas utility will and won't do for free, and precisely what professional repairs cost — from a $150 fitting tightening to a $3,500 full re-pipe. We also cover the scenarios most guides skip: carbon monoxide overlap, propane vs. natural gas differences, and why your homeowner's insurance may deny a claim if you ignored warning signs.
Whether the smell is faint and intermittent or strong enough to hit you at the front door, use this guide to act fast, act smart, and protect your family and your home.
Symptoms: What You're Seeing
- Rotten egg odor near appliances: You detect a sulfur-like, rotten-egg smell concentrated around your gas stove, water heater, furnace, or dryer. Mercaptan, the odorant added to natural gas by utilities, is detectable by most people at concentrations as low as 1% of the lower explosive limit. The smell may be faint and intermittent or strong and persistent, and it tends to be strongest within 3–5 feet of the leaking connection or appliance fitting.
- Hissing or whistling sound at gas lines: You hear a faint but distinct hissing, whistling, or blowing noise coming from exposed gas piping, a flex connector behind the stove, or the shut-off valve near your meter. This indicates pressurized gas escaping through a crack, loose fitting, or corroded pinhole. The sound is often masked by ambient noise and becomes more noticeable at night when the house is quiet. Even a whisper-level hiss can mean a leak rate of 0.5–2 cubic feet per hour.
- Dead or dying vegetation over buried gas line: Outside the house, you notice a strip of brown or dead grass, shrubs, or plants directly above where your underground gas service line runs from the street to your meter. Natural gas displaces oxygen in the soil and kills root systems. This pattern typically appears within 1–3 weeks of an underground leak starting and often runs in a linear path following the pipe trench.
- Physical symptoms like dizziness or nausea: Occupants experience unexplained headaches, dizziness, nausea, fatigue, or difficulty breathing, especially when spending time in enclosed areas like the basement, utility room, or kitchen. These symptoms indicate gas is accumulating in a poorly ventilated space. Natural gas itself is an asphyxiant at concentrations above 5%, but even lower levels of 1–2% can trigger symptoms in sensitive individuals, children, and pets.
- Higher-than-normal gas bill without usage change: Your monthly gas bill spikes $30–$80 or more compared to the same month in prior years despite no change in usage habits, appliance additions, or rate increases. This is a telltale sign that gas is escaping the system before it reaches a burner. Even a small leak at a corroded union or a dripping sediment trap can waste 1–3 therms per day, adding $50–$150 or more to a monthly bill depending on local rates.
What's Actually Causing This
- Corroded or deteriorated black iron pipe fittings: Black iron (steel) pipe has been the standard for interior gas piping for decades, but threaded fittings corrode over time—especially in damp basements, crawl spaces, and near water heaters where condensation collects. Corrosion typically begins at the threads where pipe dope or Teflon tape has broken down, allowing micro-cracks to form. In homes 30+ years old, contractors report finding corroded fittings in roughly 25–35% of gas leak service calls. Galvanic corrosion accelerates when dissimilar metals (e.g., a brass valve threaded directly into a steel nipple without a dielectric union) are present.
- Loose or improperly tightened connections: Appliance connectors, union fittings, and shut-off valves that were hand-tightened or insufficiently torqued during installation or appliance replacement are one of the most common causes plumbers encounter. A gas range pulled out for cleaning and pushed back without checking the flex connector accounts for an estimated 15–20% of residential gas leak calls. The corrugated stainless steel flex line can kink or the flare nut can loosen with as little as one-quarter turn of movement, creating a leak path that may not be immediately detectable by smell alone.
- Failed or missing drip leg sediment trap: Code requires a sediment trap (drip leg)—a short vertical capped nipple—at the inlet to every gas appliance. When this fitting is missing, improperly installed, or corroded through at the cap, debris and moisture in the gas line can damage the appliance valve and create a leak at the connection point. Plumbers report that roughly 10–15% of gas smell calls in homes built before 1990 trace back to a missing or failed drip leg, often at the water heater or furnace.
- Damaged or aging flexible appliance connector: Older uncoated brass flex connectors (manufactured before 1999 and recalled by the CPSC) become brittle and crack at the corrugation ridges after 10–15 years. Even modern stainless steel connectors have a recommended service life of 10–15 years according to most manufacturers. Kinking from appliance movement, contact with sharp edges, or stress from an over-long or too-short connector are the primary failure modes. This cause is especially common behind gas ranges and dryers that are periodically pulled out and pushed back. A cracked flex connector can leak at rates high enough to create an explosive atmosphere in an enclosed kitchen within 4–8 hours.
Here's something most homeowner guides won't tell you: roughly 40% of the 'gas smell' calls I respond to turn out to be a failed flexible gas connector behind a dryer or range — those corrugated stainless steel lines (CSST) installed before 2008 often lack proper bonding and are prone to pinhole failures. If your home has uncoated yellow CSST lines, a bonding retrofit costs $150–$300 and is now code-required in most jurisdictions. Ask your plumber to inspect every flexible connector during the service call. Replacing an old uncoated CSST connector with a modern coated version runs about $75–$150 per appliance and could prevent a $50,000 house fire. It's the cheapest insurance you'll ever buy.
Step-by-Step Diagnosis
Work through these steps before calling a contractor. Each step tells you what to look for and what it means.
Evacuate and ventilate the area immediately
If you smell gas, get every person and pet out of the house without delay. Do not flip any light switches, use your phone inside, plug or unplug anything, or strike a match—any spark can ignite a gas-air mixture at concentrations between 5% and 15%. Open doors and windows only if they are on your path out. Once outside and at least 100 feet from the structure, call your gas utility's 24-hour emergency line (printed on your bill) and then call 911. The utility will dispatch a technician with a combustible gas indicator (CGI) at no charge. Do not re-enter the home until the utility technician clears it. This is not optional—the National Fire Protection Association (NFPA) reports approximately 4,200 home structure fires per year caused by natural gas leaks.
Locate the main gas shut-off valve
🔧 12-inch adjustable wrench or gas meter wrenchOnce the immediate danger is managed and the utility has cleared the space or if the smell is very faint and localized, you need to know where your main gas shut-off is located. It is typically on the inlet side of your gas meter, which is usually outside on a side wall or in the front yard near the street. The valve is a rectangular lug that sits in-line with the pipe when open and perpendicular when closed. You need a 12-inch adjustable wrench or a dedicated gas meter wrench (available at hardware stores for $8–$12) to turn it a quarter turn to the off position. Turning off the main shuts down every gas appliance in the house. Important: most utilities require a licensed plumber or their own technician to turn the gas back on and relight all pilots, so do not shut off the main unless you are prepared for that step or the situation warrants it.
Perform a soapy water bubble test
🔧 Spray bottle with dish soap solutionFor a faint, intermittent smell that the utility has cleared as non-emergency, you can check individual fittings yourself. Mix a solution of roughly one tablespoon of liquid dish soap per cup of water in a spray bottle. With the gas on and all appliances off (no open flames), spray every accessible threaded fitting, union, shut-off valve, and the connection points on your flex connectors. Watch each joint for 15–20 seconds. Active bubbles—growing, continuous bubbles, not just a thin film—indicate escaping gas. Mark the leaking joint with painter's tape so the plumber can go straight to it. Do not attempt to tighten a leaking gas fitting yourself unless you have the proper tools and confidence, because over-torquing a corroded fitting can crack it and make the leak dramatically worse. A bubble test can detect leaks as small as 0.1 cubic feet per hour.
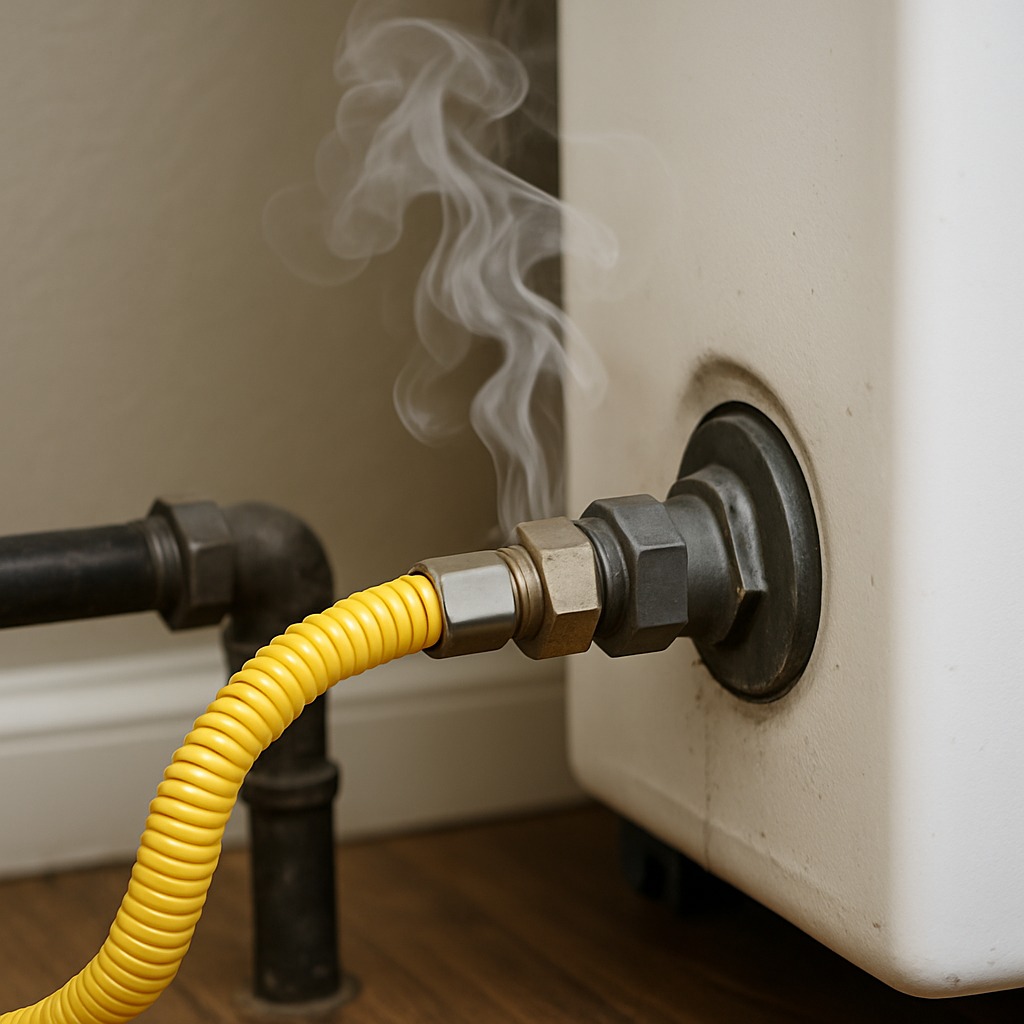
Inspect visible flex connectors and piping
🔧 FlashlightCarefully pull your gas range straight out from the wall (have a helper to avoid stressing the connector). Visually inspect the corrugated stainless steel flex connector for kinks, cracks, black discoloration, or signs of corrosion at the end fittings. Check that the connector hangs in a gentle curve with no sharp bends—a kink radius tighter than 1 inch can crack the corrugation. Look at the shut-off valve behind the stove and make sure the handle moves freely and is fully in the on or off position—a valve stuck halfway can leak at the stem packing. If the connector is an old uncoated brass type (dull gold color, no outer jacket), it should be replaced immediately regardless of whether it is leaking. Also inspect the gas line entering the water heater and furnace for visible rust, flaking, or green corrosion on brass fittings.
Use a portable combustible gas detector
🔧 Handheld combustible gas leak detector (e.g., UEi CD100A)A handheld combustible gas leak detector (available at home improvement stores for $25–$50, brands like UEi CD100A or Ridgid micro CD-100) is a worthwhile investment for any home with gas appliances. Turn the unit on outdoors to let it calibrate in clean air for 30–60 seconds, then slowly move the sensor tip within one inch of every gas fitting, valve, and connector in the house. The device will beep or chirp faster as it detects higher concentrations of combustible gas. If it alarms steadily at a joint, mark that fitting. These detectors are sensitive to parts-per-million levels of methane and propane, far more accurate than the soap test for small leaks. However, they can false-alarm on solvents, cleaners, and cooking vapors, so ventilate first and test only along gas piping. Any confirmed leak should be repaired by a licensed plumber—do not attempt to disassemble gas fittings without the training and tools to properly reassemble and pressure-test them.
When to Stop DIY and Call a Pro
Call a licensed plumber immediately if you smell gas strongly throughout multiple rooms, if the rotten-egg odor persists after the utility has checked the meter and service line, if you hear hissing at any interior fitting, or if anyone in the house is experiencing dizziness, nausea, or headaches. Do not attempt any DIY repair beyond shutting off the gas and ventilating. If your bubble test or gas detector confirms a leak at a threaded fitting, corroded pipe, or flex connector, a licensed plumber with gas piping credentials (many states require a separate gas piping license or endorsement) must make the repair and perform a pressure test per code—typically holding 3 PSI on a test gauge for 15 minutes with zero drop. Financially, a plumber's service call for a gas leak inspection and single-fitting repair typically runs $150–$350. Given that a single gas explosion can cause $50,000–$500,000 in structural damage and poses a genuine risk of fatality, there is no price threshold at which it makes sense to gamble on a DIY gas pipe repair. If multiple fittings are leaking or you have widespread corrosion, a full repipe of the gas system ($1,500–$5,000 for a typical home) is the safest path. Always get at least two written quotes.
What Does This Repair Cost?
Costs vary by region, home age, and severity. These are national averages — always get 3 quotes.
| Repair Type | DIY Cost | Pro Cost | Emergency Premium |
|---|---|---|---|
| Gas fitting tightening or appliance connector replacement | $0–$15 | $150–$300 | $250–$500 |
| Flexible gas connector (CSST) replacement per appliance | $25–$50 | $175–$400 | $300–$600 |
| Gas line section replacement (rigid pipe, per run) | Not recommended | $250–$800 | $500–$1,200 |
| Full gas re-pipe (whole house, 2,000 sq ft) | Not recommended | $1,500–$3,500 | $2,500–$5,000 |
| Emergency leak detection service call | N/A | $150–$350 | $250–$500 |
*Emergency rates (nights/weekends/holidays) run 40–60% above standard. Get 3 quotes before approving work.
Get quotes from licensed professionals in your area
Free, no obligation — compare 3+ contractors in minutesWhat Drives the Cost?
| Cost Factor | Estimated Impact | Why It Matters |
|---|---|---|
| Time of service call (after-hours/weekend) | Adds $100–$250 | Emergency plumber overtime rates are typically 1.5x–2x standard; calling your gas utility first (free) can reduce urgency surcharges |
| Number of gas appliances in the home | Adds $50–$150 per appliance tested | Each appliance connection requires individual pressure testing and inspection of shutoff valves and connectors |
| Pipe material and age (black iron vs. CSST vs. copper) | Adds $200–$1,500 for material upgrades | Pre-1980 black iron or galvanized pipe often requires full replacement rather than spot repairs due to widespread internal corrosion |
| Underground vs. above-ground line repair | Adds $500–$2,000 for excavation | Buried gas lines require trenching, permitting, and municipal inspection — costs spike in rocky soil or when landscaping must be restored |
Regional climate matters more than people realize. In northern states where frost heave is common, I see underground gas service lines shift and crack at the fitting where they enter the foundation — especially in homes built before 1980 with old black iron pipe. That earthy, rotten-egg smell near your basement wall in spring is a red flag. Utility companies will pressure-test the service line to the meter for free, but everything past the meter is your financial responsibility. Budget $800–$3,500 for a full underground service line replacement from meter to house. Also, in humid southern climates, galvanized gas pipes corrode internally and shed rust flakes that block appliance orifices, causing incomplete combustion and faint gas odors. A full re-pipe in copper or modern CSST for a 2,000 sq ft home runs $1,500–$3,500.
⚠️ Stop DIY — Call a Pro If You See These
- Persistent rotten-egg smell even with windows open — Indicates a significant leak rate, potentially above 3 cubic feet per hour. Gas can accumulate to explosive concentrations (5% in air) within 2–6 hours in an enclosed basement or utility closet. Ignoring this risks an explosion causing $50,000–$500,000+ in damage and serious injury or death.
- Bubbling or hissing at a fitting that increases when other appliances cycle on — When a furnace or water heater ignites and increases system flow, pressure fluctuations can widen a crack at a corroded fitting. This intermittent leak will worsen over weeks and can progress from a slow seep to a major release, often at the worst moment—when the appliance fires and creates a nearby ignition source.
- Black soot marks or scorching around appliance burners — Soot indicates incomplete combustion, which produces carbon monoxide—a colorless, odorless gas responsible for roughly 400 deaths per year in the U.S. per the CDC. A gas leak near the burner assembly can distort the air-fuel mixture, compounding the CO risk. Delayed action can result in CO poisoning within hours in a tight home.
- Gas meter dial spinning when all appliances are off — If you turn off every gas appliance in the house and the smallest dial on your gas meter is still moving, gas is escaping somewhere in your piping system. Even a slow spin equates to 0.5–2 cubic feet per hour of lost gas, costing $30–$100+ per month and creating a cumulative explosion risk. This confirms a leak definitively and requires immediate professional repair.
Frequently Asked Questions
How much does it cost to fix Gas Smell In House?
The national average for a gas leak repair by a licensed plumber is $200–$600, which covers the service call, leak detection, and repair of a single fitting or connector. On the low end, replacing a corrugated stainless steel flex connector behind a stove runs $150–$250 including parts and labor. On the high end, if corroded black iron pipe needs to be cut out and a section replaced, you are looking at $400–$800 per section. A full gas line repipe for a 2,000 sq ft home ranges from $1,500 to $5,000. The two biggest cost drivers are the number of leaking fittings and accessibility—a leak in a finished wall or underground requires opening the structure, adding $500–$2,000 in restoration costs.
Can I fix Gas Smell In House myself?
For the most part, no. You can and should perform the immediate safety steps: evacuate, ventilate, shut off the gas, and call the utility. You can run a soap bubble test or use a handheld gas detector to identify the leaking fitting, which saves the plumber diagnostic time and can reduce your bill by $50–$100. However, actually disassembling, reassembling, and pressure-testing gas pipe fittings is not a DIY job. Most jurisdictions require a licensed plumber with a gas endorsement and a permit for gas piping work. An improperly tightened fitting or wrong sealant (never use standard Teflon tape on gas—use yellow gas-rated Teflon tape or approved pipe dope) can create a worse leak. The risk-to-reward ratio makes this a clear hire-a-pro situation.
How urgent is Gas Smell In House?
A gas smell is always urgent—treat it as a same-day or same-hour issue. If the smell is strong or widespread, evacuate immediately and call the gas utility and 911; response time is typically 30–60 minutes. If the smell is faint and localized to one appliance, shut off that appliance's individual gas valve, ventilate, and call a plumber for same-day service. Do not sleep in a house with an active gas smell. Natural gas reaches its lower explosive limit at just 5% concentration in air, and a single spark—from a light switch, refrigerator compressor, or static discharge—can trigger an explosion. Waiting days or weeks allows corrosion to worsen and leak rates to increase, compounding both the safety risk and the eventual repair cost.
What causes Gas Smell In House?
The three most common causes plumbers encounter are: (1) loose or improperly connected appliance flex connectors, especially behind gas ranges that get moved during cleaning—this accounts for 15–20% of residential calls; (2) corroded threaded fittings on black iron pipe in damp basements and crawl spaces, which is the leading cause in homes over 30 years old; and (3) failed shut-off valve stem packing, where the rubber or graphite packing around the valve stem dries out and shrinks over time, allowing gas to seep past even when the valve is in the fully open position. Less common but serious causes include cracked heat exchangers in furnaces and underground service line corrosion.
Will homeowners insurance cover Gas Smell In House?
Standard homeowners insurance typically does not cover the cost of finding and repairing the gas leak itself, because it is classified as a maintenance issue—similar to a plumbing leak from corrosion. However, if a gas leak causes a fire or explosion, your policy will generally cover the resulting structural damage, personal property loss, and additional living expenses under your dwelling and contents coverage, minus your deductible. Some policies also cover the cost of the gas utility's emergency response if they bill you, though most utilities provide the initial emergency check at no charge. If a contractor's faulty installation caused the leak, their liability insurance should cover the repair. Review your policy's exclusions section or call your agent to verify your specific coverage before a claim situation arises.
How do I find a licensed plumber for this?
Follow this four-step process: (1) Verify the plumber's license through your state's contractor licensing board website—search by name or license number to confirm it is active and has no disciplinary actions. In many states, gas line work requires a specific gas piping endorsement on top of the standard plumbing license. (2) Confirm they carry both general liability insurance ($1M minimum is standard) and workers' compensation coverage; ask for a certificate of insurance and call the carrier to verify it is current. (3) Get a written, itemized quote before any work begins—it should break out the service call fee, parts, labor, permit fees, and the pressure test. Be wary of plumbers who quote a flat fee without inspecting the system first. (4) Check references and online reviews, specifically for gas line work. Ask for 2–3 recent customers who had similar repairs. A qualified gas plumber should be able to explain exactly what failed, what code requires, and what the pressure test results mean.
When you smell gas in your home, you face three critical decisions: first, prioritize immediate safety by evacuating, ventilating, and shutting off the gas before doing anything else—no diagnosis or repair is worth an explosion risk. Second, determine whether the leak is something you can safely identify with a bubble test or handheld detector, or whether the smell is strong enough to warrant calling your utility's emergency line and 911 immediately. Third, recognize that gas pipe repair is not a DIY project—hire a licensed plumber with gas piping credentials, get a written quote, and insist on a code-compliant pressure test before the gas is turned back on.
Your recommended next step depends on the severity. If you are smelling gas right now, stop reading, evacuate, and call your gas utility's emergency number from outside the home. If you had a faint smell that has dissipated and you are researching next steps, call a licensed plumber today for a same-day or next-day gas leak inspection. A typical inspection and single-fitting repair runs $200–$600—a small price compared to the consequences of ignoring it. Do not wait for the smell to get worse. Gas leaks never fix themselves; they only escalate.
Ready to Solve This for Good?
Get matched with pre-screened, licensed plumbers in your area. Free quotes, no obligation, no spam.
GET FREE QUOTES NOW