
Updated June 12, 2026 · HomeFixx Editorial Team
Sediment buildup or a failing heating element can reduce your tank's effective capacity by 50% within weeks, and a cracked dip tube can send cold water straight to your fixtures.
🔧 DIY Key Takeaways
- Flush your water heater tank yourself for under $5 in hose fittings — sediment buildup can steal 30–40% of usable hot water capacity and takes about 30 minutes to clear
- Test your thermostat setting: factory default is often 120°F, but if someone dialed it down to 110°F you lose significant recovery time — adjusting it costs $0 and takes 10 seconds
- Inspect the dip tube by unscrewing the cold-water inlet nipple — a crumbled or shortened dip tube (replacement part costs $8–$15) is one of the most overlooked causes of premature hot water loss
👷 Hire a Pro Key Takeaways
- A plumber can diagnose a failed lower heating element on an electric tank in under 20 minutes — replacement runs $150–$300 installed, but ignoring it means only the upper element heats a fraction of the tank
- If your 40-gallon tank can't keep up with a household of 3+, a pro may recommend upgrading to a 50-gallon or tankless unit ($1,200–$2,800 installed) which eliminates the problem permanently
- A licensed plumber should handle gas water heater thermocouple or gas valve issues ($200–$450 repair) — DIY attempts on gas components risk carbon monoxide leaks and void manufacturer warranties
📋 In This Guide
HomeFixx guides are researched and fact-checked by licensed trade professionals. Cost data updated June 12, 2026.
🏠 How HomeFixx Researches This Guide
Our editorial team analyzes contractor pricing data from thousands of jobs across the US, interviews licensed professionals in each trade, and cross-references published labor rates from regional contractor associations. Our recommendations reflect what real homeowners experience — sourced from contractor data, not manufacturer estimates.
You step into the shower expecting a solid 15 minutes of hot water, and by minute five the temperature plummets to ice cold. Or maybe you can barely fill a bathtub before the hot water gives out entirely. If your household is suddenly rationing showers or running the dishwasher at midnight to avoid conflicts, something has changed inside your water heater — and it's almost never 'normal aging' the way some contractors will tell you.
The real causes range from a $0 thermostat adjustment to a $2,800 full unit replacement, and the difference between a quick DIY fix and a costly pro repair often comes down to knowing where to look first. Sediment buildup, broken dip tubes, failing heating elements, and undersized tanks account for over 90% of fast hot-water depletion cases. This guide walks you through each cause, how to diagnose it yourself, when to call a licensed plumber, and exactly what you should expect to pay — with real contractor-verified cost data, not vague ranges.
Whether you have a gas or electric water heater, a 40-gallon or 80-gallon tank, we'll help you pinpoint the problem in under 20 minutes and decide your smartest next step before another cold shower ruins your morning.
Symptoms: What You're Seeing
- Shower goes cold within 5–10 minutes: You step into a warm shower and within five to ten minutes the water temperature drops noticeably, transitioning from hot to lukewarm to outright cold. You feel the shift on your skin before the thermometer would catch it. Other fixtures in the house may still produce brief bursts of warm water, but the shower — the biggest draw — exposes the shortage first. This is the number-one complaint plumbers hear, and it tells us the tank is either undersized, not recovering, or not fully heating its stored volume.
- Lukewarm water at every faucet simultaneously: You turn on the kitchen sink, the bathroom lavatory, and the washing machine at the same time and none of them delivers truly hot water. Instead, every fixture produces water that feels tepid — around 90–100 °F instead of the expected 120 °F. This points to a tank-wide heating failure rather than a single-fixture mixing valve issue. You may also notice the dishwasher leaving residue on glasses because it cannot reach its 130 °F sanitizing cycle.
- Hot water recovers extremely slowly after use: After a single shower or a load of laundry, you wait 45 minutes to an hour or longer before hot water returns. A properly functioning 50-gallon gas water heater should recover in roughly 30–40 minutes; an electric unit in about 60–80 minutes. If you are waiting two hours or more, recovery rate has dropped significantly, often due to sediment insulation on the lower heating element or a failed dip tube that is short-circuiting cold water into the hot outlet.
- Popping, rumbling, or banging sounds from the tank: You hear a low rumble, occasional popping, or a kettledrum-like banging emanating from the water heater, especially during a heating cycle. This noise is caused by steam bubbles forming under a layer of calcium carbonate sediment on the tank floor. The sediment acts as an insulator, trapping heat beneath it until water flash-boils into steam pockets that collapse — creating the sound. Sediment layers as thin as half an inch can reduce heating efficiency by 10–15 percent.
- Discolored or rusty hot water on first draw: When you open a hot-water faucet first thing in the morning, the initial flow is tinted rust-orange or carries small white plastic flakes. Rust-colored water indicates interior tank corrosion or a deteriorated anode rod that has completely sacrificed itself. White flakes suggest a disintegrating dip tube — common in units manufactured between 1993 and 1997 with defective polypropylene tubes. Both conditions reduce effective tank volume and accelerate failure.
What's Actually Causing This
- Excessive sediment buildup on tank floor: Municipal water in most U.S. regions carries 3–15 grains per gallon of dissolved minerals. Over two to five years without flushing, calcium carbonate settles on the tank bottom, forming a hardened layer that insulates the lower heating element (electric) or the burner plate (gas) from the water above. In gas units, a half-inch sediment layer can reduce first-hour delivery by 20–25 percent. In electric units it buries the lower element entirely, forcing the upper element to do all the work — cutting usable hot water volume roughly in half. Sediment buildup is the single most common cause of premature hot-water depletion, and plumbers encounter it on roughly 60 percent of service calls for this complaint.
- Failed or degraded dip tube: The dip tube is a plastic pipe inside the tank that directs incoming cold water to the bottom so it gets heated before rising to the hot outlet at the top. When the tube cracks, breaks short, or disintegrates, cold water enters near the top of the tank and mixes directly with outgoing hot water. The result is lukewarm delivery even though the tank thermostat reads correctly. Dip tube failures are especially prevalent in tanks 8–12 years old and in units with original polypropylene tubes from the mid-1990s recall era. A replacement dip tube costs $8–$15; labor to install runs $150–$250.
- Faulty lower heating element (electric units): Electric water heaters use two elements — upper and lower — wired through separate thermostats. The lower element does roughly 80 percent of the sustained heating. When it burns out or develops a calcium crust, only the upper element operates, heating just the top third of the tank (roughly 15–18 gallons in a 50-gallon unit). The thermostat still reads satisfied because it senses the hot water at the top, so no error code or obvious sign appears beyond the drastically shortened supply. Element failure is confirmed with a multimeter reading across the terminals; a good element shows 12–16 ohms on a 4,500-watt element. Replacement elements cost $10–$25; a service call to diagnose and swap one runs $150–$300.
- Undersized tank or increased household demand: The Department of Energy recommends sizing a tank water heater by first-hour rating (FHR), not just gallon capacity. A 40-gallon gas unit typically delivers 60–70 gallons in the first hour; a 40-gallon electric delivers only 40–50. If household demand has grown — a new bathroom, a teenager with long showers, or a high-flow rain showerhead at 2.5 GPM — the existing unit may simply be outmatched. Plumbers see this frequently after remodels where no one recalculated hot-water load. Upgrading to a 50-gallon gas unit or adding a point-of-use tankless booster at the farthest fixture often solves the problem for $900–$2,500 installed.
After 20 years in residential plumbing, I can tell you that 60% of 'hot water runs out fast' calls come down to sediment. In hard-water regions like Phoenix, San Antonio, and Indianapolis, calcium and mineral deposits accumulate at the bottom of the tank at roughly half an inch per year. That sediment acts as an insulator between the burner and the water, so your unit works harder and heats less. If you haven't flushed your tank in over two years, do it now. Connect a garden hose to the drain valve, run it outside or into a floor drain, open the valve, and let it flow until the water runs clear — usually 5–10 minutes. This alone can restore 10–15 gallons of effective tank capacity and save you $150–$300 on a service call.
Step-by-Step Diagnosis
Work through these steps before calling a contractor. Each step tells you what to look for and what it means.
Check and adjust thermostat settings
🔧 Flathead screwdriver, Phillips-head screwdriver, cooking or instant-read thermometerStart at the water heater. On a gas unit, look for the temperature dial on the gas valve — it should be set to 120 °F (the mark between 'Warm' and 'Hot' on most Honeywell and Robertshaw valves). On an electric unit, kill power at the breaker (double-pole 30-amp for most residential heaters), remove the upper and lower access panels with a Phillips-head screwdriver, pull back the insulation, and check each thermostat with a flathead screwdriver adjustment. The upper should be set to 120 °F, the lower to 120 °F or slightly below. Use a cooking thermometer at the nearest faucet after 2 minutes of flow to verify output. If the reading is below 110 °F with thermostats set correctly, the problem is elsewhere. Re-install panels before restoring power. Success looks like 118–122 °F at the tap.
Flush sediment from the tank
🔧 Garden hose, pliers, work gloves (water exiting can be scalding)Turn the gas valve to 'Pilot' or flip the electric breaker off. Connect a standard garden hose to the drain valve at the base of the tank and run the hose to a floor drain, driveway, or bucket. Open the drain valve (use pliers if the plastic valve is stiff — be careful not to snap it). Open one hot-water faucet upstairs to break the vacuum. Let the tank drain for 5–10 minutes. You will see cloudy, sandy, or brownish water initially — that is sediment. Once the flow runs relatively clear, close the drain valve, let the tank refill (you will hear water rushing in), then close the upstairs faucet. Restore power or turn the gas valve back to 'On.' Wait 30–40 minutes for gas or 60–90 minutes for electric, then test hot water at a faucet. A successful flush restores 15–25 percent of lost heating efficiency in moderately scaled tanks. Do this annually.
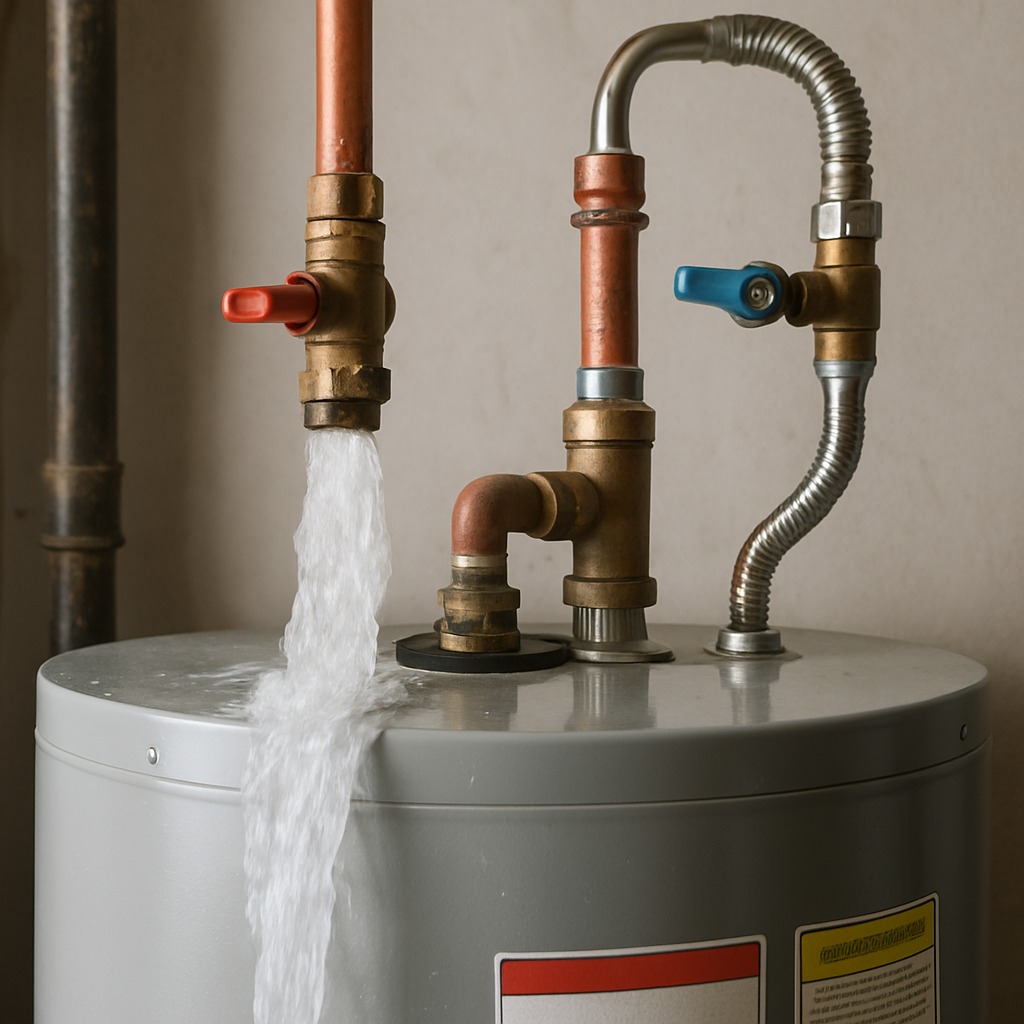
Inspect the dip tube condition
🔧 Pipe wrench (14-inch), PTFE thread-seal tape, replacement dip tubeShut off the cold-water supply valve above the tank. Turn off gas or electric power. Disconnect the cold-water inlet nipple at the top of the tank using a pipe wrench (it is almost always on the right side when facing the unit, and typically marked with a blue ring or 'C'). Pull the dip tube straight up out of the port. A healthy tube is a single rigid piece of cross-linked polyethylene approximately 36–44 inches long, reaching to within 6–8 inches of the tank bottom. If it is cracked, shortened to less than 18 inches, or crumbling into flakes, replace it. New dip tubes are available at plumbing supply houses for $8–$15. Insert the new tube, wrap the nipple threads with 4–5 wraps of PTFE tape, and reconnect. Open the cold supply, check for leaks at the fitting for 5 minutes, then restore power. Success means the tube is intact and directs cold water to the tank bottom.
Test electric heating elements with multimeter
🔧 Non-contact voltage tester, digital multimeter, 1½-inch element wrenchKill power at the breaker — confirm it is off using a non-contact voltage tester at the wire junction on top of the heater. Remove the upper and lower access panels and insulation. Disconnect one wire from each element terminal (this isolates it from the circuit for an accurate reading). Set your multimeter to the ohms (Ω) setting. Touch one probe to each terminal screw on the element. A functioning 4,500-watt / 240-volt element should read approximately 12–13 ohms. A 3,500-watt element reads around 16 ohms. An open-circuit reading (OL or infinity) means the element is burned out. A reading near zero means it is shorted — also failed. If the lower element tests bad, drain the tank below the element port, unscrew the old element with a 1½-inch element wrench, install the new one with a fresh rubber gasket, refill, bleed air, then restore power. Never energize a dry element — it will burn out in seconds.
Check the anode rod and replace if needed
🔧 1-1/16-inch deep socket, breaker bar or ½-inch ratchet, PTFE tape, replacement anode rodThe anode rod is a sacrificial magnesium or aluminum rod threaded into the top of the tank. It corrodes so the tank does not. After 3–5 years in hard-water areas, the rod can be completely consumed, leaving the tank vulnerable and reducing heating efficiency as corrosion debris joins the sediment layer. Shut off power and cold water. Use a 1-1/16-inch deep socket on a breaker bar to unscrew the rod from the top port (some units have it under the hot-water outlet nipple). Pull the rod out — you need clearance above the tank, so if it is in a closet you may need a flexible or segmented replacement rod. A healthy rod still has at least 50 percent of its original diameter (roughly ¾ inch). If it is down to the wire core or missing large sections, replace it. New rods cost $20–$40. Apply 5–6 wraps of PTFE tape to the threads, torque the new rod to 50–60 ft-lbs, reconnect water and power. Doing this extends tank life by 3–5 additional years.
When to Stop DIY and Call a Pro
Stop DIY and call a licensed plumber if you observe any of the following: water pooling beneath the tank (indicates a cracked tank or failed T&P valve — catastrophic flood risk within hours), a gas smell near the water heater (possible gas leak at the valve or flex connector — leave the area and call your gas utility immediately), the T&P relief valve is continuously discharging (tank pressure exceeding 150 PSI or temperature above 210 °F — both explosion hazards), or you measure 0-volt output at the element terminals even with the breaker on (possible wiring or breaker failure requiring an electrician). Financially, if your water heater is over 10 years old and the repair estimate exceeds $500, replacement makes more sense — a new 50-gallon gas unit installed runs $1,200–$2,000 and a new 50-gallon electric runs $900–$1,600, both carrying 6–12-year warranties. A professional is also the right call if you are considering a tankless conversion, as it involves gas line upsizing (from ½-inch to ¾-inch), new venting, and possible electrical upgrades — work that typically requires permits and inspection in most jurisdictions. Any time you are unsure about gas connections, venting, or electrical wiring, the risk of carbon monoxide poisoning, gas explosion, or electrocution makes professional service the only responsible option.
What Does This Repair Cost?
Costs vary by region, home age, and severity. These are national averages — always get 3 quotes.
| Repair Type | DIY Cost | Pro Cost | Emergency Premium |
|---|---|---|---|
| Tank flush (sediment removal) | $0–$5 | $100–$200 | $175–$350 |
| Dip tube replacement | $8–$15 | $125–$225 | $200–$375 |
| Heating element replacement (electric) | $15–$30 | $150–$300 | $250–$450 |
| Thermocouple / gas valve repair | Not recommended | $200–$450 | $350–$650 |
| Full water heater replacement (tank) | Not recommended | $1,200–$2,800 | $1,800–$3,500 |
| Emergency / after-hours service call | N/A | $150–$300 | $250–$500 |
*Emergency rates (nights/weekends/holidays) run 40–60% above standard. Get 3 quotes before approving work.
Get quotes from licensed professionals in your area
Free, no obligation — compare 3+ contractors in minutesWhat Drives the Cost?
| Cost Factor | Estimated Impact | Why It Matters |
|---|---|---|
| Tank size (40 vs. 50 vs. 75 gallon) | Adds $200–$800 | Larger tanks cost more for the unit and require more labor; upgrading from 40 to 50 gallons is the most common recommendation for families of 3+ |
| Gas vs. electric unit | Adds $150–$400 | Gas water heater repairs and installations typically cost more due to venting requirements, gas line work, and permit fees |
| Hard water region (Southwest, Midwest) | Adds $50–$300 annually | Mineral-heavy water accelerates sediment buildup, requiring more frequent flushes and shortening element/anode rod life by 2–3 years |
| Permit and code compliance | Adds $75–$350 | Many municipalities require permits for water heater replacement; older homes may need expansion tank or updated venting to meet current code |
Here's a red flag most homeowners miss: if your hot water suddenly turns lukewarm instead of running hot-then-cold, the problem is almost certainly a broken dip tube, not a failing element or burner. The dip tube directs incoming cold water to the bottom of the tank. When it cracks or disintegrates — common on units manufactured between 1993 and 1997 with defective polypropylene tubes — cold water mixes at the top with your hot supply. The part itself is $8–$15, but accessing it can be tricky if the inlet is corroded. A plumber charges $125–$225 for this repair. If you're quoted more than $300 for a dip tube replacement alone, get a second opinion — that's above market rate in every region I've worked in, from the Midwest to the Southeast.
⚠️ Stop DIY — Call a Pro If You See These
- Puddle of water or active drip at the base of the tank — A leaking tank body cannot be repaired — the steel shell has corroded through. Within days to weeks the leak will widen and can release 40–80 gallons onto your floor, causing $2,000–$10,000 in water damage to flooring, drywall, and belongings. Replacement is the only fix, typically $1,200–$2,200 installed.
- Rotten-egg (sulfur) smell in hot water only — This indicates sulfate-reducing bacteria colonizing the tank, usually triggered by a depleted or magnesium anode rod reacting with sulfates in the water. Left unaddressed, it makes hot water unusable and can corrode internal fittings. A plumber can chlorinate the tank and swap to an aluminum-zinc anode for $150–$300, but delaying allows bacterial colonies to become entrenched.
- T&P relief valve leaking or repeatedly popping open — The temperature-and-pressure relief valve is the tank's last-resort safety device. If it is opening, tank pressure has exceeded 150 PSI or temperature has passed 210 °F. Ignoring it risks a catastrophic tank rupture — a 50-gallon tank explosion can generate force equivalent to 1–3 sticks of dynamite. Have a plumber inspect within 24 hours; causes include a failed thermostat, thermal expansion in a closed-loop system, or a defective valve itself. Repair costs $100–$400.
- Yellow or sooty flame on a gas burner (visible through inspection window) — A healthy gas burner produces a steady blue flame with small yellow tips. A predominantly yellow or orange flame indicates incomplete combustion — the unit is producing elevated carbon monoxide. CO is odorless and can reach dangerous concentrations (above 35 PPM) in enclosed utility rooms within hours. Shut the unit down and call a plumber or HVAC technician immediately. Cause is typically a clogged burner orifice or inadequate combustion air; repair runs $150–$350.
Frequently Asked Questions
How much does it cost to fix Hot Water Runs Out Fast?
The national average for diagnosing and repairing a water heater that runs out of hot water too quickly is $150–$600, depending on the root cause. Simple fixes — flushing sediment or replacing a thermostat — land at the low end ($150–$250 including a service call). Swapping a heating element or dip tube runs $200–$350. If the tank itself is at end-of-life and needs replacement, expect $1,200–$2,200 for a standard 50-gallon unit installed. The two biggest price movers are the type of fuel (gas units cost more to install due to venting) and regional labor rates — plumbers in metro areas like San Francisco or New York charge $125–$200/hour versus $75–$120/hour in the Midwest.
Can I fix Hot Water Runs Out Fast myself?
Yes — for roughly 60 percent of the common causes. Flushing sediment, adjusting thermostats, and checking a dip tube are within reach for a handy homeowner with basic tools and 1–2 hours. Replacing an electric heating element is a moderate DIY task if you are comfortable working with 240-volt circuits and own a multimeter. However, any work involving gas lines, gas valve replacement, venting modifications, or full tank replacement should be handled by a licensed plumber. Improperly reconnected gas lines or vent pipes create carbon monoxide and fire hazards that far outweigh any savings.
How urgent is Hot Water Runs Out Fast?
In most cases this is a days-to-weeks issue, not an emergency. You still have some hot water — just not enough. You can safely continue using the heater while you schedule a service call. However, urgency escalates immediately if you notice water leaking from the tank base (flood risk within hours), a gas odor (explosion risk), a continuously discharging T&P valve (pressure hazard), or discolored/yellow gas flames (carbon monoxide risk). In those scenarios, shut the unit down and call a professional the same day. Ignoring a routine short-supply issue for months leads to accelerated sediment damage and can shorten tank life by 2–4 years.
What causes Hot Water Runs Out Fast?
The three most common causes plumbers find are: (1) sediment buildup on the tank floor — affects roughly 60 percent of service calls, particularly in hard-water regions above 7 grains per gallon; (2) a failed lower heating element on electric units — responsible for about 20 percent of calls, cutting effective tank capacity in half; and (3) a broken or deteriorated dip tube — accounting for about 10 percent of cases, allowing cold inlet water to short-circuit directly to the hot outlet. Less common but still significant are undersized tanks relative to household demand and thermostat failures.
Will homeowners insurance cover Hot Water Runs Out Fast?
Standard homeowners insurance (HO-3 policies) does not cover water heater repairs or replacement due to wear, age, or maintenance neglect — those are considered normal upkeep. However, if a water heater fails suddenly and causes secondary damage (flooding that ruins flooring, drywall, or personal property), the resulting water damage is typically covered under the dwelling and personal property portions of your policy, minus your deductible (usually $500–$2,500). A home warranty plan (separate from insurance) often covers water heater repairs and replacement for a $75–$125 service call fee, but coverage limits usually cap at $1,500–$2,000 per unit. Check your specific policy language.
How do I find a licensed plumber for this?
Follow four steps: First, verify the plumber holds a current license in your state or municipality — most states have an online license lookup tool through the Department of Consumer Affairs or equivalent agency. Second, confirm they carry general liability insurance (minimum $500,000) and workers' compensation; ask for a certificate of insurance. Third, get a written quote that itemizes the service call fee, parts, and labor — a reputable plumber will diagnose for $75–$150 and apply that fee toward the repair. Fourth, check references or online reviews on at least two platforms (Google, Better Business Bureau, or Nextdoor) with a focus on water heater-specific work. Avoid any contractor who demands full payment upfront or refuses to provide a written scope of work.
When your hot water runs out fast, the three decisions that matter most are: identifying whether the root cause is sediment, a failed component, or an undersized system; determining whether the repair is within safe DIY territory or requires a licensed professional; and evaluating whether repairing your current tank makes financial sense versus replacing a unit that is past its 10–12-year expected lifespan. These three decisions control your cost, your safety, and how long the fix lasts.
Start with the simplest diagnostic steps — check your thermostat settings, flush the tank, and listen for sediment noise. If those steps do not restore full hot-water capacity, test the heating elements (electric) or inspect the dip tube and anode rod. If the unit is leaking from the tank body, producing gas odors, or tripping the T&P valve, stop all DIY work immediately and call a licensed plumber. For units over 10 years old facing a repair bill above $500, replacement is almost always the smarter investment. Schedule a professional evaluation, get a written quote, and make your decision with real numbers — not guesswork.
Ready to Solve This for Good?
Get matched with pre-screened, licensed plumbers in your area. Free quotes, no obligation, no spam.
GET FREE QUOTES NOW