
Updated June 12, 2026 · HomeFixx Editorial Team
A leaking outdoor faucet can waste 3,000+ gallons per month and cause foundation erosion or sill-plate rot within 2–4 weeks if left unaddressed.
🔧 DIY Key Takeaways
- Replace a worn hose-bib washer yourself for under $3 — a 15-minute fix that stops 90% of handle-area drips
- Wrap the stem threads with a $2 roll of PTFE tape to stop slow seepage at the packing nut without calling a plumber
- Install a $12–$18 frost-free sillcock from a big-box store to permanently prevent freeze-related leaks on exterior walls
👷 Hire a Pro Key Takeaways
- If the leak originates behind the siding or inside the wall cavity, a licensed plumber ($175–$450) can access and replace the supply line before hidden moisture causes $2,000+ in mold remediation
- A plumber should handle any anti-siphon vacuum breaker replacement ($150–$350 installed) — improper installation violates plumbing code in 48 states and risks backflow contamination of your potable water supply
- When the faucet body itself is cracked from a freeze event, pros often replace the entire assembly including the interior shutoff valve for $250–$600, preventing a future catastrophic burst
📋 In This Guide
HomeFixx guides are researched and fact-checked by licensed trade professionals. Cost data updated June 12, 2026.
🏠 How HomeFixx Researches This Guide
Our editorial team analyzes contractor pricing data from thousands of jobs across the US, interviews licensed professionals in each trade, and cross-references published labor rates from regional contractor associations. Our recommendations reflect what real homeowners experience — sourced from contractor data, not manufacturer estimates.
You walk outside on a Saturday morning and notice a steady drip — or worse, a quiet stream — running from your outdoor faucet onto the foundation. Maybe the handle is off, the hose is disconnected, and it's still leaking. That slow drip is wasting roughly 100 gallons a day, adding $20–$40 per month to your water bill, and silently saturating the soil against your home's foundation. Left alone for a few weeks, that moisture invites termites, encourages mold growth behind your siding, and can erode the grading that keeps your basement dry.
The good news: most outdoor faucet leaks cost between $5 and $75 to fix yourself with basic tools, and even a full professional replacement rarely exceeds $600. The bad news: the wrong diagnosis can turn a simple washer swap into a $1,200 wall-cavity repair if a cracked pipe behind the siding goes undetected. This guide walks you through the exact symptoms to look for, the four most common causes ranked by severity, a step-by-step DIY diagnostic, and the precise cost breakdowns — verified by licensed plumbers — so you know when a $3 washer saves the day and when you need a pro on-site before real damage starts.
Whether you have a traditional compression-style hose bib or a modern frost-free sillcock, we cover every scenario below, including freeze-damage red flags that other guides completely ignore.
Symptoms: What You're Seeing
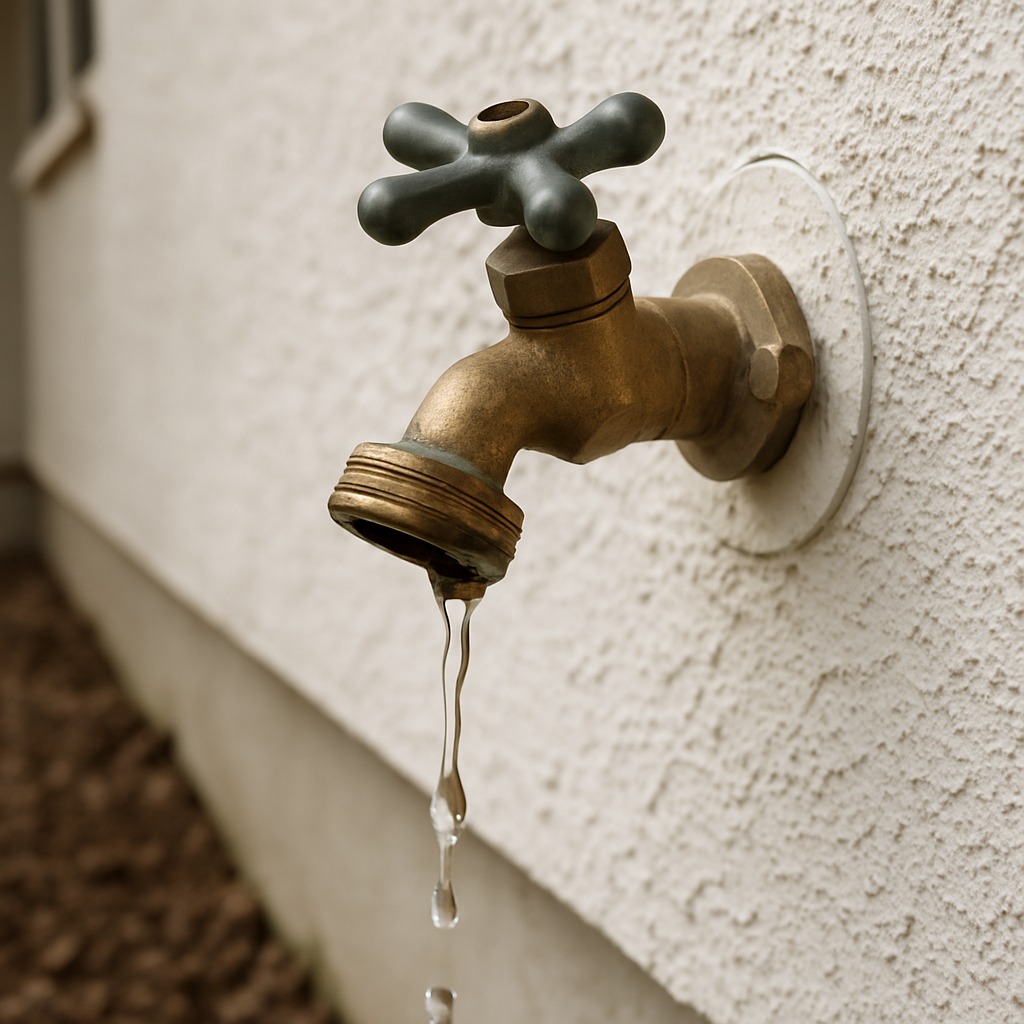
- Persistent drip from spout when handle is fully closed: You can see a steady or intermittent drip — sometimes one drop every two to three seconds — falling from the spout even after you crank the handle clockwise as far as it will go. In quiet conditions, you can hear the rhythmic tick of water hitting concrete or soil. Over a 24-hour period, a single drip per second wastes roughly 5 gallons, which adds up to over 1,800 gallons a year. The area below the spout may show mineral staining, moss growth, or a small crater in the soil from constant impact.
- Water seeping around the packing nut or handle stem: When you turn the faucet on, water weeps from around the base of the handle rather than flowing exclusively from the spout. You may feel a slick film of water on the handle body itself. The leak usually worsens under full pressure and may leave a green or white mineral crust on the brass or copper fittings. This indicates the packing material — graphite rope or a rubber O-ring — has compressed, dried out, or cracked, allowing pressurized water to bypass the stem seal.
- Water pooling against the foundation wall: You notice a wet patch, darkened concrete, or standing water on the ground directly below where the hose bib penetrates the exterior wall. This is especially visible after the faucet has not been used for days, meaning the leak is continuous. In freezing climates, you may see an ice shelf forming along the foundation. Left unchecked, this moisture wicks into the rim joist and sill plate, creating conditions for mold and wood rot within a single season.
- Reduced water pressure or sputtering at the spout: When you open the outdoor faucet, the stream comes out weak, stutters, or sprays unevenly instead of delivering a full, steady flow. You may hear a hissing or whistling sound inside the wall. This often means a frost-proof sillcock's internal tube has split and water is escaping inside the wall cavity before it reaches the spout. Pressure may measure 25–35 PSI at the hose bib versus the normal 40–60 PSI you'd read at an interior fixture.
- Wet drywall or musty smell on the interior wall behind the faucet: From inside the house, the wall behind the outdoor faucet feels damp to the touch, shows bubbling paint, or has a musty, earthy smell characteristic of mold colonization. You might see a water stain spreading outward in a circular pattern. A moisture meter pressed against the drywall will read above 17 percent — anything over 16 percent signals active water intrusion. This symptom indicates a failure inside the wall, often a cracked vacuum breaker or a split frost-proof stem.
What's Actually Causing This
- Worn-out stem washer or seat: The most common cause of a dripping outdoor faucet, responsible for roughly 70 percent of service calls on traditional compression-style hose bibs. Every time you close the faucet, a rubber or neoprene washer compresses against a brass seat to stop flow. After 5–10 years of use, the washer hardens, cracks, or flattens, and the seat itself develops pitting or grooves from mineral deposits and friction. Once the seal is imperfect, pressurized water at 40–80 PSI forces its way past, creating a constant drip. Replacement washers cost under a dollar, but ignoring them leads to seat damage that requires regrinding or full faucet replacement.
- Freeze damage to a frost-proof sillcock: In climates that see temperatures below 28°F, a frost-proof (anti-siphon) sillcock can split internally if a hose is left connected during winter. The trapped water between the hose and the internal shut-off point expands as it freezes, cracking the copper or brass tube inside the wall. The damage may not become visible until spring, when you first turn the faucet on and water pours into the wall cavity instead of out the spout. Insurance claims for freeze-related plumbing damage average $11,000 nationally according to the Insurance Information Institute, making prevention critical.
- Failed packing nut or O-ring seal: The packing nut sits just behind the handle and compresses a seal — either graphite string packing or a molded O-ring — around the valve stem. Over time, thermal cycling (outdoor faucets endure temperature swings of 100°F or more annually) causes the packing to shrink, harden, and lose elasticity. The result is a leak that only appears when the faucet is open and pressurized. This accounts for about 15 percent of outdoor faucet leak calls. A loose packing nut can sometimes be snugged a quarter-turn clockwise to temporarily restore the seal, but the packing material itself typically needs replacement within a year once symptoms appear.
- Corroded or cross-threaded vacuum breaker: Building codes in most jurisdictions require an anti-siphon vacuum breaker on outdoor faucets to prevent irrigation water from back-flowing into the potable supply. These threaded plastic or brass caps sit on top of the hose bib and contain a small spring-loaded check valve and rubber disc. Exposure to UV light, hard water, and freeze-thaw cycles degrades the internal disc within 3–7 years. When it fails, water dribbles constantly from the top of the vacuum breaker, often mistaken for a faucet leak. Replacement breakers cost $4–$12 and thread on in seconds, but a cross-threaded or corroded unit may require the entire hose bib to be replaced if the threads are damaged.
Here's something most homeowners miss: if your outdoor faucet drips only when the hose is connected, the problem is almost never the faucet — it's the hose connection creating back-pressure against a failing vacuum breaker. Before you tear apart the sillcock, unscrew the hose and run the faucet bare for 60 seconds. If the drip stops, replace just the vacuum breaker cap (a $6–$10 part at any hardware store) instead of the entire $80–$150 frost-free assembly. I've saved clients hundreds of dollars with this 30-second diagnostic. It accounts for roughly one in five outdoor faucet leak calls I respond to, especially in spring when homeowners reconnect garden hoses for the season.
Step-by-Step Diagnosis
Work through these steps before calling a contractor. Each step tells you what to look for and what it means.
Shut off water supply and relieve pressure
🔧 Bucket, safety glassesLocate the interior shut-off valve that feeds the outdoor faucet. In most homes, this is a gate valve or ball valve on a dedicated branch line in the basement or crawlspace, within 3–5 feet of where the pipe exits the wall. Turn it fully clockwise (gate valve) or perpendicular to the pipe (ball valve). Then go outside and open the hose bib fully to drain any residual water and relieve pressure. You should see a brief stream that slows to a trickle and stops within 10–15 seconds. If water continues flowing at full volume, you have the wrong shut-off or the interior valve itself is defective — do not proceed until supply is confirmed off. Keep a small bucket underneath the spout to catch residual drainage. Safety note: wear safety glasses, as pressurized water and debris can spray unexpectedly when disassembling brass fittings.
Remove the handle and extract the stem
🔧 Phillips screwdriver, flathead screwdriver, adjustable wrench or 12-inch tongue-and-groove pliersUse a Phillips-head screwdriver to remove the handle screw (usually concealed under a decorative cap you can pry off with a flathead screwdriver). Pull the handle straight back off the stem. Next, use an adjustable wrench or 12-inch tongue-and-groove pliers to unthread the packing nut — turn counterclockwise. On a standard compression hose bib, the packing nut is typically 3/4-inch or 7/8-inch hex. Once the packing nut is free, grip the stem with pliers and turn it counterclockwise to unscrew it from the valve body. Pull it straight out. On a frost-proof sillcock, the stem may be 6–12 inches long with the washer on the far interior end. Inspect the stem for green corrosion, scoring, or mineral buildup. Lay parts on a clean rag in the order you removed them so reassembly is intuitive.
Inspect and replace the stem washer
🔧 Screwdriver, replacement washer kit, flashlightAt the end of the stem, you will see a rubber washer held in place by a brass screw. Remove the screw with a flathead or Phillips screwdriver. The old washer will likely be flattened, cracked, or grooved. Take it to the hardware store for an exact size match — common sizes are 1/4-inch (00), 3/8-inch (0), and 1/2-inch (M). A universal washer assortment kit (approximately $3–$6) covers most residential hose bibs. Press the new washer into the retainer cup and re-tighten the brass screw snugly — do not overtighten, as you can split the new washer. While you have the stem out, run your pinky finger or a flashlight beam across the brass seat inside the valve body. If you feel grooves or see pitting, the seat needs to be resurfaced with a seat grinder or the entire faucet replaced.
Replace packing material or O-ring on stem
🔧 Replacement O-ring or graphite packing, silicone plumber's greaseInspect the area of the stem that sits directly under the packing nut. If your faucet uses an O-ring, roll the old one off and slide a new one of the exact diameter and cross-section into the groove — lubricate it with a thin coat of silicone-based plumber's grease to prevent pinching during reassembly. If your faucet uses graphite string packing, wrap 3–4 turns of new packing clockwise around the stem in the same direction the packing nut tightens so it compresses rather than unwinds. Both O-rings and packing are available at any hardware store for under $3. A properly packed stem should turn smoothly by hand with slight resistance. If the stem is scored or pitted, water will bypass even new packing; at that point, full stem or faucet replacement is the right call.
Reassemble, restore water, and test for leaks
🔧 Adjustable wrench, dry rag for visual leak checkingThread the stem back into the valve body clockwise by hand until snug, then finish with your wrench — just past hand-tight, roughly a quarter-turn. Thread the packing nut on and tighten until snug plus a quarter-turn. Push the handle back on and secure the handle screw. Go inside and slowly open the interior shut-off valve. Return outside and operate the faucet through its full range: fully open, half open, fully closed. Watch three areas for leaks: the spout (washer seal), the packing nut (packing seal), and the vacuum breaker on top (check disc). A successful repair shows zero drips with the faucet closed after a 60-second observation period, and no weeping around the handle when open at full pressure. If the packing nut weeps, snug it an additional eighth-turn. If the spout still drips, the seat is likely damaged and needs professional attention.
When to Stop DIY and Call a Pro
Stop the DIY approach and call a licensed plumber if you discover water actively leaking inside the wall cavity — wet drywall, mold, or dripping from the rim joist area behind the faucet. This indicates a split frost-proof sillcock tube or a failed solder joint, which requires cutting into the wall, sweating new copper fittings, or replacing the entire sillcock assembly from inside the house. You should also call a professional if the valve seat is pitted and you cannot restore a drip-free seal after replacing the washer, or if the faucet body itself is corroded through with visible green patina and pinholes. Any repair involving soldering near wood framing carries a fire risk and typically requires a plumber's torch and a fire watch. Financially, a plumber's service call for a straightforward washer-and-packing replacement runs $120–$225 in most markets. A full frost-proof sillcock replacement — including cutting into the wall and patching — runs $225–$500. If the leak has already caused water damage to the rim joist, sill plate, or interior drywall, remediation costs can climb to $1,500–$4,000. The threshold where professional involvement saves money is clear: any time damage extends past the faucet itself, the labor to diagnose and prevent further structural or mold damage far outweighs the cost of the call.
What Does This Repair Cost?
Costs vary by region, home age, and severity. These are national averages — always get 3 quotes.
| Repair Type | DIY Cost | Pro Cost | Emergency Premium |
|---|---|---|---|
| Washer or O-ring replacement | $2–$8 | $85–$175 | $175–$300 |
| Packing nut tightening or repacking | $3–$10 | $100–$200 | $200–$350 |
| Full sillcock / hose-bib replacement | $18–$75 | $250–$600 | $450–$900 |
| In-wall pipe repair (freeze crack) | Not recommended | $175–$800 | $400–$1,200 |
| Emergency shutoff + diagnostic call | N/A | $95–$175 | $175–$350 |
*Emergency rates (nights/weekends/holidays) run 40–60% above standard. Get 3 quotes before approving work.
Get quotes from licensed professionals in your area
Free, no obligation — compare 3+ contractors in minutesWhat Drives the Cost?
| Cost Factor | Estimated Impact | Why It Matters |
|---|---|---|
| Frost-free vs. standard hose bib | Adds $30–$120 for parts | Frost-free sillcocks extend 6–14 inches through the wall, requiring precise measurement and sometimes siding removal for proper fit |
| Wall access difficulty | Adds $150–$500 in labor | If the faucet supply line is buried behind finished drywall or masonry, the plumber must cut access panels and patch afterward |
| Permit & code compliance | Adds $50–$150 | Some municipalities require a permit for new sillcock installation or backflow-preventer upgrades, adding inspection fees |
| Regional labor rates (urban vs. rural) | Varies $50–$200 per job | Metro-area plumbers average $125–$185/hr versus $75–$120/hr in rural markets; always get two quotes minimum |
In northern climates (zones 3–5), I see a pattern every March: homeowners discover a 'leaking' outdoor faucet that's actually a cracked pipe behind the wall from a winter freeze. The telltale sign is water appearing at the siding or foundation line rather than from the spout itself. Do not simply tighten the handle — that crack is pressurized, and any vibration can blow it wide open, flooding your rim joist and basement in minutes. Shut off the interior stop valve immediately (usually in the basement near the faucet location) and call a plumber. The pipe replacement runs $175–$400, but catching it before a full burst saves you $1,500–$5,000 in water damage and potential mold remediation. I carry thermal cameras to trace moisture behind finished walls — ask your plumber if they offer leak detection as part of the service call.
⚠️ Stop DIY — Call a Pro If You See These
- Wet or soft wood on the rim joist or sill plate behind the faucet — Active water contact with structural framing leads to wood rot within one to two seasons. Rim joist replacement costs $800–$2,500 per bay, and prolonged moisture invites carpenter ants and termites, compounding the damage.
- Visible mold or persistent musty odor on the interior wall behind the hose bib — Mold colonizes damp drywall within 24–48 hours of sustained moisture. Professional mold remediation for a single wall section averages $1,500–$3,500 and may require clearance testing before the area can be closed up.
- A continuous stream (not just a drip) from the spout when the handle is fully closed — This usually means the seat is heavily grooved or the stem threads are stripped, allowing full bypass of the shutoff mechanism. At even a thin stream, you can waste 100+ gallons per day, adding $30–$50 per month to your water bill and risking foundation erosion near the leak point.
- Ice formation around the hose bib or a bulging section of pipe visible in the crawlspace during winter — A bulging or frost-covered pipe is on the verge of bursting. A burst pipe inside a wall can release 4–8 gallons per minute, causing catastrophic water damage within an hour. Emergency plumbing calls during freeze events run $300–$600 before parts.
Frequently Asked Questions
How much does it cost to fix Outdoor Faucet Leaking?
For a straightforward washer and packing replacement, most plumbers charge $120–$225, which includes the service call and about 30 minutes of labor. Parts are typically under $10. If the entire frost-proof sillcock needs replacement, expect $225–$500 depending on accessibility — a faucet mounted through brick or stone veneer costs more due to additional labor. The two biggest factors that move the price are whether the plumber needs to open a wall from inside to access the pipe, and whether the faucet has caused secondary water damage that requires remediation.
Can I fix Outdoor Faucet Leaking myself?
Yes, if the leak is a simple drip from the spout or seep from the packing nut, and you can confirm the problem is a worn washer or dried-out packing. The repair requires only basic hand tools — screwdriver, adjustable wrench, and a $3–$6 washer kit — and takes 20–45 minutes. However, if the leak is inside the wall, if the faucet body is cracked, or if the seat is badly pitted, you'll need soldering equipment and potentially wall access, which puts the job firmly in professional territory. Always shut off the interior supply valve before disassembling anything.
How urgent is Outdoor Faucet Leaking?
A slow drip from the spout — one to two drops per second — is a days-to-weeks urgency item. You're wasting water and money (roughly 5 gallons per day per drip-per-second), but there's no immediate structural risk. However, if water is leaking inside the wall, behind the siding, or against the foundation, treat it as a same-day emergency. Mold begins colonizing within 48 hours of sustained moisture, and a split frost-proof sillcock can worsen dramatically the next time temperatures drop below freezing. The faster you act on interior leaks, the less you spend on damage repair.
What causes Outdoor Faucet Leaking?
The two most common causes are a worn stem washer and freeze damage. The rubber washer inside the faucet hardens and cracks after 5–10 years of normal use, losing its seal against the brass seat — this accounts for about 70 percent of outdoor faucet leak calls. Freeze damage is the second most common cause, especially when a garden hose is left attached in winter, trapping water inside a frost-proof sillcock that then expands and splits the tube. A distant third is a failed vacuum breaker disc, which causes a dribble from the top of the faucet body and is often mistaken for a more serious issue.
Will homeowners insurance cover Outdoor Faucet Leaking?
Standard homeowners policies cover sudden and accidental water damage — for example, if a frost-proof sillcock splits and floods your wall cavity, the resulting water damage to drywall, insulation, and framing is typically covered after your deductible. However, the faucet itself (the source of the leak) is not covered; that's considered a maintenance item. Gradual leaks — a slow drip you've ignored for months — are almost universally excluded because insurers classify them as deferred maintenance. Document the damage with photos, call your insurer before starting demolition, and keep all receipts. Deductibles on water claims average $1,000–$2,500.
How do I find a licensed plumber for this?
First, verify the plumber holds a valid license in your state — most states have an online license lookup through the Department of Consumer Affairs or equivalent. Second, confirm they carry general liability insurance (minimum $500,000) and workers' compensation; ask for a certificate of insurance, not just a verbal confirmation. Third, get a written quote that itemizes the service call fee, hourly labor rate, and parts — a reputable plumber will provide this before starting work. Fourth, check at least two references or online reviews on verified platforms. For an outdoor faucet repair, you generally don't need a specialized contractor — any licensed residential plumber handles this daily.
A leaking outdoor faucet comes down to three decisions: identify whether the leak is external (dripping spout or weeping packing nut) or internal (water escaping inside the wall), determine whether a simple washer and packing replacement will restore a seal or whether the faucet body and seat are too damaged for a parts-level repair, and recognize when the scope of damage — mold, wood rot, foundation erosion — exceeds what a DIY fix can address. Getting these three calls right saves you money and prevents a $5 problem from becoming a $3,000 remediation project.
Your recommended next step: shut off the interior supply valve feeding the outdoor faucet right now to stop any ongoing water waste or damage. Then visually inspect the interior wall behind the hose bib for moisture, staining, or odor. If the wall is dry and the leak is a straightforward spout drip, pick up a washer assortment kit and follow the steps above — the repair takes under an hour. If you see any sign of water inside the wall or structural moisture damage, call a licensed plumber for a same-day evaluation. A service call today costs $120–$225; ignoring an in-wall leak for a month can cost ten to twenty times that amount in secondary damage.
Ready to Solve This for Good?
Get matched with pre-screened, licensed plumbers in your area. Free quotes, no obligation, no spam.
GET FREE QUOTES NOW