
Updated June 12, 2026 · HomeFixx Editorial Team
Exposed underlayment or decking can allow water intrusion that causes $5,000–$15,000 in structural and mold damage within 48–72 hours of a rain event.
🔧 DIY Key Takeaways
- A bundle of 3-tab replacement shingles costs $30–$45 at Home Depot and covers roughly 33 sq ft — buy an extra bundle to keep as attic spares for future storms
- Use a $9 tube of Henry wet-patch roof cement and a flat pry bar to slip a replacement shingle under the course above, nailing with 1¼-inch galvanized roofing nails at the nailing strip line
- As a same-day emergency tarp, secure a 10×12 ft poly tarp with 2×4 lumber screwed through the tarp into the decking — never use bricks or cinder blocks, which slide off and cause more damage
👷 Hire a Pro Key Takeaways
- If more than 5–8 shingles are missing across multiple roof planes, a licensed roofer should inspect for blown-off underlayment and damaged decking — partial re-roofing runs $800–$3,500 depending on area and pitch
- Missing shingles that expose rotted or delaminated OSB decking require board replacement at $75–$125 per sheet plus labor; skipping this step voids most manufacturer warranties
- Filing a homeowners insurance wind-damage claim typically has a $1,000–$2,500 deductible — a roofer's documented inspection report with photos is required by most carriers and costs $75–$150 if not rolled into repair
📋 In This Guide
HomeFixx guides are researched and fact-checked by licensed trade professionals. Cost data updated June 12, 2026.
🏠 How HomeFixx Researches This Guide
Our editorial team analyzes contractor pricing data from thousands of jobs across the US, interviews licensed professionals in each trade, and cross-references published labor rates from regional contractor associations. Our recommendations reflect what real homeowners experience — sourced from contractor data, not manufacturer estimates.
You step outside after last night's storm and spot bare patches on your roof where shingles used to be — or worse, you find the shingles themselves scattered across your yard. Missing roof shingles aren't just cosmetic. Every exposed square foot is an open invitation for rainwater to reach your roof deck, insulation, and ceiling joists. In as little as 48 hours of moisture exposure, you're looking at potential mold growth, rotted sheathing, and repair bills that climb from a simple $150–$350 shingle replacement to a $3,500+ partial re-roofing nightmare.
This HomeFixx guide gives you what generic advice sites don't: contractor-verified diagnosis steps, real-world cost breakdowns by repair type, and the exact DIY techniques that can buy you time before a pro arrives. We'll show you how to assess whether you're dealing with a quick patch or an insurance-claim-level event, what questions to ask every roofer who shows up, and how to avoid the most common upsell traps in the storm-damage repair industry.
Whether you lost one shingle tab or an entire ridge line, read on — the clock is ticking on your roof's exposed decking, and the decisions you make in the next 24 hours will determine whether this costs you hundreds or thousands.
Symptoms: What You're Seeing
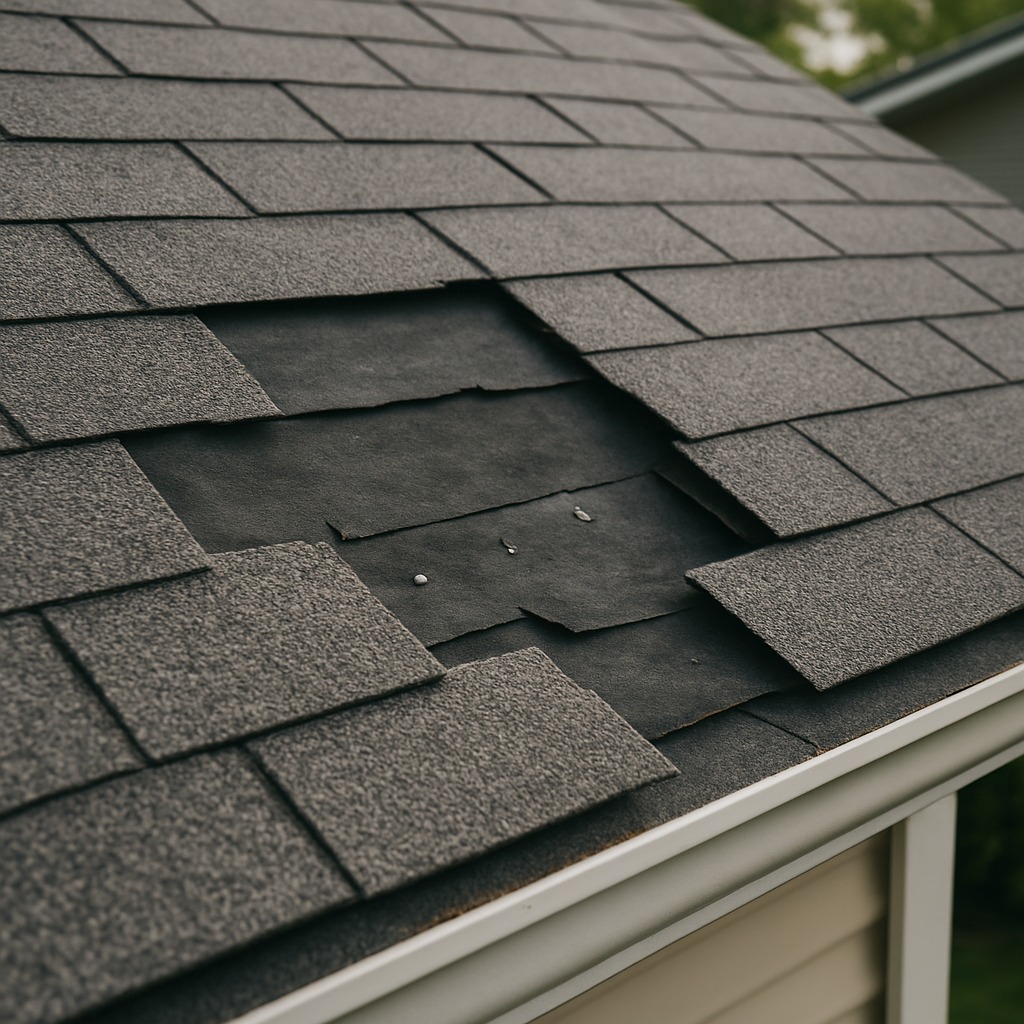
- Bare patches visible on roof surface: When you look up at your roof from the ground or a neighbor's yard, you notice dark, irregularly shaped patches where the black or gray felt underlayment — or even bare plywood decking — is exposed. These patches stand out clearly against the surrounding shingle color, especially after a storm. You may see raw wood grain or the textured surface of #30 felt paper. On a 20-year-old three-tab roof, these bare spots commonly appear first along the south-facing slope where UV exposure is highest.
- Shingle fragments in gutters and downspouts: During gutter cleaning or after a windstorm, you find broken pieces of asphalt shingle — ranging from small granule-covered chips to full 5-inch tab sections — clogging your gutters and collecting at downspout elbows. The fragments feel brittle, curl easily, and crumble between your fingers. Heavy accumulations can block water flow and cause gutter overflow, compounding water damage at the fascia. This is a telltale sign that shingles are actively deteriorating and losing structural integrity.
- Granule loss accumulating at drip edges: You notice a sandy, gritty residue — dark gray or black — pooling on the ground beneath gutter downspout outlets or collecting in valleys where two roof planes meet. These are ceramic-coated granules that protect the asphalt layer from UV radiation. When granules shed excessively, the exposed asphalt underneath dries out, cracks, and becomes brittle. Running your hand along the shingle surface reveals a smooth, tar-like feel instead of a rough, sandpaper-like texture.
- Water stains on attic rafters or ceiling drywall: Inside the house, you spot yellowish-brown rings or streaks on ceiling drywall, especially in upstairs bedrooms or along exterior walls. In the attic, you see dark wet spots on the underside of roof decking, moisture beading on nail tips, or damp insulation. These stains often appear 3 to 10 feet laterally from the actual point of water entry because water travels along rafters before dripping. A musty smell in the attic confirms active moisture infiltration.
- Increased energy bills and attic temperature spikes: Missing shingles compromise the thermal envelope of your roof assembly. You notice your HVAC system running longer cycles, particularly in summer, as attic temperatures spike 15–25°F above normal. Your energy bill may increase 10–15% compared to the same month in previous years. In winter, you may feel cold drafts in upstairs rooms directly below the damaged section. An infrared thermometer pointed at the ceiling will read noticeably colder in the affected area.
What's Actually Causing This
- High-wind uplift and storm damage: Sustained winds above 60 mph — common in severe thunderstorms, hurricanes, and nor'easters — create negative pressure on the leeward side of a roof, lifting shingle tabs that have lost their adhesive seal strip bond. Three-tab shingles are rated to 60–70 mph; architectural (dimensional) shingles typically handle 110–130 mph. The failure starts at edges, ridges, and hip caps where wind catch is greatest. NOAA data shows the average U.S. homeowner files a wind-damage roofing claim every 12–15 years. Once one shingle lifts, the exposed edge of the next shingle becomes vulnerable, causing a cascading zipper effect across the course.
- Adhesive strip failure from age and thermal cycling: Asphalt shingles rely on a factory-applied thermoplastic adhesive strip (often referred to as a tar line) that bonds each tab to the course below. Over 15–20 years of daily thermal cycling — expansion during 140°F summer surface temperatures and contraction in winter — this adhesive becomes brittle and loses its bond strength. In northern climates with extreme freeze-thaw cycles, adhesive failure can occur as early as 12 years. Once the seal breaks, shingles are vulnerable to winds as low as 30–40 mph. This is the number-one cause of shingle loss on roofs aged 15 years and older, accounting for roughly 40% of missing-shingle service calls.
- Improper installation and insufficient fastening: Building code (IRC R905.2.6) requires four nails per three-tab shingle and six nails per laminate shingle in high-wind zones. Nails must be placed in the manufacturer's designated nailing zone — typically a 1-inch-wide band located 5⅝ inches above the butt edge. When roofers nail too high (a common shortcut that speeds production), the nail misses the overlap of the course above and provides zero wind resistance. Studies by the Insurance Institute for Business & Home Safety (IBHS) show that high-nailed shingles fail at wind speeds 20–30 mph lower than properly fastened ones. This installation defect is found in roughly 1 in 5 roofs inspected post-storm.
- Biological degradation from moss, algae, and ice damming: In humid, shaded environments — Pacific Northwest, Northeast, and Southeast — moss and algae colonies grow between shingle courses, physically lifting edges and retaining moisture against the asphalt mat. Moss roots (rhizoids) penetrate the granule layer and accelerate decomposition. In cold climates, ice dams form at the eave when attic heat melts snow that refreezes at the unheated overhang; the expanding ice pries shingles upward and breaks their seal. The average ice-dam repair costs $1,500–$3,000 including interior water damage. These biological and ice-related forces account for about 15% of missing-shingle cases nationally.
A 20-year roofing contractor will tell you that the most common mistake homeowners make is color-matching replacement shingles by the name on the wrapper. Manufacturers change dye lots constantly, and a shingle that sat in sun for even 3 years will be noticeably lighter than a fresh one from the same product line. The pro move: pull a sacrificial shingle from an inconspicuous area — behind a dormer, above a garage, or under a ridge cap — and use that as your visible repair piece, then install the new shingle in the hidden spot. This trick costs $0 extra but prevents the ugly patchwork look that can actually lower your home's curb appeal and appraisal value by 1–3%.
Step-by-Step Diagnosis
Work through these steps before calling a contractor. Each step tells you what to look for and what it means.
Safely access the roof and assess damage
🔧 Extension ladder, roof harness, chalk, smartphone cameraSet up an OSHA-compliant Type IA fiberglass extension ladder at a 75.5-degree angle (base 1 foot out for every 4 feet of height) on firm, level ground. Wear rubber-soled roofing boots with ankle support and use a roof harness anchored to a ridge bracket if the pitch exceeds 6:12. Never work on a wet or frost-covered roof. Walk the entire roof systematically, starting at the ridge and working toward the eaves. Count the number of missing shingles, note their location by slope direction (north, south, etc.), and photograph each damaged area with a phone camera. Check for soft or spongy decking underfoot — this indicates rot and means the repair scope is beyond a simple shingle swap. Mark damaged areas with chalk. A successful assessment gives you an exact shingle count and confirms the decking is solid.
Remove damaged nails and old shingle remnants
🔧 Flat pry bar / shingle ripper, hammer, utility knife, synthetic underlayment patchUsing a flat pry bar (also called a shingle ripper or cat's paw), slide under the overlapping shingle course above the missing shingle area. Locate the roofing nails — there will be four to six per shingle — and lever them out cleanly. Pull nails from the damaged course and the course directly above, since those upper nails also pass through the top edge of the shingle you're replacing. Work carefully to avoid cracking adjacent shingles, especially in cold weather when asphalt becomes brittle below 40°F. Remove all nail shanks; do not leave broken nails embedded in the decking. Inspect the exposed underlayment (#15 or #30 felt or synthetic) for tears. If the underlayment is torn or missing, cut a patch of synthetic underlayment (like GAF FeltBuster) 2 inches larger than the damaged area on all sides and slide it underneath the surrounding felt, stapling the top edge only. A clean, nail-free, underlayment-intact surface means you're ready for the new shingle.
Cut and dry-fit the replacement shingle
🔧 Utility knife with hook blade, straight edge, tape measurePurchase replacement shingles that match your existing roof in brand, product line, color, and profile. Bring a sample of your old shingle to the supply house — colors fade over time, so an exact match from the same manufacturer batch is ideal. If replacing a three-tab shingle, trim the new shingle to size with a hooked roofing blade in a utility knife, scoring the back side and snapping along the line. For architectural shingles, align the laminated overlay pattern with adjacent shingles. Dry-fit the new shingle by sliding it into position under the course above until the butt edge aligns perfectly with the neighboring shingles on either side. The bottom edge should overhang the course below by the standard 5-inch exposure (for standard three-tab) or the exposure specified by the manufacturer for laminate shingles. Check that the shingle lies flat with no buckling. A proper dry fit means even shadow lines across the course.
Nail the replacement shingle in position
🔧 Pneumatic roofing nailer or roofing hatchet, 1¼-inch galvanized roofing nailsLift the overlapping shingle course above and drive four 1¼-inch galvanized roofing nails through the new shingle in the manufacturer's nailing zone — typically a line 5⅝ inches above the butt edge for three-tab, or just below the adhesive strip for architectural shingles. Space nails approximately 1 inch inward from each end and evenly between. Drive nails flush with the shingle surface; overdriven nails tear through the mat and provide no holding power, while underdriven nails create a bump that prevents the upper course from sealing. Use a pneumatic coil roofing nailer set to the correct depth, or hand-nail with a smooth-face roofing hatchet. After nailing, press the upper course back down over the nail heads. Verify that every nail head is covered by the shingle above — exposed nail heads are future leak points. A correctly nailed shingle will not budge when you tug the butt edge firmly.
Seal shingle edges and verify watertightness
🔧 Roofing cement, caulk gun, polyurethane roofing sealant, garden hose, flashlightApply a quarter-sized dab of roofing cement (like Henry 208 or Geocel 2300) under each tab corner and along the adhesive strip line of the new shingle, then press the overlapping course down firmly. In temperatures below 70°F, the factory adhesive strip will not self-seal for weeks or months, so manual sealing is critical. Use a caulk gun with a tube of polyurethane roofing sealant to seal over any exposed nail heads you find during your final inspection. Do not over-apply sealant — excessive globs trap moisture and cause premature shingle deterioration. After sealing, perform a water test by running a garden hose over the repair area for 10 minutes while a helper checks the attic below with a flashlight for any drips. A successful repair shows zero water penetration, flush shingle alignment, and sealed edges that resist a firm tug. Clean up all debris from the roof and gutters, and dispose of old shingles properly — they weigh about 60–80 pounds per bundle.
When to Stop DIY and Call a Pro
Stop the DIY approach and call a licensed roofer immediately if you find soft, spongy decking when you walk the roof — this means plywood rot has set in and structural repairs are needed before any shingles go on. If more than 10–15 shingles are missing across multiple roof planes, or if the damage spans more than 100 square feet (roughly one roofing square), the scope exceeds a patch job and requires professional assessment of underlayment, flashing, and deck integrity. Any damage near penetrations — plumbing vents, chimneys, skylights, or valley flashing — demands a pro because improper flashing work causes 95% of chronic roof leaks. If your roof pitch is 8:12 or steeper, the fall risk is severe; OSHA reports that falls account for over 300 roofing deaths annually in the U.S. Financially, once repair costs approach $1,500–$2,000 for materials and your time, you've crossed the threshold where a professional crew (which can complete the work in 2–4 hours with warranty coverage) is the smarter investment. If your roof is over 20 years old and shingles are missing in multiple locations, a roofer's inspection may reveal that full replacement — typically $8,000–$15,000 for a 2,000-square-foot roof — is more cost-effective than chasing patches on a failing system.
What Does This Repair Cost?
Costs vary by region, home age, and severity. These are national averages — always get 3 quotes.
| Repair Type | DIY Cost | Pro Cost | Emergency Premium |
|---|---|---|---|
| 1–3 shingle replacement (same slope) | $30–$60 | $150–$350 | $250–$500 |
| Partial section repair (10–30 shingles) | $60–$120 | $400–$1,200 | $700–$1,800 |
| Decking + underlayment repair (per 4×8 sheet) | Not recommended | $175–$350 | $300–$550 |
| Emergency tarp & inspection call | N/A | $150–$300 | $250–$500 |
*Emergency rates (nights/weekends/holidays) run 40–60% above standard. Get 3 quotes before approving work.
Get quotes from licensed professionals in your area
Free, no obligation — compare 3+ contractors in minutesWhat Drives the Cost?
| Cost Factor | Estimated Impact | Why It Matters |
|---|---|---|
| Roof pitch (steep vs. walkable) | Adds $200–$800 | Steep roofs (8/12+) require harnesses, roof jacks, and extra labor time, significantly increasing the per-hour rate |
| Second-story or multi-story height | Adds $150–$500 | Taller ladder setups and safety requirements add setup time; some roofers charge a flat access surcharge |
| Architectural vs. 3-tab shingles | Adds $50–$300 | Architectural (dimensional) shingles cost 40–60% more per bundle and require more precise layering during repair |
| Insurance claim coordination | Saves $500–$3,000 | Wind and hail damage is typically covered minus your deductible; a roofer experienced with adjusters can maximize your approved scope of work |
Regional climate matters more than most guides admit. In Gulf Coast and Southeast states, missing shingles expose your home to wind-driven rain that moves horizontally under the remaining courses, so even one missing shingle warrants same-day tarping. In contrast, in arid Western states like Arizona or Nevada, you may have a wider repair window — but UV exposure on bare felt paper degrades the underlayment within 30–60 days, turning a $200 repair into a $1,200 underlayment replacement. Also watch for this red flag: if your roofer quotes a full tear-off and replacement for just a few missing shingles without showing you photographic evidence of widespread damage, get a second bid. Upselling full replacements on storm-damage calls is the number-one complaint filed with state contractor licensing boards.
⚠️ Stop DIY — Call a Pro If You See These
- Multiple shingles missing along the same course or in a widening pattern — This indicates systemic adhesive failure or underlayment compromise across an entire roof section. Within 1–3 rainstorms, water will penetrate the decking, saturate insulation, and cause ceiling damage costing $2,000–$8,000 in interior repairs. Mold colonization begins within 48 hours of sustained moisture exposure.
- Exposed decking plywood turning dark or showing visible grain swelling — Unprotected OSB or plywood absorbs water rapidly — a single heavy rain can raise moisture content above 19%, triggering delamination and fungal wood rot. Within 2–4 weeks of exposure, decking loses structural integrity and may require full sheet replacement at $75–$150 per 4×8 panel including labor, plus new underlayment and shingles on top.
- Flashing around chimney, skylight, or vent is lifted or bent — The same wind event that removed shingles often bends step flashing or counter flashing. A compromised flashing-to-wall junction allows bulk water entry that a shingle repair alone will not stop. Chimney flashing leaks cause an average of $3,500 in interior damage per incident, including drywall, paint, and potential electrical hazard if water reaches junction boxes.
- Sagging or dipping visible in the roof plane from ground level — A sag between rafters or trusses means the decking has already lost load-bearing capacity from prolonged moisture damage. This is a structural emergency — additional weight from rain, snow, or even a person walking the roof can cause localized collapse. Structural rafter and decking repairs run $5,000–$12,000 depending on the area affected.
Frequently Asked Questions
How much does it cost to fix Roof Shingles Missing?
For a minor repair of 1–10 missing shingles on a single-story, walkable roof, expect to pay a licensed roofer $250–$550, which covers materials (one bundle of shingles runs $30–$50), nails, sealant, and about 1–2 hours of labor at $50–$100 per hour. For larger sections — say 1–3 roofing squares (100–300 sq ft) — costs jump to $600–$1,800. Two factors that move the price significantly: roof pitch (anything above 8:12 adds 20–40% for safety equipment and slower work) and shingle type (premium architectural or designer shingles cost $45–$90 per bundle versus $30–$40 for standard three-tab). Emergency tarping after a storm adds $200–$500 on top of the permanent repair.
Can I fix Roof Shingles Missing myself?
Yes, if three conditions are met: the roof pitch is 6:12 or lower (you can stand comfortably without sliding), the decking underneath is solid and dry, and fewer than 10 shingles need replacement. You need matching shingles, a flat pry bar, roofing nails, sealant, and a proper ladder setup. Budget about 2–3 hours for a first-timer replacing 3–5 shingles. However, if the roof is steep, if you're uncomfortable at heights, or if damage is near flashing or valleys, the leak risk from improper installation outweighs the $300–$500 you'd save. Warranty is another consideration — many shingle manufacturers void their warranty if installation wasn't performed by a certified contractor.
How urgent is Roof Shingles Missing?
On a scale of urgency, missing shingles are a days-not-weeks issue. If rain is forecast within 48 hours, at minimum apply a temporary tarp secured with 2×4 battens and masonry screws into the decking. Each rain event that hits exposed underlayment or bare decking accelerates deterioration exponentially — underlayment saturates, nail holes become leak channels, and decking begins to swell. In warm, humid conditions, mold can colonize within 48–72 hours of initial moisture intrusion. During dry weather, you have a window of 1–2 weeks for permanent repair, but do not wait longer. Every day of UV exposure on bare felt or asphalt-saturated underlayment degrades its waterproofing performance.
What causes Roof Shingles Missing?
The two most common causes are wind damage and adhesive strip failure. Wind speeds above 60 mph can lift three-tab shingles, especially if they're over 15 years old and the thermoplastic seal strip has degraded. The second major cause is improper nailing during original installation — nails placed too high (above the nailing zone) miss the overlap and allow shingles to slide out under moderate wind. A third cause, particularly in the Pacific Northwest and Northeast, is biological growth: moss and algae colonies grow under shingle edges, physically prying them up and accelerating moisture damage until tabs crack and blow off.
Will homeowners insurance cover Roof Shingles Missing?
Homeowners insurance typically covers missing shingles if the damage is caused by a sudden, named peril — windstorm, hail, fallen tree, or tornado. You'll file a claim, pay your deductible (commonly $1,000–$2,500), and the insurer pays the rest. However, insurance does not cover shingles lost due to age, wear and tear, neglect, or improper installation — these are classified as maintenance issues. If your roof is over 20 years old, many insurers apply depreciation and pay actual cash value rather than replacement cost. Document damage with photos and a written roofer's inspection report before filing. Some insurers require filing within 12 months of the damage event.
How do I find a licensed roofer for this?
Follow four steps. First, verify the contractor holds a current roofing license in your state — check your state's contractor licensing board website (e.g., CSLB in California, DPOR in Virginia). Second, confirm they carry both general liability insurance ($1 million minimum) and workers' compensation; ask for a certificate of insurance and call the insurer to verify it's active. Third, get a written, itemized quote — not a verbal estimate — that specifies shingle brand and model, number of squares, underlayment replacement if needed, and a timeline. Fourth, check references: ask for three recent jobs within 20 miles and actually call those homeowners. Avoid any contractor who asks for more than 30% deposit upfront or wants to deal in cash only.
When shingles go missing, you have three decisions to make immediately. First, determine the scope — count the missing shingles, check the decking for soft spots, and inspect nearby flashing. If the damage is limited to a handful of shingles on a walkable roof with solid decking, a confident DIYer can handle the repair for under $100 in materials. Second, decide on timing — missing shingles are not a someday problem. Every rainstorm drives water into exposed nail holes and underlayment seams, and interior damage escalates repair costs by thousands of dollars. Third, assess whether the missing shingles are an isolated wind event or a symptom of a 20-year-old roof reaching the end of its service life, which changes the conversation from repair to full replacement.
Your recommended next step: get on a ladder today (safely) and photograph every damaged area up close. Count the missing shingles, note their location relative to flashing, vents, and valleys, and check your attic for any signs of water intrusion. If you see fewer than 10 missing shingles, solid decking, and no flashing damage, purchase matching shingles and complete the repair this weekend. If the damage is more extensive, or if your roof is over 18 years old, call two or three licensed roofers for written inspections and quotes within the next 48 hours. Temporary tarping costs $200–$500 and buys you time, but it is not a permanent solution — get the real repair scheduled before the next storm cycle hits your area.
Ready to Solve This for Good?
Get matched with pre-screened, licensed roofers in your area. Free quotes, no obligation, no spam.
GET FREE QUOTES NOW