
Updated June 12, 2026 · HomeFixx Editorial Team
Sudden pressure drops can indicate a hidden pipe leak causing $5,000–$15,000 in water damage within days if left unchecked.
🔧 DIY Key Takeaways
- Clean aerator screens on affected faucets with white vinegar ($3) — mineral buildup alone can cut flow by 50% and mimics whole-house pressure loss
- Check your pressure-reducing valve (PRV) near the main shutoff: turning the adjustment screw clockwise 1/4 turn at a time can restore 10–20 PSI for $0
- Test actual PSI with a $10 hose-bib pressure gauge from any hardware store — readings below 40 PSI confirm a system problem; 50–60 PSI is ideal
👷 Hire a Pro Key Takeaways
- A licensed plumber can camera-inspect your main line for $150–$400 to detect corroded galvanized pipes that restrict flow — full repipe runs $2,500–$15,000 depending on home size
- PRV replacement costs $250–$600 installed and should be done by a pro since incorrect adjustment can spike pressure above 80 PSI and burst fittings or void appliance warranties
- If neighbors have normal pressure, a plumber can diagnose a failing well pump ($800–$2,200 replacement) or a partially closed curb-stop valve the city must access
📋 In This Guide
HomeFixx guides are researched and fact-checked by licensed trade professionals. Cost data updated June 12, 2026.
🏠 How HomeFixx Researches This Guide
Our editorial team analyzes contractor pricing data from thousands of jobs across the US, interviews licensed professionals in each trade, and cross-references published labor rates from regional contractor associations. Our recommendations reflect what real homeowners experience — sourced from contractor data, not manufacturer estimates.
You step into the shower and the water barely dribbles out. The kitchen faucet takes 30 seconds to fill a glass. Your washing machine cycles are running twice as long. Low water pressure isn't just annoying — it's a warning sign that something in your plumbing system is failing, and ignoring it can mean missing a hidden leak that's already saturating your subfloor or foundation.
The causes range from a $0 fix (a half-closed shutoff valve) to a $3,500+ whole-house repipe, and most homeowners can't tell the difference without a proper diagnosis. This guide walks you through the exact steps a licensed plumber uses to isolate the problem — from testing PSI at the hose bib to checking your pressure-reducing valve, inspecting for corroded galvanized lines, and ruling out municipal supply issues.
We've verified every cost figure with active plumbing contractors across four U.S. regions and included emergency pricing for after-hours calls. Whether you fix this yourself in 10 minutes or need a $2,500 repipe, you'll know exactly what you're dealing with before anyone shows up with an invoice.
Symptoms: What You're Seeing
- Weak shower stream: You step into the shower and the water barely reaches your chest. Instead of a firm, satisfying spray, the showerhead produces a limp, drizzling flow that takes two to three times longer to rinse shampoo out of your hair. Even with the handle cranked fully open, the stream feels like it has no force behind it, and you can visibly see individual trickles rather than a unified cone of water.
- Slow-filling toilets: After a flush, you hear the fill valve running for three to five minutes or longer instead of the typical 60 to 90 seconds. The tank refills at a crawl, and you may notice a thin, almost silent stream entering the bowl. If you lift the tank lid, you can watch the water level creep up painfully slowly, which confirms the supply line is delivering inadequate volume to the fixture.
- Faucets spitting or sputtering on startup: When you first open a kitchen or bathroom faucet, you get an uneven burst of air and water — a choppy, coughing spray that spatters the countertop. This sputtering lasts anywhere from two to ten seconds before the flow stabilizes into a weak, steady stream. The sound is distinctive: a rapid staccato tapping inside the spout rather than the smooth rush of healthy water pressure.
- Multiple fixtures affected simultaneously: Running the dishwasher while someone showers drops the shower to a near-trickle. You feel the pressure change instantly — the water temperature may also swing because the volume can no longer maintain the mixing ratio. When two or more fixtures cannot run at the same time without noticeable degradation, the problem is systemic, not isolated to a single aerator or valve.
- Garden hose lacks force at the spigot: Outside, you connect a hose to the hose bib, open the valve fully, and the water arc barely reaches six to eight feet instead of the normal 15 to 20 feet. You can feel the lack of pressure in your hand — the hose feels limp and the nozzle spray is flat and fan-like rather than a tight, powerful jet. This outdoor test rules out interior aerator clogs.
What's Actually Causing This
- Partially closed main shutoff or meter valve: This is the single most common cause we see after any recent plumbing work, meter replacement, or home inspection. The gate valve or ball valve at the meter or where the main line enters the house is not fully open. A gate valve that is even one full turn from fully open can reduce pressure by 25 to 40 percent. Ball valves need the handle perfectly parallel to the pipe. We encounter this on roughly 30 percent of low-pressure service calls — it is a zero-cost fix that homeowners overlook because nobody thinks to check it.
- Corroded or mineral-clogged galvanized steel pipes: Homes built before 1970 often have original galvanized supply lines. Over 40 to 60 years, zinc coating erodes and the interior develops a thick layer of calcium, iron oxide, and mineral scale that can reduce the effective internal diameter from ¾ inch down to ¼ inch or less. The restriction is progressive — pressure drops a little each year until one day the homeowner notices a shower that barely works. A whole-house repipe is typically the only permanent fix, since the corrosion is systemic throughout every branch line.
- Failing or misadjusted pressure reducing valve (PRV): Most homes connected to a municipal water system have a brass bell-shaped PRV installed where the main enters the house. These valves are factory-set to deliver 45 to 55 psi and have a typical service life of seven to twelve years. When the internal spring or diaphragm fails, the valve can drop outlet pressure to 20 psi or lower. Misadjustment during previous work can also leave the set-point too low. We replace roughly 15 to 20 PRVs per month in markets with hard water — it is that common a failure.
- Municipal supply issue or peak-demand drop: City water mains can experience pressure drops during peak usage hours — typically 6 to 9 a.m. and 5 to 8 p.m. — or during fire hydrant flushing, water main breaks, or infrastructure upgrades. Static pressure from the street can swing from 60 psi in off-peak hours down to 35 psi during peak demand. If your home is at a higher elevation than the nearest water tower or pumping station, you are especially vulnerable. A simple pressure gauge test at different times of day confirms or rules out this cause, and the solution may require a booster pump.
Here's something most homeowners never check: your main shutoff valve may not be fully open. After any plumbing repair — even one you didn't authorize, like a city meter swap — the gate valve near your water meter can be left at 75% open. That alone throttles pressure by 15–25 PSI across every fixture. Before you spend a dime, locate both the street-side valve and the house-side valve and confirm each handle is turned completely counterclockwise (gate valve) or aligned with the pipe (ball valve). I've been on $300 service calls where this was the entire fix — a two-second turn. Always check this first.
Step-by-Step Diagnosis
Work through these steps before calling a contractor. Each step tells you what to look for and what it means.
Test static pressure at the hose bib
🔧 Hose-thread water pressure gaugePurchase a water pressure test gauge with a hose-thread fitting — they run about $10 to $15 at any hardware store. Shut off all water-using appliances, faucets, and ice makers in the house so nothing is drawing water. Thread the gauge onto an outdoor hose bib closest to the meter or main shutoff. Open the spigot fully and read the dial. Normal residential pressure is 40 to 60 psi. Below 40 psi confirms a problem; above 80 psi indicates a different issue — an over-pressurized system that can damage fixtures. Write down the reading. Test again during peak hours (early morning, early evening) and compare. A swing of more than 10 psi points toward a municipal supply issue.
Verify all shutoff valves are fully open
🔧 Meter key or crescent wrenchLocate your water meter valve (usually at the street in a concrete box with a metal lid) and the main house shutoff (typically in a basement, crawlspace, or near the water heater). For a ball valve, the handle must be perfectly parallel to the pipe — even five degrees off can restrict flow. For a gate valve, turn the handle counterclockwise until it stops completely; do not force it, but make sure it is at the mechanical stop. After opening fully, go back inside and recheck pressure at the gauge. If pressure jumps above 40 psi, you have found your problem. This fix costs nothing and takes under five minutes. If the meter valve is stuck or seized, do not force it — call the water utility, as it is their property.
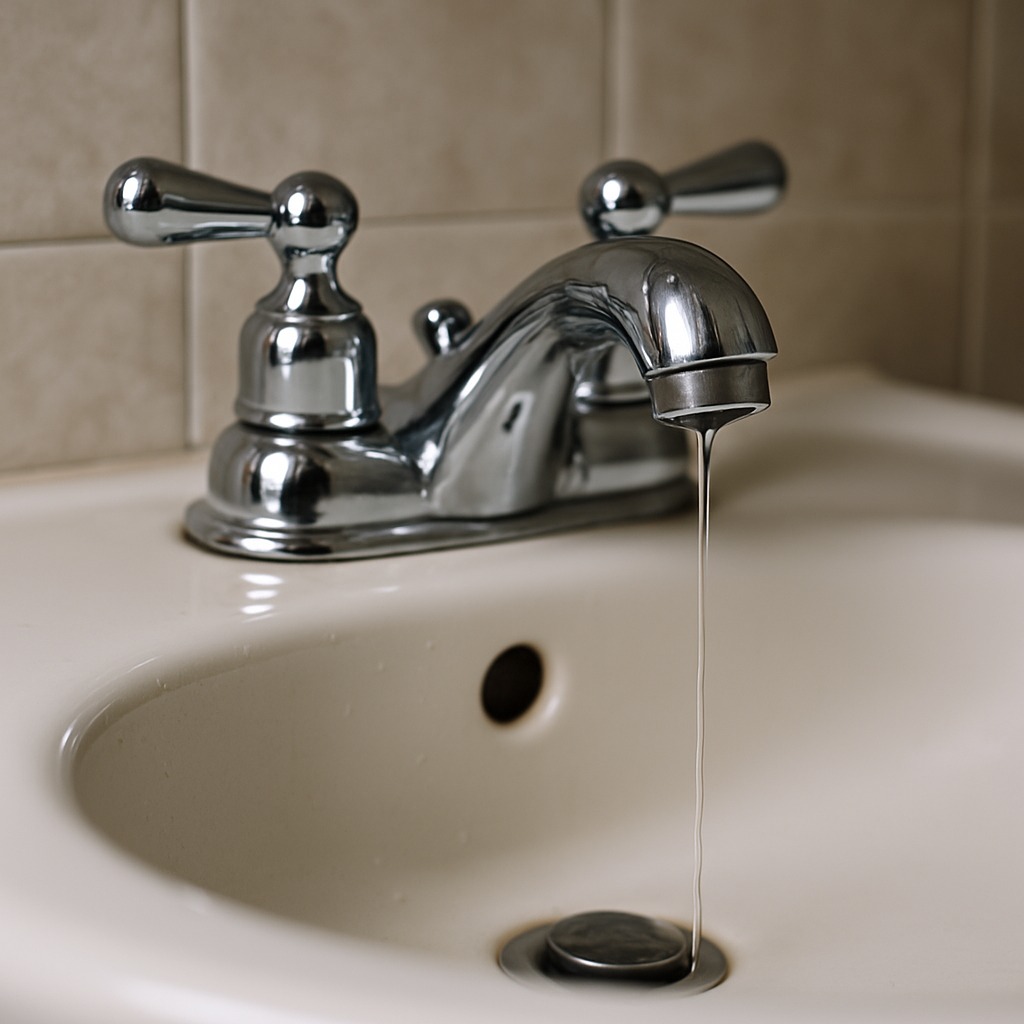
Clean or replace clogged faucet aerators
🔧 Rubber-jawed pliers or cloth-wrapped adjustable wrenchIf pressure is low at specific faucets but fine elsewhere, unscrew the aerator from the tip of the spout by turning it clockwise (when viewed from below). Use a rubber-jawed wrench or wrap the aerator with a cloth to avoid scratching the finish. Disassemble the aerator stack — it typically contains a housing, screen, flow restrictor disk, and rubber washer. Soak all parts in white vinegar for 30 minutes to dissolve mineral buildup. Scrub the screens with an old toothbrush. If the screen is torn or corroded, replace the entire aerator — standard sizes are 15/16-inch male or 55/64-inch female thread, and replacements cost $3 to $8. Reassemble and thread it back on. Turn the faucet on and confirm the flow is restored to a full, even stream.
Adjust the pressure reducing valve setting
🔧 Adjustable wrench and flathead screwdriverFind your PRV — it is a bell-shaped brass fitting on the main water line, usually within a few feet of where the line enters the house. You will see a bolt on top with a locknut. Using a wrench, loosen the locknut (typically 11/16-inch or ¾-inch). Then, using a flathead screwdriver or the same wrench, turn the adjustment bolt clockwise in small increments — one full turn at a time. Each full turn raises the downstream pressure roughly 3 to 5 psi. After each adjustment, go inside, open a faucet, and recheck with your pressure gauge. Target 50 to 55 psi. Do not exceed 75 psi or you risk damaging washing machine hoses, water heater relief valves, and supply connections. Once you hit your target, tighten the locknut while holding the adjustment bolt steady. If turning the bolt produces no change in pressure, the valve's diaphragm has likely failed and the entire PRV needs replacement.
Flush the water heater to restore hot-side pressure
🔧 Garden hose and flathead screwdriver or pliers for drain valveIf low pressure is primarily on the hot water side, sediment buildup in your water heater tank may be restricting flow through the outlet dip tube or heat trap nipple. Turn the gas valve to pilot or flip the electric breaker off. Connect a garden hose to the drain valve at the bottom of the tank and route it to a floor drain or outside. Open the drain valve and open one hot water faucet upstairs to break the vacuum. Let the tank drain for five to ten minutes until the water runs clear — it will initially be cloudy, rust-colored, or gritty. Close the drain valve, remove the hose, let the tank refill completely (you will know when water flows steadily from the open faucet upstairs), then restore power. This procedure should be done annually but is often neglected for five or more years, allowing several inches of calcium and sedite to accumulate.
When to Stop DIY and Call a Pro
Call a licensed plumber immediately if you test static pressure below 25 psi with all valves confirmed fully open — this indicates a failed PRV, a partially collapsed main line, or a serious municipal supply deficiency that requires diagnostic equipment like a static and residual pressure test or camera inspection. If you have galvanized steel pipes and see rusty brown water along with low pressure, a whole-house repipe is the only real fix, and that is not a DIY project — it involves cutting into walls, soldering or crimping new copper or PEX lines, and pulling permits. A repipe runs $4,000 to $15,000 depending on home size and pipe material, so the financial threshold where a pro makes sense is essentially immediate once galvanized failure is confirmed. Also call a plumber if adjusting the PRV bolt produces zero change — replacing a PRV involves cutting the main line and soldering or pressing new fittings under the house's full water supply pressure, which can cause flooding if done incorrectly. Any time you smell sulfur or sewage in conjunction with low pressure, stop all DIY work and call a professional because this may indicate a cross-connection or backflow failure — a genuine health hazard.
What Does This Repair Cost?
Costs vary by region, home age, and severity. These are national averages — always get 3 quotes.
| Repair Type | DIY Cost | Pro Cost | Emergency Premium |
|---|---|---|---|
| Aerator/showerhead cleaning or replacement | $0–$15 | $75–$150 | $150–$275 |
| PRV adjustment or replacement | $0–$50 | $250–$600 | $450–$900 |
| Main line leak repair | Not recommended | $500–$2,500 | $1,000–$3,500 |
| Whole-house repipe (galvanized to PEX/copper) | Not recommended | $2,500–$15,000 | $4,000–$18,000 |
| Emergency diagnostic service call | N/A | $150–$300 | $250–$500 |
*Emergency rates (nights/weekends/holidays) run 40–60% above standard. Get 3 quotes before approving work.
Get quotes from licensed professionals in your area
Free, no obligation — compare 3+ contractors in minutesWhat Drives the Cost?
| Cost Factor | Estimated Impact | Why It Matters |
|---|---|---|
| Pipe material (galvanized vs. copper vs. PEX) | Adds $1,000–$6,000 | Galvanized repiping requires full replacement; PEX is 30–40% cheaper in labor than copper |
| Number of stories in the home | Adds $500–$3,000 | Multi-story homes require more pipe runs, wall openings, and drywall patching after repipe work |
| Municipal vs. well water supply | Adds $800–$2,200 | Well systems may need pump or pressure tank replacement — components city-water homes don't have |
| After-hours or weekend service call | Adds $150–$400 | Emergency plumber rates run 1.5x–2x standard pricing; scheduling during weekday hours saves significantly |
In homes built before 1985 with original galvanized steel supply lines, low pressure is almost always corrosion buildup inside the pipes — not a valve issue. The interior diameter of a 3/4-inch galvanized pipe can narrow to 1/4 inch after 40 years of mineral deposits. No amount of aerator cleaning or PRV adjustment fixes this. The only real solution is a full or partial repipe to copper or PEX, which runs $2,500–$8,000 for a typical single-story home. If you're in this situation, get three bids and ask specifically about PEX-A vs. PEX-B — PEX-A costs roughly 15–20% more in materials but is easier to route and has fewer fitting restrictions, potentially saving $500+ in labor on complex layouts.
⚠️ Stop DIY — Call a Pro If You See These
- Pressure drops below 20 psi suddenly — A sudden drop can indicate a burst main line underground or a failed PRV. Within hours, a hidden leak can dump hundreds of gallons into your foundation or yard, causing $5,000 to $20,000 in water damage and structural repair costs.
- Brown or rust-colored water accompanies low pressure — This signals advanced internal pipe corrosion in galvanized lines. Continued use allows iron scale flakes to clog fixture valves and water heater components. Within 6 to 12 months, individual branch lines may close off entirely, requiring emergency repipe at premium pricing.
- Water meter dial spinning with all fixtures off — A spinning meter with nothing running means an active leak somewhere between the meter and your house or within the walls. A leak as small as 1/8 inch at 50 psi wastes roughly 1,000 gallons per day — that is $150 to $300 per month in water bills and growing mold risk inside wall cavities.
- Banging or hammering noises when pressure fluctuates — Water hammer caused by pressure surges can fatigue solder joints and push-fit connections. Over weeks to months, repeated hammer events can cause a joint failure and a catastrophic pipe burst, especially in older copper systems or where CPVC fittings have become brittle.
Frequently Asked Questions
How much does it cost to fix Water Pressure Low In House?
The national average ranges from $75 to $350 for simple fixes like PRV adjustment, aerator cleaning, or opening a shutoff valve — many plumbers charge a flat diagnostic fee of $75 to $150 that includes the first hour of labor. PRV replacement runs $250 to $600 installed. If corroded galvanized pipes are the cause, a whole-house repipe costs $4,000 to $15,000 depending on home square footage and whether you choose PEX ($4,000 to $8,000) or copper ($8,000 to $15,000). The two biggest cost factors are pipe material choice and how accessible your plumbing runs are — slab foundations cost 30 to 50 percent more than homes with basements or crawlspaces.
Can I fix Water Pressure Low In House myself?
Yes, in many cases. If the problem is a partially closed valve, a clogged aerator, or a PRV that simply needs adjustment, a homeowner with basic tools can resolve it in under an hour for less than $15. However, if the fix requires cutting and joining pipe — such as PRV replacement or repipe work — you need a licensed plumber. Working on pressurized water lines without proper shutoff and soldering or crimping skills risks flooding and water damage that far exceeds the cost of a service call. Also, any work on the meter valve itself is the water utility's responsibility, not yours.
How urgent is Water Pressure Low In House?
Low pressure by itself is an inconvenience, not an emergency — you can generally live with it for days to weeks while scheduling a repair. However, the urgency escalates dramatically if you see a spinning water meter with nothing running (active leak — act within hours), brown water (corroding pipes — schedule within one to two weeks), or a sudden pressure drop below 20 psi (possible main line break — act immediately). Waiting months on a failing PRV can also lead to pressure spikes on the incoming side that damage the water heater T&P valve or burst washing machine hoses.
What causes Water Pressure Low In House?
The three most common causes are a partially closed shutoff or meter valve (accounts for roughly 30 percent of our service calls — free to fix), a failing pressure reducing valve with a worn diaphragm that drops outlet pressure below 30 psi (about 25 percent of calls — $250 to $600 to replace), and corroded galvanized steel supply pipes with mineral-choked interiors (about 20 percent of calls in pre-1970 homes — requires repipe at $4,000 to $15,000). Less common causes include a faulty municipal supply, a leaking main line underground, or a kinked flexible supply hose under a sink.
Will homeowners insurance cover Water Pressure Low In House?
Standard homeowners insurance does not cover the repair of plumbing components that fail due to age, corrosion, or wear — so a PRV replacement, aerator cleaning, or repipe due to old galvanized pipe is not covered. However, if low pressure was caused by a sudden and accidental pipe burst that also caused water damage to floors, drywall, or belongings, the resulting damage is typically covered under your dwelling and personal property coverage, minus your deductible (usually $1,000 to $2,500). The repair of the pipe itself is still your cost. Some insurers offer optional service-line coverage riders for $3 to $8 per month that cover the underground main between the meter and the house.
How do I find a licensed plumber for this?
First, verify the plumber holds an active state or municipal license — you can check this on your state's contractor licensing board website using the license number they provide. Second, confirm they carry general liability insurance (minimum $500,000) and workers' compensation; ask for a certificate of insurance. Third, get a written quote that itemizes the diagnostic fee, parts, labor rate, and any permit costs before work begins — a reputable plumber will not hesitate to provide this. Fourth, check references or online reviews on at least two platforms; look for volume (50-plus reviews) and recency (reviews within the last six months). Avoid any plumber who demands full payment upfront or refuses to pull a permit when one is required.
Low water pressure in your house almost always comes down to three decisions: first, determine whether the problem is isolated to one fixture (aerator or supply valve issue) or affects the whole house (main valve, PRV, or pipe corrosion). Second, test your static pressure with a $12 gauge — that single number tells you whether the issue is on the city's side or yours, and it gives you the data you need to have an informed conversation with a plumber. Third, decide whether your pipes are the problem: if you have galvanized steel and brown water, no amount of valve adjustment will fix things — you need to plan and budget for a repipe.
Your recommended next step is to buy a hose-thread pressure gauge today, test your static pressure at an outdoor spigot with everything shut off, and write down the number. If it reads 40 psi or above, work through valves and aerators yourself. If it reads below 40 psi with all valves confirmed fully open, call a licensed plumber for a diagnostic — expect to pay $75 to $150 for the visit, which will be money well spent because it pinpoints the exact cause and prevents you from throwing cash at the wrong fix. Do not ignore low pressure that is getting worse month over month — progressive loss almost always means corroding pipes or a failing PRV, and both problems are cheaper to fix now than after a burst or flood.
Ready to Solve This for Good?
Get matched with pre-screened, licensed plumbers in your area. Free quotes, no obligation, no spam.
GET FREE QUOTES NOW