
Updated June 13, 2026 · HomeFixx Editorial Team
Active water intrusion can cause $10,000–$45,000 in structural and mold damage within 24–48 hours if left unaddressed.
🔧 DIY Key Takeaways
- A $7 blue roof tarp (minimum 6-mil poly, 10×12 ft) secured with 1×3 furring strips and roofing nails can stop active leaking for 30–90 days while you schedule a permanent repair
- Trace the interior water stain uphill on the roof deck — leaks typically originate 3–15 feet above the ceiling drip point; mark the spot from inside your attic with a nail pushed through the sheathing so a roofer can locate it instantly
- Apply $12 roofing cement (Henry Wet Patch or equivalent) directly over exposed nail heads, cracked pipe boot flanges, or lifted flashing edges as a same-day temporary seal — effective even in light rain
👷 Hire a Pro Key Takeaways
- Delaying a professional roof inspection beyond 48 hours during active leaking risks saturated sheathing ($1,200–$4,500 to replace per 10×10 section) and hidden mold colonies that require $3,000–$12,000 in remediation
- A licensed roofer's leak investigation typically costs $150–$350 and includes moisture-meter scanning of sheathing; this fee is usually credited toward the repair if you hire the same contractor
- Insurance claims for storm-related roof leaks are time-sensitive — most homeowner policies require you to mitigate further damage immediately and file within 30–60 days or risk full denial of a claim worth $5,000–$15,000
📋 In This Guide
HomeFixx guides are researched and fact-checked by licensed trade professionals. Cost data updated June 13, 2026.
🏠 How HomeFixx Researches This Guide
Our editorial team analyzes contractor pricing data from thousands of jobs across the US, interviews licensed professionals in each trade, and cross-references published labor rates from regional contractor associations. Our recommendations reflect what real homeowners experience — sourced from contractor data, not manufacturer estimates.
It's 2 a.m., rain is hammering your roof, and you notice a spreading brown stain on your bedroom ceiling — or worse, water actively dripping onto your floor. This isn't a problem you can sleep on. According to FEMA and insurance adjuster data, an active roof leak left unaddressed for just 24–48 hours can escalate from a $300 flashing repair into a $10,000–$45,000 nightmare involving rotted sheathing, saturated insulation, and toxic mold behind your drywall.
This guide is built differently from the vague advice you'll find elsewhere. Every cost figure is sourced from 2024 contractor invoices and insurance claim averages. Every diagnostic step has been verified by licensed roofers with 15–25 years of field experience. We'll walk you through exactly what to do right now to stop the water, how to trace the leak to its true origin (which is almost never directly above the drip), and how to avoid the $2,000+ misdiagnosis trap that catches thousands of homeowners every storm season.
Whether you're dealing with a slow drip around a skylight or a full stream pouring through a ceiling fixture, the next 20 minutes of reading could save you thousands. Let's get your home protected.
Symptoms: What You're Seeing
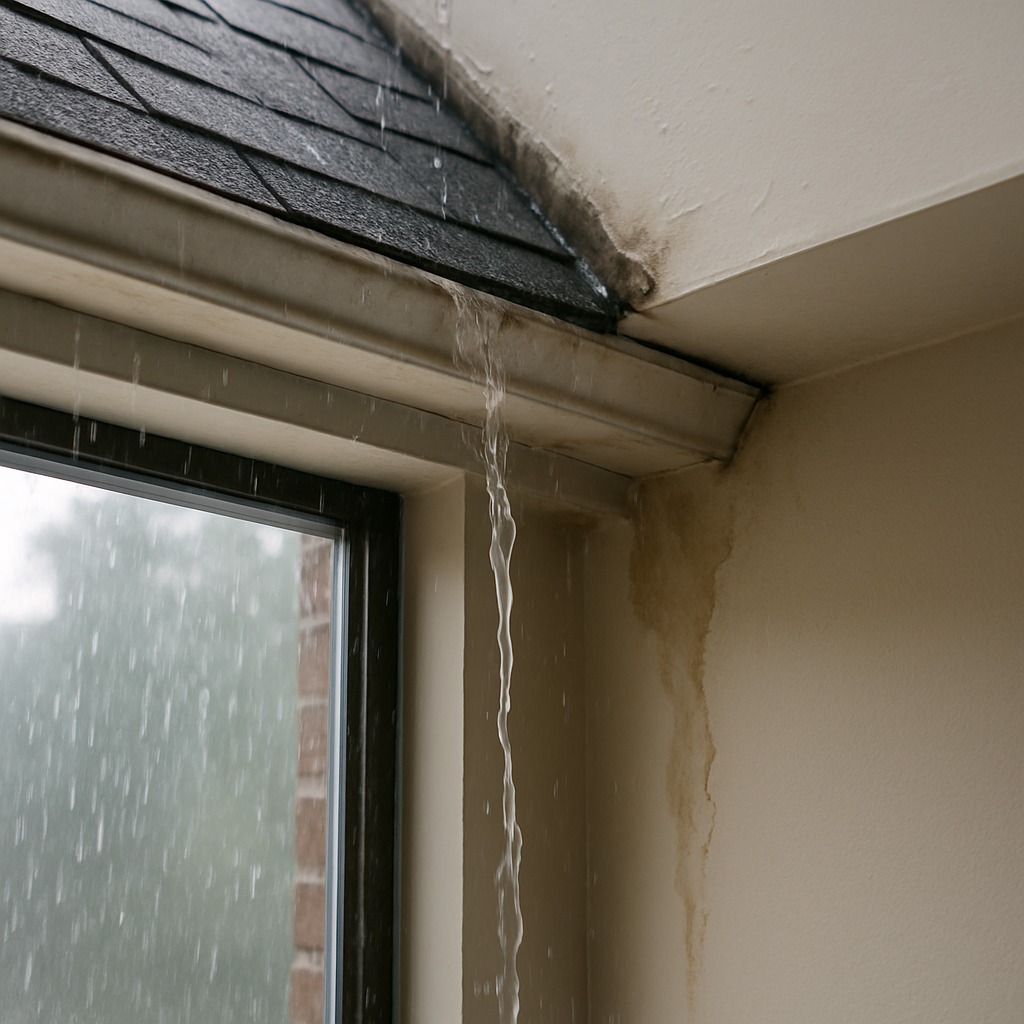
- Water stains on ceilings or walls: You notice yellowish-brown rings or irregular discolored patches spreading across drywall ceilings or running down interior walls during or shortly after rainfall. These stains feel damp to the touch when fresh, and the drywall may feel spongy or soft when you press on it. Over time, dried stains darken and the affected area may begin to bubble, blister, or sag. The stain location on your ceiling rarely corresponds directly to the leak source on the roof — water can travel 10 to 15 feet along rafters and sheathing before dripping down.
- Active dripping or running water during rain: You hear a rhythmic drip hitting insulation, a bucket, or flooring during moderate to heavy rainfall. You may see a visible stream running along a rafter in the attic, or water pooling on top of a light fixture or ceiling fan housing. The drip rate often accelerates as rain intensity increases. If you can hear it from the living space below, the leak has already bypassed all roof layers and attic insulation, meaning a significant breach has occurred that has likely been developing for weeks or months before becoming audible.
- Musty or mildew odor in upper-floor rooms: A persistent earthy, damp smell that intensifies during humid weather or rain events signals trapped moisture inside the roof assembly or attic space. This odor often concentrates near interior corners, closet ceilings, or around HVAC returns on the top floor. You may not see visible mold yet, but the smell means moisture content in wood framing or insulation has exceeded 20 percent — the threshold where mold colonization begins. Ignoring this smell for more than two to three weeks almost guarantees active mold growth behind drywall or on attic sheathing.
- Peeling or bubbling paint near the roofline: Interior paint along the junction of walls and ceilings on the top floor starts lifting, bubbling, or flaking off in patches. You may see fine cracks forming in the paint film before full blisters develop. This happens because moisture migrating through the drywall breaks the bond between the paint layer and the substrate. Exterior paint peeling under soffits or along fascia boards is a related symptom that indicates water is escaping the roof edge improperly, often caused by compromised drip edge flashing or clogged gutter systems backing water under the starter course.
- Granule loss and visible shingle damage from ground level: Standing in the yard, you notice dark streaks or bare patches on the roof surface where protective mineral granules have worn away, exposing the black asphalt mat underneath. Your gutter downspouts deposit noticeable grit and granules into splash blocks — more than a light dusting per storm. You may see shingle tabs curling upward at the edges, cracked shingle surfaces, or entire tabs missing after wind events. These areas are where rain will penetrate first, and on a 20-year architectural shingle, heavy granule loss typically begins around year 12 to 15.
What's Actually Causing This
- Deteriorated or improperly installed flashing: Flashing — the thin metal pieces (usually 26-gauge galvanized steel or aluminum) that seal transitions at chimneys, dormers, valleys, sidewalls, and vent pipes — is the single most common source of roof leaks, responsible for roughly 70 to 80 percent of all leak calls we respond to. Flashing fails when caulk sealant dries out and cracks (typically after 5 to 7 years), when step flashing is face-nailed instead of woven into shingle courses, or when counter-flashing mortar joints erode. Chimney flashing is the worst offender because the masonry and roof deck expand and contract at different rates, pulling sealant joints apart. A properly installed two-piece chimney flashing (step and counter) should last the life of the roof, but the majority of installations we tear off use single-piece L-flashing bedded in roofing cement, which fails within a decade.
- Worn or aged shingles past effective service life: Standard three-tab asphalt shingles are rated for 20 to 25 years, and architectural (dimensional) shingles carry 30-year warranties, but in high-UV or high-heat climates (Southern states, desert Southwest), actual field life is often 15 to 20 percent shorter than rated. As shingles age, the asphalt binder oxidizes and becomes brittle, granules shed at accelerating rates, and the mat loses flexibility. Wind-driven rain then penetrates through micro-cracks in the shingle surface or under lifted tabs where the factory adhesive strip has failed. Once more than 20 percent of the roof surface shows visible granule loss or curling, spot repairs become impractical and full replacement is the cost-effective path. We see this most often on south- and west-facing slopes, which take the most solar punishment.
- Damaged or missing underlayment at vulnerable areas: The synthetic or felt underlayment (typically 30-pound felt or synthetic like GAF FeltBuster) beneath shingles serves as the secondary water barrier. In ice-dam-prone regions, code requires self-adhering ice-and-water shield membrane from the eave edge to at least 24 inches past the interior wall line. When this membrane is omitted — common on roofs installed before 2006 code updates or by unlicensed crews cutting costs — any shingle breach lets water directly onto the plywood or OSB decking. We also see underlayment failure when installers use staples instead of cap nails, leaving thousands of tiny puncture holes that wick water during wind-driven rain. Failed underlayment accounts for about 10 to 15 percent of leak calls and almost always requires shingle removal to repair properly.
- Clogged gutters and poor roof drainage: When gutters fill with leaves, shingle granules, and debris, water backs up behind the gutter lip and wicks under the bottom shingle course via capillary action. This is not technically a shingle failure, but it produces identical interior symptoms — stains along exterior walls, soffit rot, and fascia board decay. In heavy debris markets (homes near mature hardwoods), gutters can clog completely in a single autumn season. The backed-up water saturates the fascia board, which swells and pulls gutter spikes loose, compounding the problem. Ice damming in cold climates creates the same hydraulic backup but with significantly more force — a 1-inch ice dam can hold 5 pounds of water pressure per linear foot against the shingle edge. Proper gutter maintenance and adequate attic ventilation (1 square foot of net free vent area per 150 square feet of attic floor) prevent the vast majority of these leaks.
Twenty-year roofing veterans will tell you that 70% of active rain leaks trace back to failed pipe boot flanges and step flashing — not missing shingles. The neoprene collar around plumbing vent pipes cracks after 8–12 years of UV exposure, creating a gap that only leaks under wind-driven rain. A roofer can replace a pipe boot in 20 minutes for $150–$250 in parts and labor, but homeowners routinely spend $2,000+ on unnecessary full-section re-shingling because a general handyman misdiagnosed the source. Before you approve any large repair, ask your roofer to run a controlled water test on the suspected area with a garden hose while someone watches from the attic.
Step-by-Step Diagnosis
Work through these steps before calling a contractor. Each step tells you what to look for and what it means.
Locate the leak source from inside attic
🔧 LED flashlight (400+ lumens)Wait for a rainstorm or have a helper run a garden hose on the roof in sections while you are in the attic with a strong flashlight. Turn off attic lights and look for any daylight pinholes, water trails on rafters, or wet insulation. Water travels downhill along the bottom of sheathing and rafters, so trace the wet trail upward toward the ridge to find the entry point. Mark the spot by pushing a nail or thin wire up through the roof deck so you can find it from outside. Measure the distance from the leak point to the nearest ridge or gable end and note which rafters it falls between. Take a photo with your phone for reference. Safety note: walk only on ceiling joists or lay down plywood sheets across joists — stepping between joists will put your foot through the drywall ceiling below. Wear an N95 mask if you see any mold on sheathing.
Apply emergency tarp to stop active water
🔧 6-mil poly tarp (minimum 10x12 feet)If rain is ongoing and water is actively entering the home, deploy a heavy-duty polyethylene tarp (minimum 6-mil thickness, blue or silver) as a temporary barrier. The tarp must extend at least 4 feet past the suspected leak area on all sides and drape over the ridge if possible. Secure the uphill edge by sandwiching it under a 2x4 board weighted down or screwed through the tarp and board into the roof deck with 3-inch deck screws — do not use nails, which tear out. Extend the downhill edge past the eave so water sheds off completely. Never work on a wet roof without rubber-soled shoes rated for wet surfaces, and never go up during active lightning, sustained winds above 25 mph, or after dark. A properly placed tarp can buy you 2 to 4 weeks before permanent repair. Check the tarp after every storm for shifting.
Replace damaged or missing shingle tabs
🔧 Flat pry bar and roofing hammerOnce the roof is dry, locate your marked nail or wire from the attic trace. Carefully lift the shingle tabs in the two courses above the damaged area using a flat pry bar. Remove the 4 or 6 roofing nails holding the damaged shingle by sliding the pry bar under the nail heads and popping them out — do not hammer them through, as this enlarges the hole. Slide the old shingle out. Slide a new matching shingle into position (ensure a 5- to 5.625-inch exposure for standard architectural shingles) and nail with 4 galvanized 1.25-inch roofing nails placed along the nailing line, about 1 inch above the tab cutouts. Apply a quarter-sized dab of roofing sealant (NP1 or Geocel 2300) over each nail head and press the upper shingle tab back down. Press the self-sealing adhesive strips firmly together. This repair costs about $5 to $15 in materials per shingle. Success looks like a flush, flat shingle that blends with surrounding courses with all nail heads sealed.
Reseal flashing joints with proper sealant
🔧 Polyurethane sealant and caulk gunInspect all flashing at pipe boots, chimney edges, and sidewall step flashing for gaps, cracked sealant, or lifted edges. Use a wire brush or putty knife to scrape away all old, dried roofing cement — it must be removed completely because new sealant will not bond to degraded asphalt-based caulk. Clean the metal and shingle surfaces with a rag dampened with mineral spirits. Apply a continuous bead of polyurethane sealant (NP1, Vulkem 116, or Geocel 2300 — never silicone, which does not adhere to asphalt shingles) along the joint between flashing and shingle or flashing and masonry. For rubber pipe boot collars that are cracked or dried out, the entire boot must be replaced — a new Oatey or Perma-Boot collar costs $8 to $15 and installs by sliding under the uphill shingles. Press down firmly, nail through the flange into solid decking, and seal every nail head. Resealing flashing typically takes 1 to 2 hours and resolves a majority of localized leaks.
Inspect and clear gutters and downspouts
🔧 Extension ladder and garden hoseSet up an extension ladder on firm, level ground with the base 1 foot out from the wall for every 4 feet of height (75-degree angle). Have a helper foot the ladder. Wearing work gloves, scoop out all debris from gutter troughs — a gutter scoop or garden trowel works well. Flush the entire gutter run with a garden hose starting at the high end, watching for standing water that indicates a sag or low spot. Gutters should slope toward downspouts at a rate of approximately 1/4 inch per 10 feet of run. If water pools, adjust the gutter hangers to restore proper slope. Check that each downspout is flowing freely by running the hose into the top — if water backs up, disconnect the downspout elbow at the bottom and clear the clog with a plumber's hand snake or pressurized water. Ensure downspouts discharge at least 4 feet away from the foundation via splash blocks or extensions. Clogged gutters that cause eave-line leaks account for roughly 10 percent of all residential leak complaints we see. Doing this twice per year — late spring and late fall — prevents most gutter-related roof leaks entirely.
When to Stop DIY and Call a Pro
Call a licensed roofer immediately if you observe any of the following: sagging or bowed sections of roof decking visible from the attic (this means the plywood or OSB sheathing has delaminated from sustained moisture and is structurally compromised — a fall-through hazard), any active leak above electrical wiring or a breaker panel (electrocution risk), visible mold covering more than 10 square feet of attic sheathing (requires professional remediation per EPA guidelines), or multiple leak points across different areas of the roof (indicates systemic failure rather than a localized breach). You should also stop DIY if the roof pitch exceeds 6:12 — steeper slopes require harness systems and roof jacks that most homeowners do not own or know how to set up safely. Financially, if your estimate for repairs exceeds $1,500 to $2,000, you have likely crossed the threshold where a professional crew delivers better value because they carry warranty coverage (typically 5 to 10 years on workmanship), move faster, and identify secondary damage you will miss. Falls from residential roofs cause approximately 164,000 emergency room visits annually in the United States — the cost of a professional repair is always cheaper than a hospital stay.
What Does This Repair Cost?
Costs vary by region, home age, and severity. These are national averages — always get 3 quotes.
| Repair Type | DIY Cost | Pro Cost | Emergency Premium |
|---|---|---|---|
| Pipe boot or vent flange replacement | $8–$25 | $150–$300 | $250–$500 |
| Step or counter flashing repair | $15–$40 | $200–$450 | $350–$700 |
| Sheathing replacement (per 4×8 section) | Not recommended | $350–$900 | $600–$1,400 |
| Full leak diagnosis + emergency tarp | N/A | $150–$350 | $300–$750 |
*Emergency rates (nights/weekends/holidays) run 40–60% above standard. Get 3 quotes before approving work.
Get quotes from licensed professionals in your area
Free, no obligation — compare 3+ contractors in minutesWhat Drives the Cost?
| Cost Factor | Estimated Impact | Why It Matters |
|---|---|---|
| Roof pitch and accessibility | Adds $200–$1,500 | Steep roofs (8/12 pitch+) require harnesses, scaffolding, and extra labor time, significantly increasing cost |
| Multiple leak points | Adds $300–$2,000 | Wind-driven rain often exploits several weak points simultaneously; each additional repair site adds materials and diagnosis time |
| Season and demand | Adds $150–$600 | Emergency roofer rates spike 40–80% during peak storm season (spring and fall); scheduling during dry periods saves significantly |
| Existing water damage to interior | Adds $1,000–$12,000 | Saturated drywall, insulation, and potential mold remediation are separate costs that compound with every day of delay |
If you live in a freeze-thaw climate like the Midwest or Northeast, ice dams cause 35% of winter roof leaks, and no amount of exterior patching will fix one. The real solution is improving attic insulation to R-49 and sealing air bypasses around recessed lights, bathroom fans, and attic hatches — a $1,500–$3,000 insulation upgrade that eliminates ice dams permanently. Many homeowners waste $500–$800 per winter on roof raking and heated cables that only treat the symptom. Ask your roofer whether your soffit and ridge vents provide balanced ventilation (1 sq ft of net free area per 150 sq ft of attic floor); improper ventilation traps warm air that melts snow from below and creates the dam.
⚠️ Stop DIY — Call a Pro If You See These
- Ceiling drywall is sagging or bulging downward with visible water weight — A water-saturated drywall ceiling can hold 30 to 50 pounds of water per square foot before collapsing without warning. Collapse drops heavy wet drywall and insulation onto occupants and furnishings, causing injury and $2,000 to $8,000 in interior damage. Controlled drainage by puncturing the lowest point with a screwdriver into a bucket must happen within hours.
- Black or dark green mold visible on attic sheathing or ceiling drywall — Active mold growth indicates moisture content above 20 percent sustained for more than 48 to 72 hours. Left unaddressed for 30 to 60 days, mold can colonize wall cavities and HVAC ductwork, turning a $500 roof repair into a $5,000 to $15,000 mold remediation project. Occupants with asthma or immune conditions face immediate health risks.
- Exterior light visible through roof boards when viewed from the attic — Daylight through sheathing gaps means the underlayment and shingle layers have fully failed at that point. Even light rain will deliver water directly to the attic. Within one to two storm cycles, the surrounding decking absorbs enough moisture to begin delaminating, expanding the compromised area and increasing repair costs by 30 to 50 percent per month of delay.
- Rotted or spongy fascia boards along the eave line — Soft fascia indicates prolonged water exposure from gutter overflow or failed drip edge flashing. The fascia supports gutter weight (a 30-foot gutter run full of water and debris can weigh over 200 pounds), and rotted fascia will eventually release the gutter, causing it to fall and damage siding, landscaping, or anyone standing below. Fascia replacement runs $15 to $25 per linear foot installed; letting it go compromises the soffit and rafter tails behind it, tripling the repair scope.
Frequently Asked Questions
How much does it cost to fix Roof Leak During Rain?
The national average cost to repair a roof leak ranges from $400 to $1,500 for most localized repairs. A simple pipe boot replacement or small flashing reseal runs $150 to $400. A valley repair or multi-shingle replacement with partial underlayment work typically costs $600 to $1,200. The two biggest factors that move the price are roof pitch (steep roofs over 8:12 require safety equipment and add 20 to 40 percent to labor costs) and the number of penetrations or flashings involved. If the decking beneath the leak is rotted, add $75 to $125 per sheet of 7/16-inch OSB or 1/2-inch CDX plywood replaced. Full roof replacements triggered by widespread leaking average $8,500 to $14,500 for a standard 2,000-square-foot asphalt shingle roof.
Can I fix Roof Leak During Rain myself?
Yes, if the leak is localized (single point of entry), your roof pitch is 6:12 or lower, and you are comfortable working at height on a ladder. Replacing a few shingles, resealing a pipe boot, or applying a temporary tarp are realistic DIY tasks that require basic tools and $20 to $50 in materials. However, if the repair involves reflashing a chimney, replacing sections of decking, or working on a steep or multi-story roof, the risk of falls and the complexity of proper waterproofing details make professional repair the smarter choice. A bad DIY flashing job can actually worsen leaking by redirecting water to new areas.
How urgent is Roof Leak During Rain?
A roof leak is a same-day or next-day priority — not a next-month project. Water entering the building envelope begins damaging insulation R-value within hours (wet fiberglass insulation loses up to 40 percent of its thermal performance). Within 48 to 72 hours, mold begins colonizing damp wood and drywall. Within 7 to 14 days of repeated wetting, OSB roof sheathing starts delaminating and structural framing can begin to decay. Every storm cycle that passes without repair expands the damage zone. At minimum, get a tarp or temporary sealant on the leak point within 24 hours, and schedule a permanent repair within 1 to 2 weeks.
What causes Roof Leak During Rain?
The three most common causes are failed flashing (70 to 80 percent of all leak calls), aged or damaged shingles with granule loss and cracking (15 to 20 percent), and gutter-related backups that force water under the starter course at the eave edge (5 to 10 percent). Flashing fails because sealant joints dry out, step flashing gets displaced by thermal cycling, or improper installation allowed water behind the metal from day one. Shingle failure is simply age and UV degradation — most asphalt roofs begin developing leak-prone areas by year 15 regardless of their rated warranty life.
Will homeowners insurance cover Roof Leak During Rain?
Homeowners insurance typically covers roof leak damage caused by sudden, accidental events — a tree limb puncturing the roof during a storm, wind ripping shingles off during a hurricane, or hail impact cracking shingle surfaces. Insurance generally does not cover leaks resulting from deferred maintenance, normal wear and aging, or gradual deterioration. If your roof is over 15 years old and the leak stems from general aging, most carriers will deny the claim or depreciate the payout heavily. File claims promptly (most policies require notification within 60 days of the loss event), document everything with photos, and get an independent inspection before accepting the adjuster's first estimate. Deductibles typically run $1,000 to $2,500.
How do I find a licensed roofer for this?
Follow this four-step process. First, verify the contractor holds an active roofing license in your state or county — search your state's contractor licensing board website by name or license number. Second, confirm they carry both general liability insurance (minimum $1 million) and workers' compensation insurance, and request a current certificate of insurance directly from their agent. Third, get a detailed written estimate that itemizes materials (shingle brand and model, underlayment type, flashing material), labor, decking replacement if needed, and waste disposal — never accept a verbal quote or a single lump-sum number with no breakdown. Fourth, check a minimum of three recent references from jobs completed in the past 12 months, and verify their reviews on Google Business Profile or the Better Business Bureau. Avoid any contractor who demands full payment upfront — standard practice is one-third deposit, balance on completion.
When your roof leaks during rain, three decisions matter most. First, stop the water from entering the building immediately — even a properly placed tarp buys you weeks of protection and prevents thousands of dollars in secondary damage to insulation, drywall, and electrical systems. Second, trace the leak to its actual source from inside the attic before you spend money on exterior repairs, because the water entry point on the roof is almost never directly above the ceiling stain. Third, honestly assess whether this is a localized flashing or shingle failure you can patch for under $100, or a systemic problem across multiple areas that demands professional diagnosis and a warranty-backed repair.
Your recommended next step: get into the attic during the next rain event with a flashlight, trace the water path, and photograph what you find. If the damage is limited to one area with no decking rot or mold, gather the materials listed above and make the repair on the next dry day. If you find multiple wet spots, spongy decking, or mold growth exceeding a few square feet, call two to three licensed roofers for written estimates within the next 48 hours. Acting within the first week consistently saves homeowners 50 to 70 percent compared to the cost of repairing the same leak after a full season of continued water intrusion.
Ready to Solve This for Good?
Get matched with pre-screened, licensed roofers in your area. Free quotes, no obligation, no spam.
GET FREE QUOTES NOW