
Updated June 12, 2026 · HomeFixx Editorial Team
Exposed roof decking can allow water intrusion that causes $8,000–$15,000 in structural and mold damage within 24–48 hours of rainfall.
🔧 DIY Key Takeaways
- A $12 roll of self-adhesive roofing membrane from any hardware store can temporarily waterproof up to 50 sq ft of exposed decking until a roofer arrives
- Photograph every damaged area from the ground using your phone's zoom — insurers require timestamped storm-damage photos within 72 hours, and climbing a wet roof causes 16,000 ER visits yearly
- A $35 bundle of three-tab shingles and a $9 tube of roofing cement can replace 1–5 missing shingles on a single-story walkable roof if you stay below a 6/12 pitch
👷 Hire a Pro Key Takeaways
- Storm damage affecting 10+ shingles or exposing underlayment requires a licensed roofer; delaying 7+ days risks voided homeowners insurance coverage and $3,000–$12,000 in secondary water damage
- A professional emergency tarp-and-secure visit typically costs $250–$600 and buys you 30–90 days before permanent repair — far cheaper than the $4,500 average interior water-damage remediation bill
- Roofers who offer free storm-damage inspections often work directly with your insurance adjuster, and contractor-documented claims are approved at 40% higher rates than homeowner-filed claims
📋 In This Guide
HomeFixx guides are researched and fact-checked by licensed trade professionals. Cost data updated June 12, 2026.
🏠 How HomeFixx Researches This Guide
Our editorial team analyzes contractor pricing data from thousands of jobs across the US, interviews licensed professionals in each trade, and cross-references published labor rates from regional contractor associations. Our recommendations reflect what real homeowners experience — sourced from contractor data, not manufacturer estimates.
You walk outside after last night's storm and your yard is scattered with asphalt shingles — some cracked, some curled, some completely torn from the nailing strip. Up on the roof, bare patches of dark underlayment or raw plywood decking are exposed to the sky. That sick feeling in your stomach is justified: every hour those gaps remain open, rainwater, wind-driven moisture, and debris have a direct path into your attic, insulation, and framing. The national average homeowner spends $950–$3,200 repairing storm-blown shingle damage, but delays can push that number past $8,500 when interior water damage, mold remediation, and rotted decking enter the equation.
This guide was built with input from licensed roofing contractors averaging 15+ years of storm-repair experience across hurricane, hail, and high-wind zones. We'll walk you through exactly what to look for, which temporary fixes actually work (and which make things worse), precisely what professional repairs cost in 2024, and how to navigate the insurance claim process so you don't leave money on the table. Whether you've lost two shingles or two dozen, the next 48 hours are critical — here's your playbook.
Symptoms: What You're Seeing
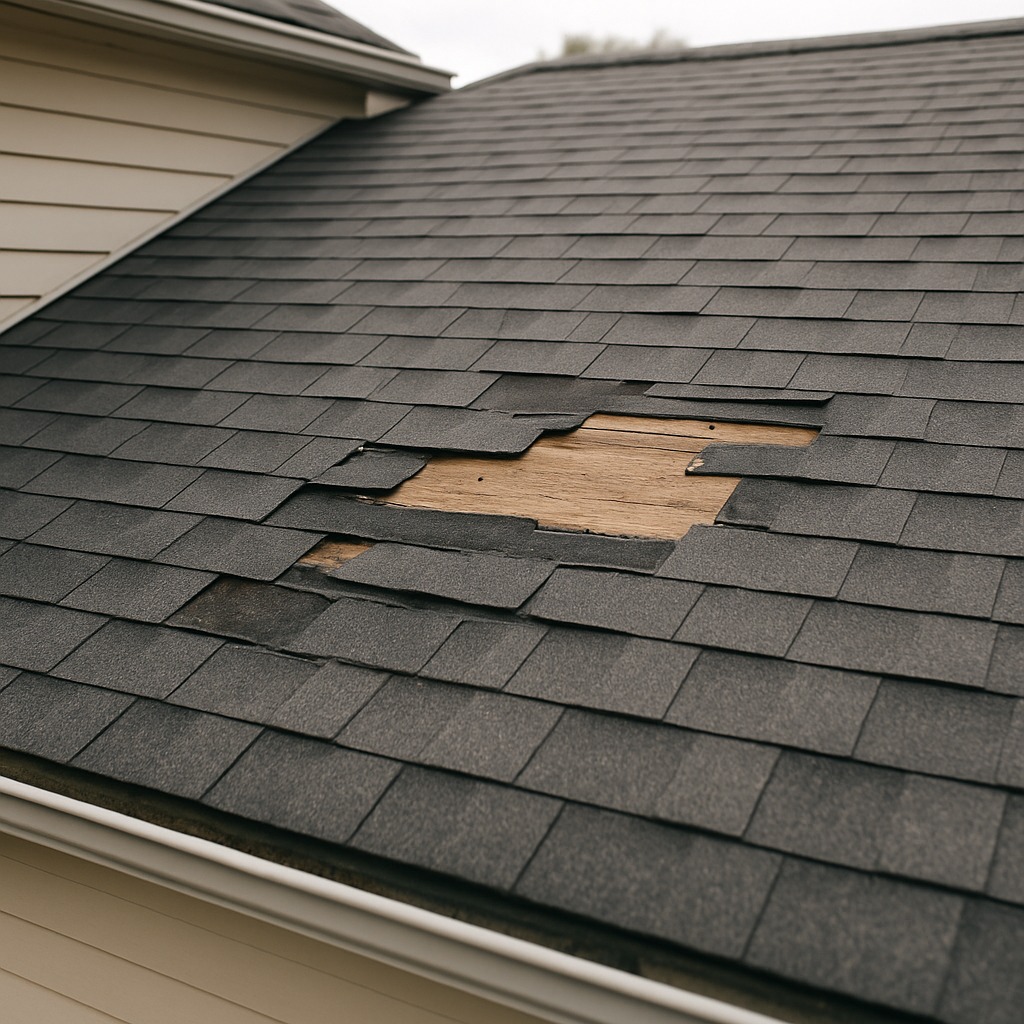
- Bare patches of exposed underlayment or decking: After a storm, look up from ground level and scan each roof plane for irregular dark rectangles or lighter-colored spots where shingles once sat. Exposed felt underlayment appears black or dark gray, while exposed OSB decking looks tan or light brown and may already show moisture darkening. These bare patches often concentrate along ridges, hips, and eaves—the areas where wind uplift is strongest. If you can see bare wood from the ground with binoculars, water infiltration has likely already begun.
- Shingle fragments and granules scattered in the yard: Walk the perimeter of your home after the storm passes and look for full shingle tabs, torn pieces, or curled fragments on the lawn, in flower beds, or caught in gutters. You may also notice heavy granule accumulation in downspout splash blocks—granules look like coarse black or gray sand. A single three-tab shingle weighs roughly 2 to 2.5 pounds; finding several means significant wind damage. The volume of debris on the ground roughly correlates with the severity of roof damage overhead.
- Active dripping or water stains on attic sheathing: Go into the attic with a flashlight within 12 hours of the storm. Look for fresh water trails on rafters, wet insulation, or drip lines on the underside of the roof deck. Wet OSB feels spongy to the touch and may smell musty even within the first day. Water stains appear as dark rings or streaks. If you see daylight through the decking, shingles and underlayment are completely gone in that area, and water entry during the next rain is guaranteed.
- Loose or lifted shingle edges visible from ground level: Using binoculars, scan each roof plane for shingles that are lifted, curled, or flapping. Wind-damaged shingles often remain partially attached but the sealant strip has broken. You may hear a soft flapping or tapping sound during moderate wind gusts of 15 mph or more. These shingles are on borrowed time—the next storm with 40-plus mph winds will rip them off completely, exposing the underlayment and fastener heads to direct rain penetration.
- Dented or displaced metal flashing and ridge caps: Inspect ridge lines, valleys, and pipe boots from the ground. Storm damage often displaces aluminum drip edge, bends step flashing along dormers, or tears off ridge cap shingles entirely. Missing ridge caps expose the ridge vent opening—a 1.5-inch-wide gap running the length of the roof peak—allowing wind-driven rain direct access to the attic. Displaced flashing around plumbing vents or chimneys may also appear bent, lifted, or missing, leaving penetration points completely unprotected.
What's Actually Causing This
- Wind uplift exceeding shingle adhesive bond strength: Asphalt shingles rely on a thermally activated adhesive strip (sealant strip) to bond each tab to the course below. This bond typically resists 60 to 70 mph winds on a properly installed roof. When sustained winds exceed this threshold—or when gusts reach 80-plus mph during severe storms—negative pressure on the leeward side lifts shingle edges, breaks the sealant bond, and peels shingles off in sheets. FEMA data shows that 70 percent of residential storm damage begins with shingle loss at edges and ridges where wind acceleration is highest. Homes on hilltops or at the end of open corridors experience wind speeds 10 to 20 percent higher than surrounding structures.
- Improper nailing pattern during original installation: The single most common installation defect contributing to wind-blown shingles is incorrect nail placement. Manufacturer specs call for nails placed in a specific nailing zone—typically 5/8 inch above the cutout on three-tab shingles or along the marked nail line on architectural shingles. High-nailing, where the roofer places fasteners 1 to 2 inches above the correct zone, misses the reinforcing overlap and reduces wind resistance by as much as 50 percent. Industry audits suggest roughly 1 in 4 roofs have nailing defects serious enough to void the manufacturer warranty. These defects remain invisible until a storm exposes them.
- Age-related sealant strip failure and granule erosion: Asphalt shingles have a functional service life of 15 to 30 years depending on the product class. After 12 to 15 years, the sealant strip begins to harden and crack, losing adhesion. Simultaneously, UV exposure erodes protective granules at a rate of roughly 3 to 5 percent per year, thinning the waterproof surface layer. By the time a roof is 20 years old, the sealant strip may have zero effective bond strength on many shingles. These aged shingles blow off in storms that a newer roof would easily withstand—sometimes in winds as low as 45 mph.
- Hail impact weakening shingle integrity before wind event: Hailstones 1 inch in diameter or larger fracture the fiberglass mat inside asphalt shingles, creating soft spots that lose granules rapidly. These impact points compromise the shingle's structural stiffness, making it more susceptible to wind lift. A roof that sustained hail damage in a prior storm—even without visible leaks—can lose shingles in a subsequent wind event at much lower wind speeds. Insurance adjusters frequently find that shingle blow-offs are actually a two-event failure: hail weakens the shingle, then wind finishes the job weeks or months later.
After 22 years of storm-damage calls, the single biggest mistake I see homeowners make is assuming that because the interior ceiling looks dry, the roof can wait. Water travels laterally along sheathing and rafters — sometimes 10 or 15 feet from the actual breach point — before it finally drips through drywall. By then your OSB decking has delaminated and you're looking at a $2,800–$4,500 decking replacement on top of the shingle work. If you see even three shingles on the ground, get a tarp up within 12 hours or call for an emergency tarp service at $250–$600. That one tarp can prevent thousands in hidden damage.
Step-by-Step Diagnosis
Work through these steps before calling a contractor. Each step tells you what to look for and what it means.
Perform a safe ground-level damage assessment
🔧 Binoculars, smartphone cameraBefore touching a ladder, walk the full perimeter of your home with binoculars and a smartphone camera. Photograph every visible bare patch, every piece of debris on the ground, and every gutter section filled with granules. Count the approximate number of missing shingles—each standard three-tab shingle covers roughly 12 by 36 inches; each architectural shingle tab covers about 13 by 39 inches. Note which roof planes are affected: north, south, east, or west. Document the storm date and save weather reports showing wind speeds; you will need this for your insurance claim. Do not climb onto a wet roof under any circumstances. If the roof pitch is 6/12 or steeper, or if any section appears structurally sagging, stop here and call a licensed roofer. This assessment typically takes 20 to 30 minutes and costs you nothing but is worth thousands in claim documentation.
Apply emergency tarp to prevent further water entry
🔧 6-mil poly tarp, 1x3 furring strips, cordless drill, 2-inch wood screws, fall-arrest harnessIf rain is forecast within 24 hours, a temporary tarp is critical. Use a heavy-duty polyethylene tarp (minimum 6-mil thickness, blue or silver) sized to extend at least 4 feet beyond the damaged area on all sides. Secure the tarp by rolling each edge around a 1x3 furring strip and screwing the furring strip through the tarp into the roof decking using 2-inch wood screws spaced every 12 inches. Do not use sandbags alone—they shift in wind. Make sure the tarp extends over the ridge if the damage is near the top of the roof, so water cannot flow under the upper edge. Wear rubber-soled shoes, use a fall-arrest harness tied to a ridge anchor if the pitch exceeds 4/12, and never work alone. A properly installed tarp will protect the interior for 30 to 90 days until permanent repairs are made. This step typically takes 45 minutes to an hour with two people.
Remove damaged shingle remnants and exposed nails
🔧 Flat pry bar, hammer, roofing stapler, 30-lb roofing feltOnce conditions are dry and you can work safely, use a flat pry bar to lift the overlapping shingle above the damaged area and extract the roofing nails (typically four to six per shingle) holding the remnants. Pull nails cleanly—do not leave them protruding, as they puncture the underlayment and create new leak points. Slide the flat bar under the damaged shingle tab, pry gently upward to break the sealant bond with the shingle above, then pull each nail. Inspect the exposed underlayment and decking beneath. If the felt paper is torn, patch it with a piece of 30-pound roofing felt lapped at least 6 inches over existing felt, secured with roofing staples. If the OSB decking is soft, swollen, or delaminated, that section must be cut out and replaced—a job that crosses into professional territory for most homeowners.
Install replacement shingles with correct nail placement
🔧 1.25-inch galvanized roofing nails, hammer or roofing nailer, roofing cement, caulk gunPurchase replacement shingles that match the existing brand, color, and profile. Bring a sample of the old shingle to your supplier—color names change across production years. Slide the new shingle into position under the course above, aligning the bottom edge with the adjacent shingles. Nail using four 1.25-inch galvanized roofing nails placed in the manufacturer's designated nail line—typically a marked strip about 1 inch above the top of the cutouts on three-tab shingles, or along the factory-indicated line on architectural shingles. Drive nails flush—overdriven nails punch through the mat and lose holding power; underdriven nails tent the shingle above. After nailing, lift the overlapping tab and apply a quarter-sized dab of roofing cement under each adhesive point to simulate the factory sealant strip. Press firmly. On a warm day (60°F or above), the sealant strip will reactivate and self-seal within 2 to 4 weeks.
Inspect from inside the attic after next rainfall
🔧 Flashlight, painter's tapeAfter the first significant rainfall following your repair—ideally 0.5 inches or more—go into the attic with a bright flashlight and inspect every area beneath the repaired zone. Run your hand along the underside of the roof sheathing feeling for any moisture. Check for fresh water stains, drip trails, or wet insulation. Pay special attention to the area directly above the nail lines of the shingles you replaced; an improperly sealed nail head is the most common source of post-repair leaks. Also check the valleys and flashing zones adjacent to the repair. If you find any moisture, mark the spot with a piece of tape and re-examine after the next rain to confirm it is an active leak rather than residual moisture. Any persistent leak means the repair needs to be redone or assessed by a professional roofer before further damage occurs to the sheathing and framing below.
When to Stop DIY and Call a Pro
Stop DIY and call a licensed roofer immediately if any of these conditions exist: more than 25 square feet of decking is exposed (roughly the size of a sheet of plywood), if the decking underneath is soft or visibly water-damaged, if the roof pitch is 8/12 or steeper, if damage spans multiple roof planes or involves flashing around chimneys or skylights, or if you see any structural sagging in the roof line. Also call a professional if you are not comfortable working at height with a harness system—falls from residential roofs account for over 100 fatalities and thousands of emergency room visits annually. From a financial standpoint, if the damage involves more than roughly 30 to 40 shingles, the materials and time investment approach $500 to $800, at which point a professional crew can complete the job in a single visit for $800 to $1,500 with a workmanship warranty. Beyond approximately 100 square feet of damage, most insurance adjusters will recommend a full slope replacement costing $3,000 to $8,000, which absolutely requires a licensed contractor to maintain your insurance coverage and manufacturer warranty. Do not attempt any work that involves removing or replacing decking, reframing damaged trusses, or modifying flashing—this is structural work requiring permits in most jurisdictions.
What Does This Repair Cost?
Costs vary by region, home age, and severity. These are national averages — always get 3 quotes.
| Repair Type | DIY Cost | Pro Cost | Emergency Premium |
|---|---|---|---|
| 1–5 missing three-tab shingles (small patch) | $35–$75 | $150–$400 | $300–$650 |
| 6–20 missing shingles (moderate damage zone) | $60–$150 | $400–$1,200 | $700–$1,800 |
| Large section replacement (50+ sq ft with decking repair) | Not recommended | $1,500–$5,500 | $2,500–$8,500 |
| Emergency tarp & secure service | N/A | $250–$600 | $400–$900 |
*Emergency rates (nights/weekends/holidays) run 40–60% above standard. Get 3 quotes before approving work.
Get quotes from licensed professionals in your area
Free, no obligation — compare 3+ contractors in minutesWhat Drives the Cost?
| Cost Factor | Estimated Impact | Why It Matters |
|---|---|---|
| Roof pitch and accessibility | Adds $200–$1,500 | Steep roofs (8/12+) require harness systems, specialized staging, and more labor hours, significantly increasing per-square costs |
| Shingle type and availability | Adds $150–$2,000 | Architectural or designer shingles cost 2–3× more than three-tab; discontinued lines may force full-slope replacement to match |
| Underlying decking damage | Adds $500–$3,500 | Rotted or delaminated OSB/plywood must be replaced before new shingles go down — hidden damage that only appears once old material is removed |
| Insurance deductible structure | Saves $0–$4,000 | Standard $1,000 deductibles vs. percentage-based wind/hail deductibles dramatically change your out-of-pocket costs; knowing yours before you call prevents claim regret |
Here's a money-saving angle most homeowners miss: if your area was declared a storm zone by the National Weather Service, your insurance deductible is often a separate wind/hail deductible — sometimes 1–2% of your home's insured value instead of a flat $1,000. That means on a $350,000 home you could owe $3,500–$7,000 out of pocket before coverage kicks in. Before filing a claim, get a written roofer estimate first. If the repair is only $800–$1,500 for a small patch job, you're better off paying cash and avoiding the claim entirely — because a single roof claim can spike your premium $300–$600 per year for 3–5 years, costing you more than the repair itself.
⚠️ Stop DIY — Call a Pro If You See These
- Water stains spreading on interior ceilings or walls — Active water infiltration is reaching living spaces, meaning it has already saturated insulation and potentially soaked drywall and framing. Within 48 to 72 hours, mold colonization begins on wet drywall and wood. Remediation costs jump from a $300 to $500 roof patch to $2,000 to $5,000 in mold remediation and drywall replacement if not addressed within the first week.
- Visible daylight through the roof deck from the attic — Both shingles and underlayment are completely gone, leaving bare wood or even an open hole. The next rainfall—even a light shower—will send water directly onto insulation, wiring, and framing. Unprotected OSB decking begins to delaminate after roughly 3 to 5 wetting-drying cycles, requiring full sheathing replacement at $75 to $100 per sheet installed, on top of the shingle repair.
- Sagging or deflection visible in the roof line — This indicates that water has been penetrating long enough to weaken rafters or trusses, or that the storm caused structural impact damage. Truss repair or sistering costs $1,500 to $4,000 per affected area and requires engineering assessment. A sagging roof is a collapse risk—do not enter the attic beneath a visibly deflecting section, and evacuate rooms directly below until a structural assessment is completed.
- Multiple missing shingles across two or more roof planes — Widespread damage across multiple slopes indicates systemic failure—either the roof was near end-of-life or the storm exceeded the shingle's rated wind resistance. Spot repairs on a systemically damaged roof fail within 1 to 3 years because adjacent aged shingles continue to blow off. Insurance adjusters typically approve full roof replacement when damage exceeds roughly 25 percent of the total roof area, so delaying a claim can result in losing coverage for the full scope.
Frequently Asked Questions
How much does it cost to fix Roof Shingles Missing After Storm?
For a small area of 10 to 20 missing shingles on a single roof plane, expect to pay a licensed roofer $250 to $750 for a service call, materials, and labor. A larger repair involving 100 to 300 square feet of shingle replacement typically runs $800 to $2,500 depending on roof pitch, height, and accessibility. If the storm damaged enough shingles to warrant a full slope or full roof replacement, costs range from $5,000 to $15,000 nationally, with the two biggest price factors being total square footage (measured in roofing squares, where 1 square equals 100 sq ft) and the shingle product grade—basic three-tab shingles run $90 to $120 per square for materials, while premium architectural shingles cost $130 to $200 per square.
Can I fix Roof Shingles Missing After Storm myself?
Yes, if the damage is limited to a small number of shingles (roughly 10 or fewer), the roof pitch is 6/12 or less, you have safe ladder access, you own or can rent a fall-arrest harness, and you are comfortable working at height. You will need matching shingles, roofing nails, a flat pry bar, and roofing cement. However, be aware that improper repairs can void both manufacturer warranties and insurance coverage. If more than one bundle of shingles (roughly 21 to 26 shingles per bundle) is needed, or if decking damage exists, the job is better handled by a licensed roofer who can guarantee the work and maintain your warranty chain.
How urgent is Roof Shingles Missing After Storm?
This is a 24-to-48-hour urgency issue. Once shingles are missing, the underlayment beneath them—typically 15-pound or 30-pound felt paper—is the only remaining water barrier, and it was never designed for prolonged UV or rain exposure. In heavy rain, underlayment nail holes and lap seams leak within hours. If underlayment is also torn or missing, water reaches the decking and attic immediately. Every day of delay increases the risk of decking rot, insulation saturation, mold growth, and interior drywall damage. At minimum, install a temporary tarp within 24 hours of the storm, even if permanent repairs cannot happen for weeks.
What causes Roof Shingles Missing After Storm?
The three most common causes are: (1) wind uplift exceeding the shingle sealant strip bond, which typically fails at sustained winds above 60 to 70 mph; (2) incorrect nail placement during original installation, especially high-nailing, which reduces wind resistance by up to 50 percent and is found on roughly 25 percent of inspected roofs; and (3) age-related deterioration where the sealant strip has hardened and granule loss has weakened the shingle, making roofs older than 15 years significantly more vulnerable to blow-offs even in moderate 45 to 55 mph wind events.
Will homeowners insurance cover Roof Shingles Missing After Storm?
Most standard homeowners policies (HO-3) cover wind and hail damage to roofing as a named peril, so storm-related shingle loss is typically covered minus your deductible. Deductibles for wind/hail are often 1 to 2 percent of the insured dwelling value—meaning on a $300,000 home, you may owe $3,000 to $6,000 out of pocket before coverage kicks in. Insurance will not cover shingle loss attributed to age, wear, or poor maintenance. If an adjuster determines the roof was past its serviceable life (typically beyond 20 to 25 years for three-tab shingles), the claim may be denied or depreciated significantly. File your claim within 30 days of the storm and document everything with dated photos, weather reports, and a contractor's written assessment.
How do I find a licensed roofer for this?
Follow these four steps: First, verify the contractor holds a valid roofing license in your state—check your state's contractor licensing board website using their license number. Second, confirm they carry both general liability insurance (minimum $1 million) and workers' compensation coverage; ask for a current certificate of insurance and call the insurer to verify it is active. Third, get a written estimate that itemizes materials, labor, tear-off if needed, and any decking repair—never accept a verbal quote. Fourth, check references by reading at least 10 recent reviews on Google or the Better Business Bureau and asking for three local references you can contact. Avoid storm chasers who knock on your door unsolicited; they often disappear before warranty claims arise. A reputable local roofer will provide a workmanship warranty of 5 to 10 years in addition to the manufacturer's material warranty.
When shingles go missing after a storm, three decisions determine whether the problem costs you $500 or $15,000: how quickly you protect the exposed area from further rain, whether the damage is small enough for a targeted shingle replacement or extensive enough to require a full slope or full roof replacement, and whether you file an insurance claim with proper documentation before the deadline. Speed matters most—every rain event on an unprotected roof compounds the damage exponentially, turning a straightforward shingle replacement into a decking, insulation, and interior repair project.
Your recommended next step is to complete the ground-level inspection and photo documentation today, install an emergency tarp if rain is forecast within 48 hours, and contact a licensed local roofer for a professional damage assessment within the first week. If the damage appears widespread—covering more than 25 to 30 square feet or spanning multiple roof planes—call your insurance company to open a claim before scheduling permanent repairs. Having a roofer's written estimate in hand when the adjuster arrives strengthens your claim significantly. Do not delay: the difference between a $300 patch and a $5,000 remediation project is often just one or two unprotected rainstorms.
Ready to Solve This for Good?
Get matched with pre-screened, licensed roofers in your area. Free quotes, no obligation, no spam.
GET FREE QUOTES NOW