
Updated June 12, 2026 · HomeFixx Editorial Team
Exposed decking can allow water infiltration that causes $5,000–$15,000 in structural and mold damage within 48–72 hours of rainfall.
🔧 DIY Key Takeaways
- A $12 bundle of matching 3-tab shingles and $8 in roofing nails can patch 1–3 missing shingles in under an hour if you're comfortable on a roof
- Apply a $6 tube of roofing sealant (like Henry Wet Patch) under lifted shingle edges and press flat with a weighted board to prevent blow-offs during upcoming storms
- Use a $30 blue tarp and 2×4 battens as a 72-hour emergency cover over exposed areas to prevent water damage while you schedule a professional inspection
👷 Hire a Pro Key Takeaways
- If more than 10% of your roof surface shows missing, cracked, or curling shingles, a roofer will typically recommend a full replacement ($6,500–$15,000 for an average 2,000 sq ft roof) rather than spot repairs that won't hold
- Insurance adjusters often deny claims filed more than 12 months after storm damage; a licensed roofer's documented inspection report ($0–$150) filed promptly can recover 80–100% of replacement costs under your homeowner's policy
- Roofers who skip the step of replacing damaged underlayment beneath blown-off shingles create hidden leak paths — always require photographic proof that felt paper or synthetic underlayment was inspected and patched, or you risk $3,000+ in hidden rot within 2 years
📋 In This Guide
HomeFixx guides are researched and fact-checked by licensed trade professionals. Cost data updated June 12, 2026.
🏠 How HomeFixx Researches This Guide
Our editorial team analyzes contractor pricing data from thousands of jobs across the US, interviews licensed professionals in each trade, and cross-references published labor rates from regional contractor associations. Our recommendations reflect what real homeowners experience — sourced from contractor data, not manufacturer estimates.
You walk out to grab the mail and notice dark patches on your roof where shingles used to be — or maybe you found granule-covered debris in your gutters after last night's windstorm. Either way, your stomach drops because you know exposed roof decking means your home's primary weather barrier has failed. What you do in the next 24 to 72 hours can mean the difference between a $200 spot repair and a $12,000 nightmare involving rotted sheathing, soaked insulation, and attic mold remediation.
Missing and damaged shingles are the single most common roofing issue in the United States, affecting roughly 35% of homes older than 15 years. Yet most online guides give you vague advice and zero real numbers. This HomeFixx guide is different: it's contractor-verified, includes 2024 regional cost data, and walks you through exactly how to assess the damage, execute a temporary DIY fix if you're able, and know when to call a licensed roofer — plus how to avoid the $3,000+ mistakes homeowners make when they hire the wrong one.
Below you'll find an urgency-rated action plan, a detailed cost comparison table for DIY versus professional repairs, and expert tips sourced from roofers with 20+ years in the field. Whether you're dealing with one wind-torn shingle or a hail-battered roof slope, this guide has you covered.
Symptoms: What You're Seeing
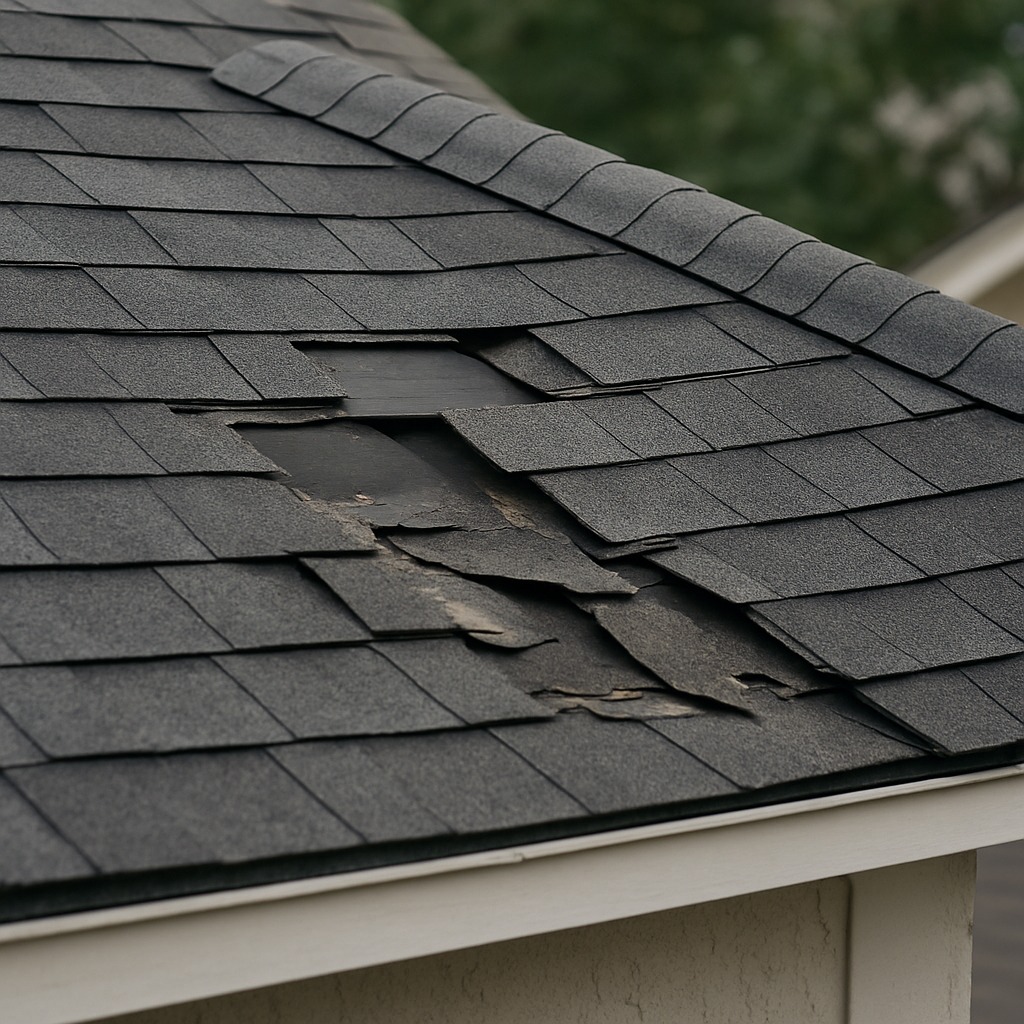
- Visible bare patches on the roof surface: You look up from the yard or a second-story window and see dark rectangles or irregular areas where the underlying felt paper or roof deck is exposed. The color contrast is obvious — the exposed underlayment is typically black or dark gray against the surrounding shingle field. After a storm, you may also spot shingle pieces scattered in the yard, gutters, or caught on landscaping. These bare spots are the single fastest indicator that your waterproof barrier has been compromised.
- Granules accumulating in gutters and downspouts: When you clean your gutters or check the bottom of downspout extensions, you find a gritty, sand-like sediment in shades of gray, black, or brown. A new roof sheds some granules in the first year, but if a mature roof (5+ years old) is dumping handfuls of granules per linear foot of gutter, the shingles are losing their UV-protective coating and becoming brittle. This accelerates cracking and curling within 12 to 18 months.
- Curling or cupping shingles visible from ground level: Shingle edges lift upward (curling) or the center of the tab pushes up while edges stay flat (cupping). You can often see the shadow lines change at different times of day. Curled shingles catch wind like a sail — once lifted past roughly 30 degrees, a 40-mph gust can rip them off entirely. Run your hand along the surface if safely accessible; curled shingles feel stiff, brittle, and may snap with light pressure.
- Water stains or active drips in the attic: Climb into the attic after a rainstorm and look along the underside of the roof deck. You will see dark, wet streaks on the plywood sheathing, discolored insulation, or actual dripping water. The smell is distinctive — musty, damp wood mixed with wet fiberglass insulation. Even a single stain that is 6 inches in diameter indicates water has breached the shingle layer and is wicking along the deck, which means the damage area above is likely larger than the stain below.
- Cracked or broken shingle tabs still in place: From a ladder at the eave line, you notice shingles with hairline fractures or clean breaks running across the tab. The pieces may still sit in position but shift when touched. These cracks allow wind-driven rain to penetrate underneath and reach the nail line. In freeze-thaw climates, water entering these cracks expands as ice and can lift surrounding shingles within one to two winter cycles, compounding the damage exponentially.
What's Actually Causing This
- Wind uplift and storm damage: High winds — particularly gusts exceeding 60 mph — get under shingle edges and peel them back. Three-tab shingles rated for 60-mph winds routinely fail at 45 to 50 mph once the self-seal adhesive strip degrades, which starts happening after roughly 8 to 12 years. Architectural (dimensional) shingles perform better but still lose tabs if the original installer failed to apply a dab of roofing cement at each end tab as required by manufacturer specs. In storm-prone regions (Gulf Coast, Tornado Alley, mid-Atlantic), wind damage is the number-one cause of shingle loss, contributing to roughly 35 to 40 percent of all roofing repair calls.
- Age-related deterioration and UV degradation: Asphalt shingles have a functional lifespan of 15 to 25 years for three-tab products and 25 to 35 years for architectural grades, but intense sun exposure shortens those numbers by 20 to 30 percent on south- and west-facing slopes. Ultraviolet radiation breaks down the asphalt binder, causing granule loss, brittleness, and micro-cracking. Once the granule layer is more than 30 percent depleted, the exposed asphalt bakes, hardens, and splits within 2 to 3 years. This is the leading non-storm cause of shingle damage and accounts for the majority of roof replacements nationwide.
- Improper installation and fastener failure: Shingles nailed too high (above the manufacturer's nail line), with too few fasteners (3 instead of the required 4 to 6 per shingle), or with over-driven or under-driven nails are prone to premature failure. An over-driven nail cuts through the fiberglass mat instead of securing it; an under-driven nail leaves the head above the shingle surface, creating a bump that prevents the self-seal strip from bonding. Industry data from the National Roofing Contractors Association suggests that installation defects are a contributing factor in roughly 25 percent of premature shingle failures. Improper nailing is the single most common defect found during warranty inspections.
- Poor attic ventilation causing heat buildup: Building code (IRC R806.1) requires 1 square foot of net free ventilation area for every 150 square feet of attic floor (or 1:300 with a vapor barrier). When ridge vents are blocked, soffit intake is insufficient, or insulation covers soffit baffles, attic temperatures can exceed 150°F in summer. That superheated air bakes shingles from below, accelerating asphalt oxidation and voiding most manufacturer warranties. This is an invisible cause — the homeowner sees shingle damage but doesn't realize the problem originates from inside the attic. It's extremely common in retrofitted or flipped homes where insulation was added without maintaining ventilation channels.
Here's something most homeowner guides skip: when you're replacing a single blown-off shingle, never drive nails through just the new shingle alone. A 20-year veteran roofer will lift the shingle two courses above the damaged area, nail through both layers in the nailing strip zone (about 1 inch above the cutout), and seal every exposed nail head with a dab of polyurethane sealant. This costs you maybe $0.50 extra in sealant per shingle but prevents the number-one callback roofers see — nail-driven leaks that show up 6 months later as ceiling stains. Also, always match the shingle profile (architectural vs. 3-tab) and color code from the manufacturer. Mismatched shingles reduce curb appeal and can lower appraisal values by $1,000–$2,000 on resale.
Step-by-Step Diagnosis
Work through these steps before calling a contractor. Each step tells you what to look for and what it means.
Safely access the roof and assess damage
🔧 Extension ladder, fall-arrest harness, tape measure, smartphone cameraWait for a dry day with no wind above 15 mph. Set up an extension ladder on firm, level ground at a 75-degree angle — the base should be 1 foot out from the wall for every 4 feet of height. Wear rubber-soled shoes and use a fall-arrest harness anchored to a ridge anchor if the pitch exceeds 6/12. Walk the roof systematically, starting at the ridge and working toward the eaves. Use a smartphone to photograph every damaged area with a tape measure in the frame for scale. Count the number of missing or cracked shingles and note their location by slope direction (north, south, etc.). A repair of fewer than 15 to 20 shingles on a walkable roof (6/12 pitch or less) is a reasonable DIY job. Anything larger calls for professional help.
Remove damaged shingles and old nails
🔧 Flat pry bar or shingle ripper, hammer, roofing cement, 30-lb felt paperUse a flat pry bar or dedicated shingle ripper (cat's paw style) to break the self-seal bond on the damaged shingle and the one directly above it. Slide the ripper under the shingle above the damaged one to locate and pop the nails — typically four to six per shingle driven through the overlapping course. Pull each nail cleanly; if a nail breaks off flush, drive the stub below the deck surface with a hammer and fill the hole with a dab of roofing cement. Remove the damaged shingle by sliding it out downslope. Inspect the exposed underlayment and sheathing. If the felt paper is torn, patch it with a piece of 30-pound roofing felt and staple it down. If the plywood sheathing is soft, spongy, or delaminated, stop — that's a professional repair requiring decking replacement. Clean the area of debris and granules so the new shingle sits flat.
Cut and fit the replacement shingle
🔧 Utility knife with hook blade, straight edge, tape measureBuy shingles that match the existing brand, model, and color as closely as possible. Big-box stores carry common lines from GAF, Owens Corning, and CertainTeed in bundles of roughly 21 to 26 shingles (covers about 33.3 square feet per bundle). If the existing shingles have faded significantly, buy one shade lighter — new shingles darken with UV exposure over 6 to 12 months and will blend better. For architectural shingles, confirm the exposure (typically 5-5/8 inches) matches the existing coursing. Measure the gap and use a utility knife with a hook blade to trim the new shingle to width if needed. Score the back of the shingle and snap it cleanly. Dry-fit the shingle into position before nailing to verify alignment with adjacent tabs and the coursing line.
Nail and seal the replacement shingle
🔧 Hammer or pneumatic roofing nailer, 1-1/4" galvanized roofing nails, roofing cement, caulk gunSlide the new shingle into position so its bottom edge aligns with the adjacent shingles in the same course. Gently lift the shingle above and nail the replacement using 1-1/4-inch galvanized roofing nails driven into the manufacturer's nail line — typically a stripe or mark 5-5/8 inches up from the bottom edge on architectural shingles. Use four nails minimum, positioned roughly 1 inch and 13 inches in from each end, with two more evenly spaced between. Drive each nail flush — the head should dimple the shingle surface slightly without cutting through the fiberglass mat. After nailing, apply a quarter-sized dab of roofing cement (Henry 208 or equivalent) under the self-seal strip of both the new shingle and the one above it, pressing firmly to bond. On warm days (70°F+), the self-seal strip will activate on its own within 2 to 4 weeks.
Inspect, clean up, and verify the repair
🔧 Flashlight, magnet-on-a-stick (for nail pickup)After completing each replacement, step back and sight down the roof line to confirm the new shingles are coursed evenly — a misaligned shingle will channel water sideways into the seam. Run your hand over the nail heads to verify none are proud of the surface. Check that roofing cement is not visible from below (sloppy cement stains detract from curb appeal). Pick up every nail, shingle scrap, and wrapper from the roof surface, gutters, and ground — a single roofing nail in a driveway will cost you a $30 tire plug or a $200 tire replacement. Finally, photograph the completed repair for your records and for any future insurance claims. After the next rain, inspect the attic space below the repair area with a flashlight to confirm no leaks are present. Repeat this attic check after two to three rains to be confident the repair is watertight.
When to Stop DIY and Call a Pro
Stop DIY and call a licensed roofer immediately if you see any of the following: soft or spongy roof decking when you step on it (indicates plywood rot requiring sheathing replacement at $75 to $120 per sheet installed), more than 20 missing or damaged shingles across multiple slopes, active leaking into living spaces (not just attic staining), any damage within 4 feet of a valley, skylight, chimney, or plumbing vent where flashing integration is critical, or a roof pitch steeper than 6/12 where fall risk multiplies dramatically. If your roof is older than 20 years and showing widespread granule loss, a spot repair is a waste of money — a full replacement ($8,000 to $15,000 for a typical 2,000-square-foot roof) is the financially sound decision because patching an aging roof delays the inevitable and adds $300 to $600 per repair visit that never gets credited toward the new roof. Insurance adjusters also look unfavorably on roofs with patchwork repairs when processing storm claims. From a safety standpoint, falls from residential roofs cause over 150 fatalities per year in the U.S. — if you are not comfortable working at height or lack proper fall protection equipment, the $250 to $500 cost of a professional repair is cheap insurance against catastrophic injury.
What Does This Repair Cost?
Costs vary by region, home age, and severity. These are national averages — always get 3 quotes.
| Repair Type | DIY Cost | Pro Cost | Emergency Premium |
|---|---|---|---|
| Single shingle replacement (1–3 shingles) | $15–$50 | $150–$350 | $250–$500 |
| Partial section repair (10–30 sq ft) | $40–$120 | $300–$800 | $500–$1,200 |
| Large area re-shingling (100+ sq ft with underlayment) | Not recommended | $1,000–$3,500 | $1,800–$5,000 |
| Emergency tarp & inspection call | N/A | $150–$400 | $300–$650 |
*Emergency rates (nights/weekends/holidays) run 40–60% above standard. Get 3 quotes before approving work.
Get quotes from licensed professionals in your area
Free, no obligation — compare 3+ contractors in minutesWhat Drives the Cost?
| Cost Factor | Estimated Impact | Why It Matters |
|---|---|---|
| Roof pitch & accessibility | Adds $200–$1,500 | Steep roofs (8/12 pitch or higher) require safety harnesses and specialized staging, increasing labor time by 30–50% |
| Shingle type (architectural vs. 3-tab vs. slate/tile) | Adds $50–$4,000 | Architectural shingles cost 2–3× more per bundle than 3-tab; specialty materials like cedar shake or synthetic slate multiply costs further |
| Underlying decking damage | Adds $500–$3,000 | Rotted OSB or plywood sheathing discovered during shingle removal must be replaced before new shingles go on — this is the hidden cost that blindsides homeowners |
| Time of year & demand | Adds or saves $300–$2,000 | Booking repairs in late fall or winter (off-season in most regions) can save 15–25% versus peak summer or post-storm demand when roofers charge premium rates |
Regional climate dramatically changes how urgent your repair timeline is. In Gulf Coast and Southeast states, a missing shingle during hurricane season (June–November) can void your wind-driven rain coverage if your insurer inspects and finds pre-existing unrepaired damage. In freeze-thaw climates like the upper Midwest and Northeast, exposed nail holes from missing shingles allow water entry that freezes overnight, expanding cracks in your roof decking at a rate that doubles repair costs every winter month you delay. A contractor trick for cold-weather temporary repairs: use peel-and-stick ice and water shield membrane ($45 per roll) instead of tarps. It self-adheres even at 40°F, stays watertight for months, and gives you until spring to schedule a proper repair without emergency-rate pricing, which typically adds 40–60% to your bill.
⚠️ Stop DIY — Call a Pro If You See These
- Daylight visible through the roof deck from inside the attic — This means the sheathing has a hole or gap, not just a missing shingle. Water is entering with every rain event. Within 30 to 60 days of persistent leaking, plywood sheathing begins to delaminate and mold colonizes framing — remediation costs jump from a $300 shingle repair to $2,000 to $5,000 in decking replacement and mold abatement.
- Multiple shingles missing in a vertical line (zipper effect) — This pattern indicates the nail line was placed incorrectly during installation, causing a systemic failure. The remaining shingles in that column will continue to peel off with each windstorm. The entire slope likely needs re-shingling, which runs $1,500 to $4,000 depending on size. Waiting risks exposing the entire underlayment and decking to UV and rain.
- Sagging or dipping visible in the roof line between trusses — Sagging means the plywood sheathing or the structural framing beneath has been compromised by prolonged moisture. This is a structural issue, not a cosmetic one. If ignored, a section of roof can collapse under snow load or even its own weight. Structural repair runs $5,000 to $15,000 and requires permits and engineering.
- Black mold or musty odor in attic directly below damaged area — Mold becomes visible within 48 to 72 hours of persistent moisture on wood. Once mold covers more than 10 square feet, EPA guidelines recommend professional remediation ($15 to $30 per square foot). Mold also degrades indoor air quality and can trigger respiratory issues for occupants. Delaying repair by even two weeks in humid conditions can triple the affected area.
Frequently Asked Questions
How much does it cost to fix Roof Shingles Missing Or Damaged?
For a small repair (1 to 10 shingles), most roofers charge $250 to $500, which includes the service call, materials, and labor. A moderate repair covering 1 to 2 squares (100 to 200 square feet) runs $500 to $1,200. A full slope re-shingle ranges from $1,500 to $4,000, and a complete roof replacement for a typical 2,000-square-foot home averages $8,000 to $15,000 nationally. The two biggest cost drivers are roof pitch (steep roofs over 8/12 add 20 to 40 percent in labor) and the number of layers to tear off ($1,000 to $2,000 extra for a second-layer removal).
Can I fix Roof Shingles Missing Or Damaged myself?
Yes, if the damage is limited to fewer than 15 to 20 shingles on a single slope with a pitch of 6/12 or less, you are physically comfortable working on a ladder and roof, and the underlying decking is solid. You will need about $50 to $100 in materials (one bundle of matching shingles, roofing nails, cement) and $50 to $150 in safety equipment if you do not already own a harness. Do not attempt DIY if the damage is near flashing, valleys, or vents — improper flashing integration is the leading cause of post-repair leaks and can void your shingle warranty.
How urgent is Roof Shingles Missing Or Damaged?
It depends on the weather forecast. If rain is expected within 24 to 48 hours, apply a temporary patch immediately: tarp the area with a 6-mil poly tarp secured with 2×4 battens screwed into the deck. This buys you 2 to 4 weeks. In dry weather, you have a more comfortable window of 1 to 3 weeks before UV exposure starts degrading the underlayment. However, every day a bare spot remains is a day where a pop-up storm can drive water into your home. The urgency escalates dramatically if the underlayment is already torn or decking is exposed — at that point, treat it as a same-day emergency.
What causes Roof Shingles Missing Or Damaged?
The three most common causes are wind damage from storms (gusts over 45 to 60 mph peel shingles from the starter edge and rake edges first), age-related deterioration from UV exposure (shingles older than 15 to 20 years lose granules and become brittle), and improper original installation (nails placed too high, too few nails, or failure to seal tabs). Less common but still significant causes include falling tree branches, foot traffic from antenna or HVAC installers, and thermal shock in climates with extreme temperature swings exceeding 50°F in 24 hours.
Will homeowners insurance cover Roof Shingles Missing Or Damaged?
Homeowners insurance typically covers shingle damage caused by sudden, accidental events — windstorms, hail, fallen trees, and fire. It does not cover damage from age, wear and tear, neglect, or improper installation. Most policies have a deductible of $1,000 to $2,500; if your repair costs less than the deductible, filing a claim is pointless and may flag your policy for rate increases. If a major storm hit your area, file a claim promptly (most policies require notice within 60 days), document everything with dated photos, and get an independent estimate before the adjuster arrives. Some newer policies in storm-prone states use a percentage-based wind/hail deductible (1 to 5 percent of the dwelling value), which can mean $3,000 to $15,000 out of pocket.
How do I find a licensed roofer for this?
First, verify the contractor holds an active roofing license in your state — check your state's contractor licensing board website (e.g., CSLB in California, DBPR in Florida). Second, confirm they carry both general liability insurance ($1 million minimum) and workers' compensation; ask for a certificate of insurance and call the carrier to verify it is current. Third, get a written, itemized quote specifying the number of shingles, product brand and model, nail pattern, underlayment type, and warranty terms — verbal quotes are worthless in a dispute. Fourth, check at least three references from jobs completed in the past 12 months and look at their Google and BBB reviews. Avoid any roofer who shows up unsolicited after a storm (storm chasers), demands full payment upfront, or refuses to pull a permit when one is required.
Three decisions will determine whether this repair protects your home or turns into a bigger problem. First, accurately assess the scope: count the damaged shingles, check the decking underneath, and honestly evaluate whether the damage is within DIY range (fewer than 20 shingles, walkable pitch, solid decking) or requires a professional. Second, match materials precisely — wrong shingle profile, wrong exposure, or wrong nailing pattern will fail within 1 to 3 years and may void your manufacturer warranty. Third, determine whether your roof's age makes repair economically rational; spending $500 to patch a 22-year-old roof that needs replacement in 3 years is money wasted.
Your recommended next step: get on a ladder safely and photograph the damage from the eave line today. Count the affected shingles and check the attic for staining. If you see fewer than 15 damaged shingles, solid decking, and no flashing involvement, pick up a matching bundle of shingles and follow the repair steps above. If the damage is larger, structural, or near flashing, call two to three licensed roofers this week for written estimates. A small repair done correctly now prevents a $5,000 to $15,000 problem later — but only if it is done right the first time.
Ready to Solve This for Good?
Get matched with pre-screened, licensed roofers in your area. Free quotes, no obligation, no spam.
GET FREE QUOTES NOW